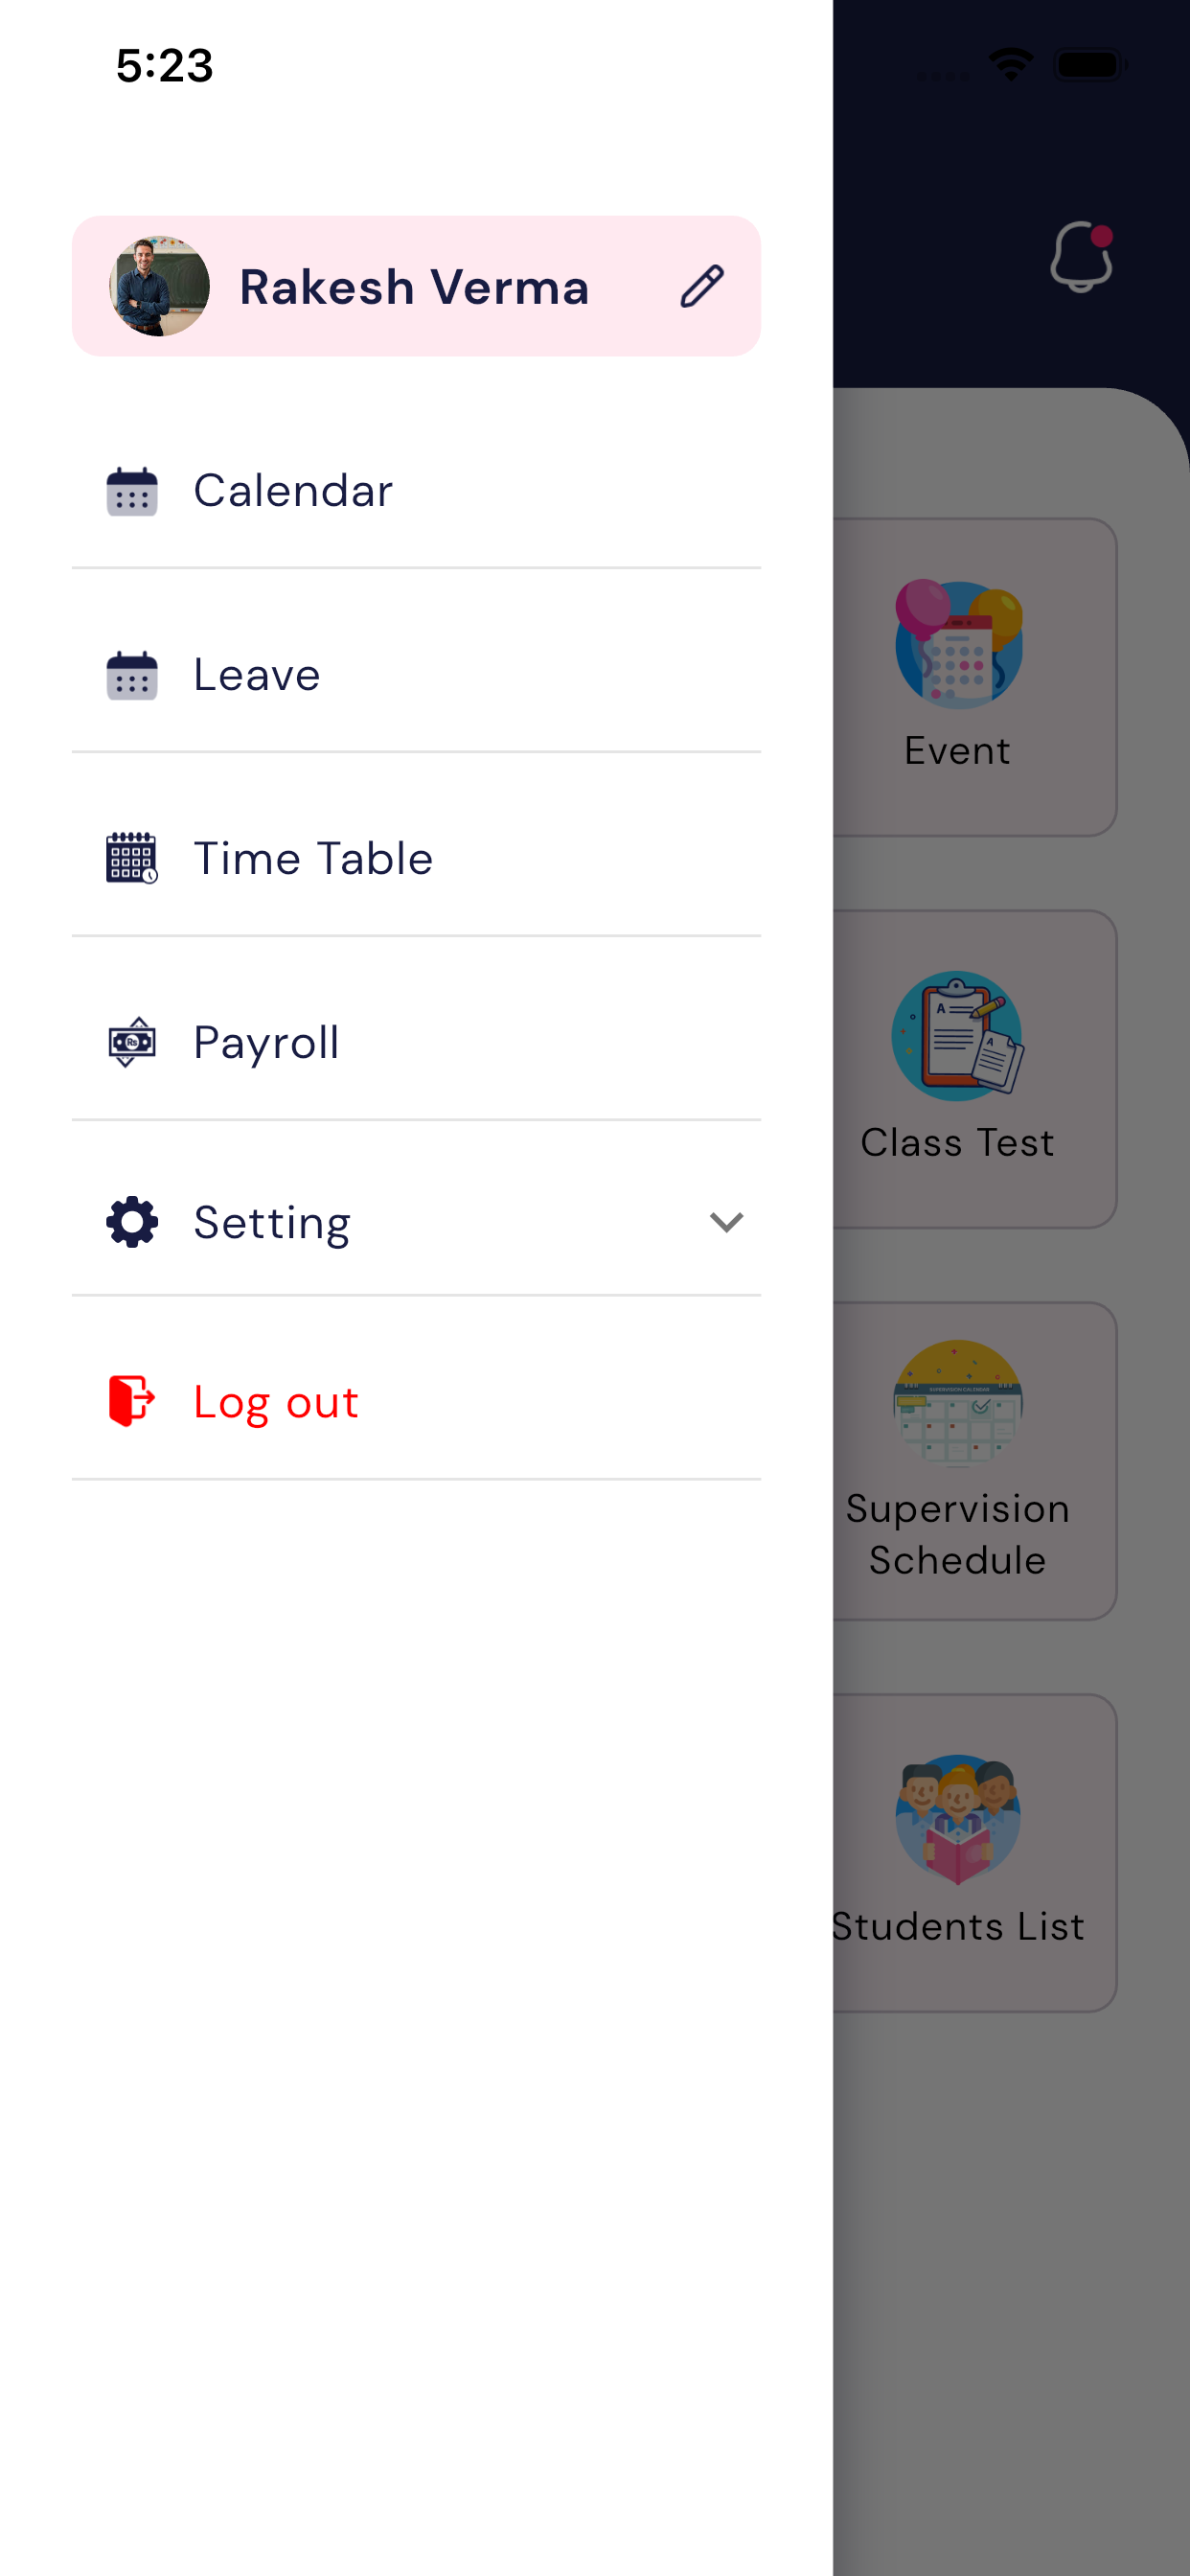
Teacher app user guide details
1. Introduction
Welcome to the Teacher App and Staff App. This application is especially designed for schools to manage teacher and staff activities digitally in a simple and efficient way.
Welcome to our application. This app is designed to help users complete tasks easily using a simple and user-friendly interface. This user guide explains how to use the app step by step.
This guide is written in simple English, especially for Indian users, so that anyone can understand it easily.
2. App Overview
App Name: Teacher App and Staff App
This application is designed for school teachers and staff members. Users can log in using theirregistered mobile number. Based on the login role (Teacher or Staff), the system automatically shows the relevant dashboard.
3. System Requirements
- Android / iOS
- Mobile number
4. Getting Started
4.1 Download and Install the App
Users can download the app from the official app stores:
- Apple App Store: https://apps.apple.com/us/app/teacher-app-myschool/id6758194960
- Google Play Store: https://play.google.com/store/apps/details?id=com.saurabhinfosys.schoolstaff
After installation, open the app to continue with the login process.
4.2 Login Module (Teacher & Staff)
This app supports two user categories:
- Teacher
- Staff
Both users follow the same login process. The dashboard is shown based on the registered role.
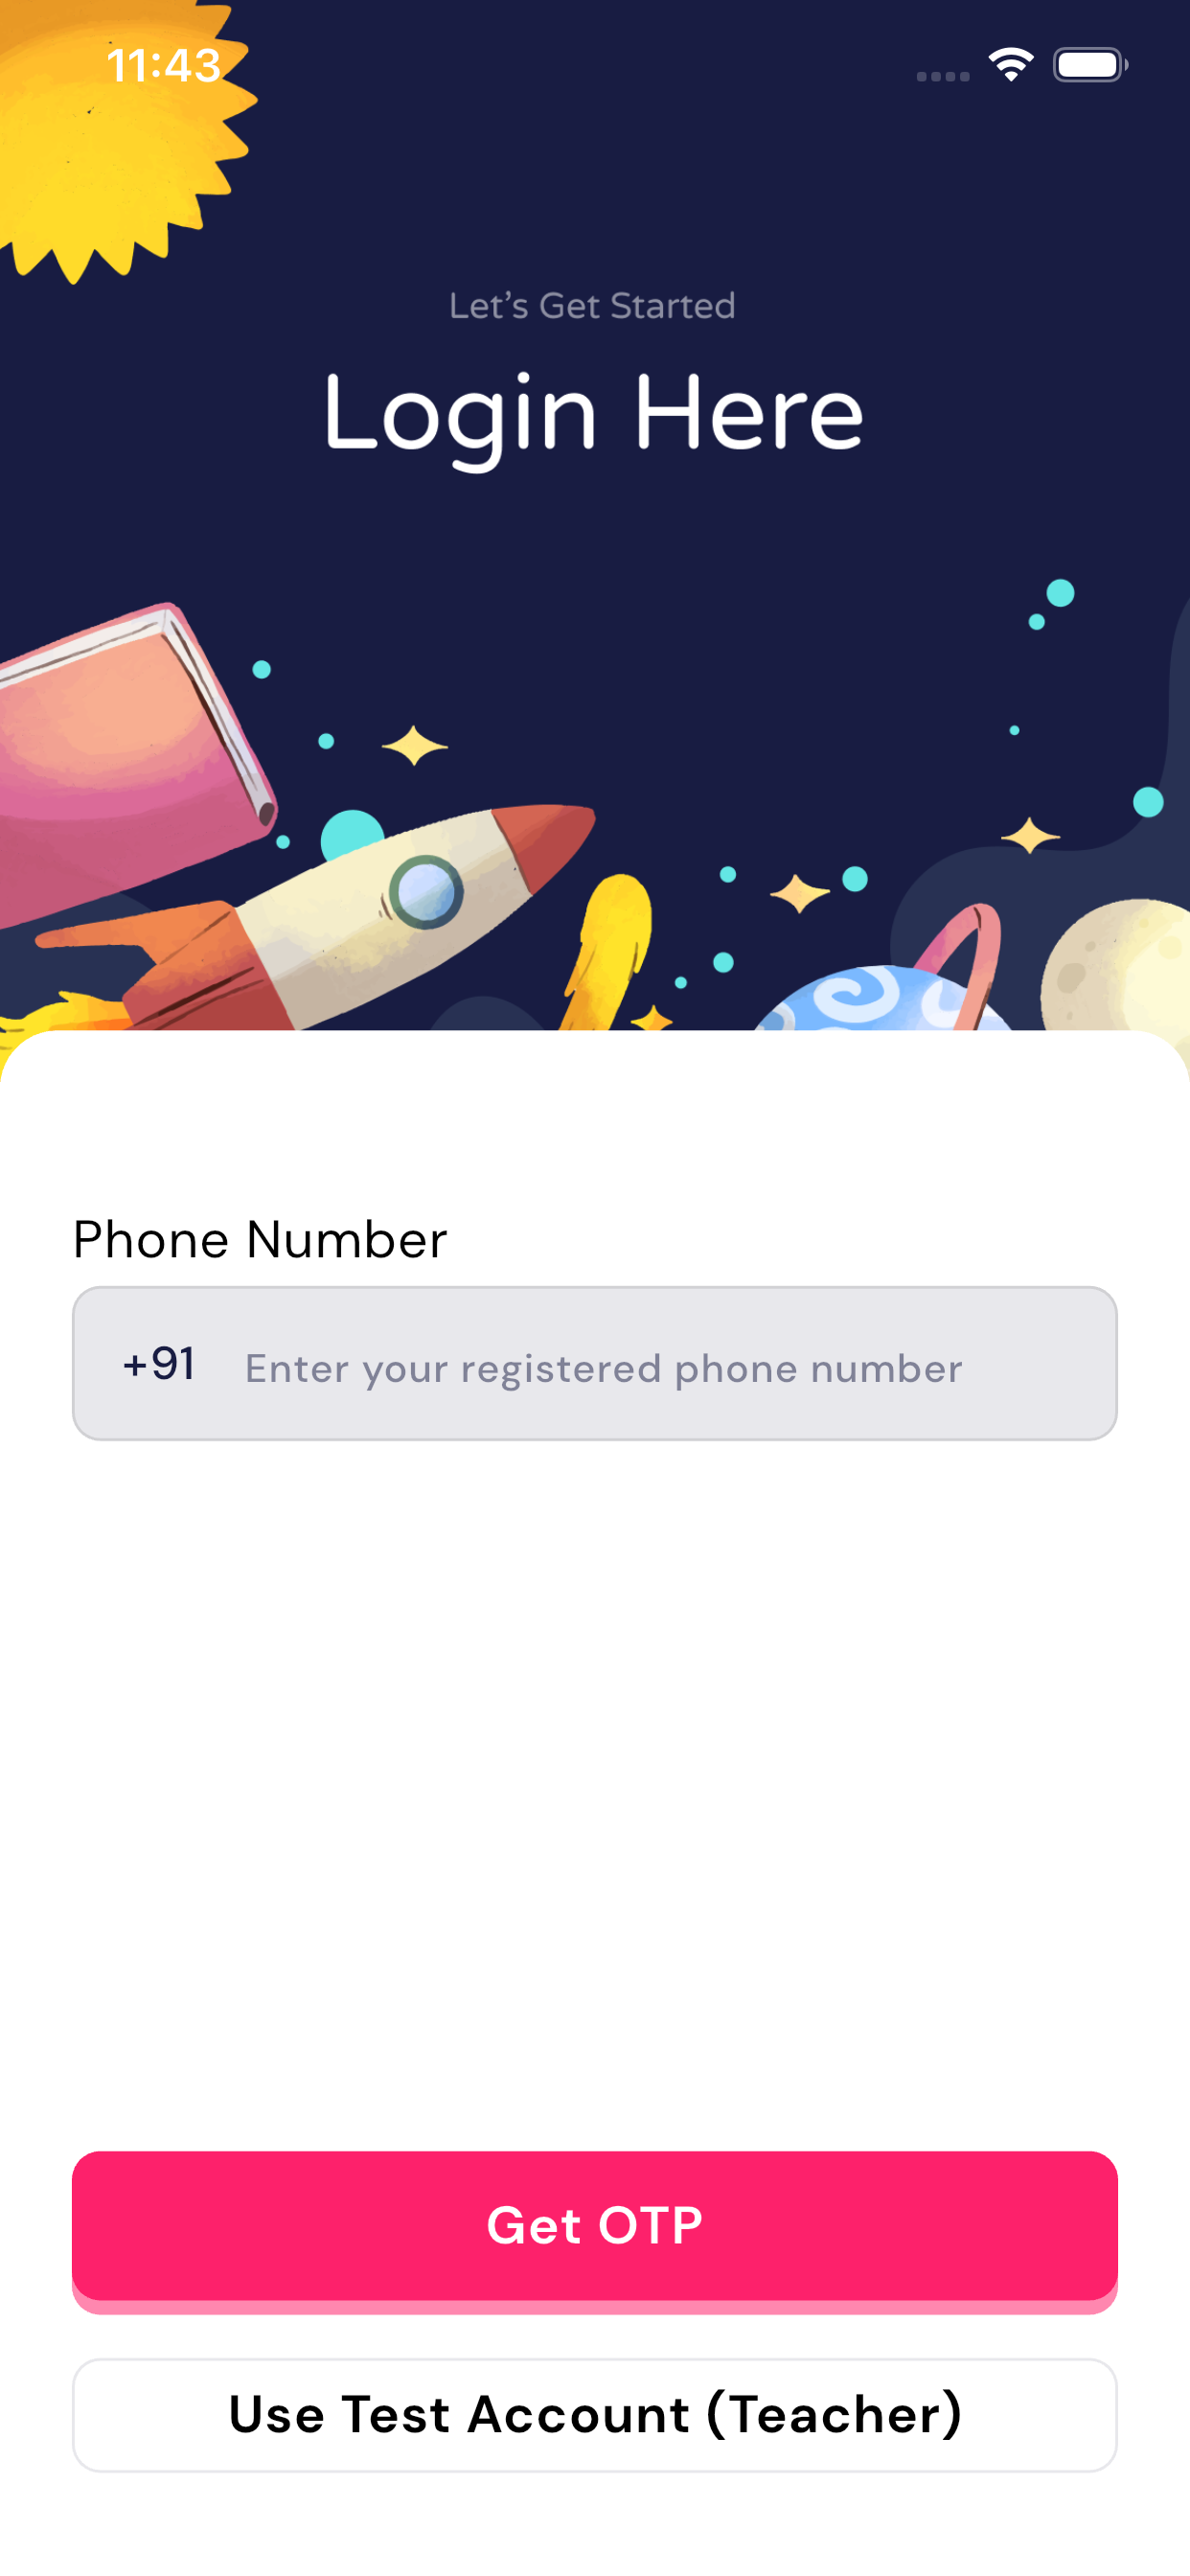
Login Steps:
- Open the app
- Enter your registered mobile number on the login screen
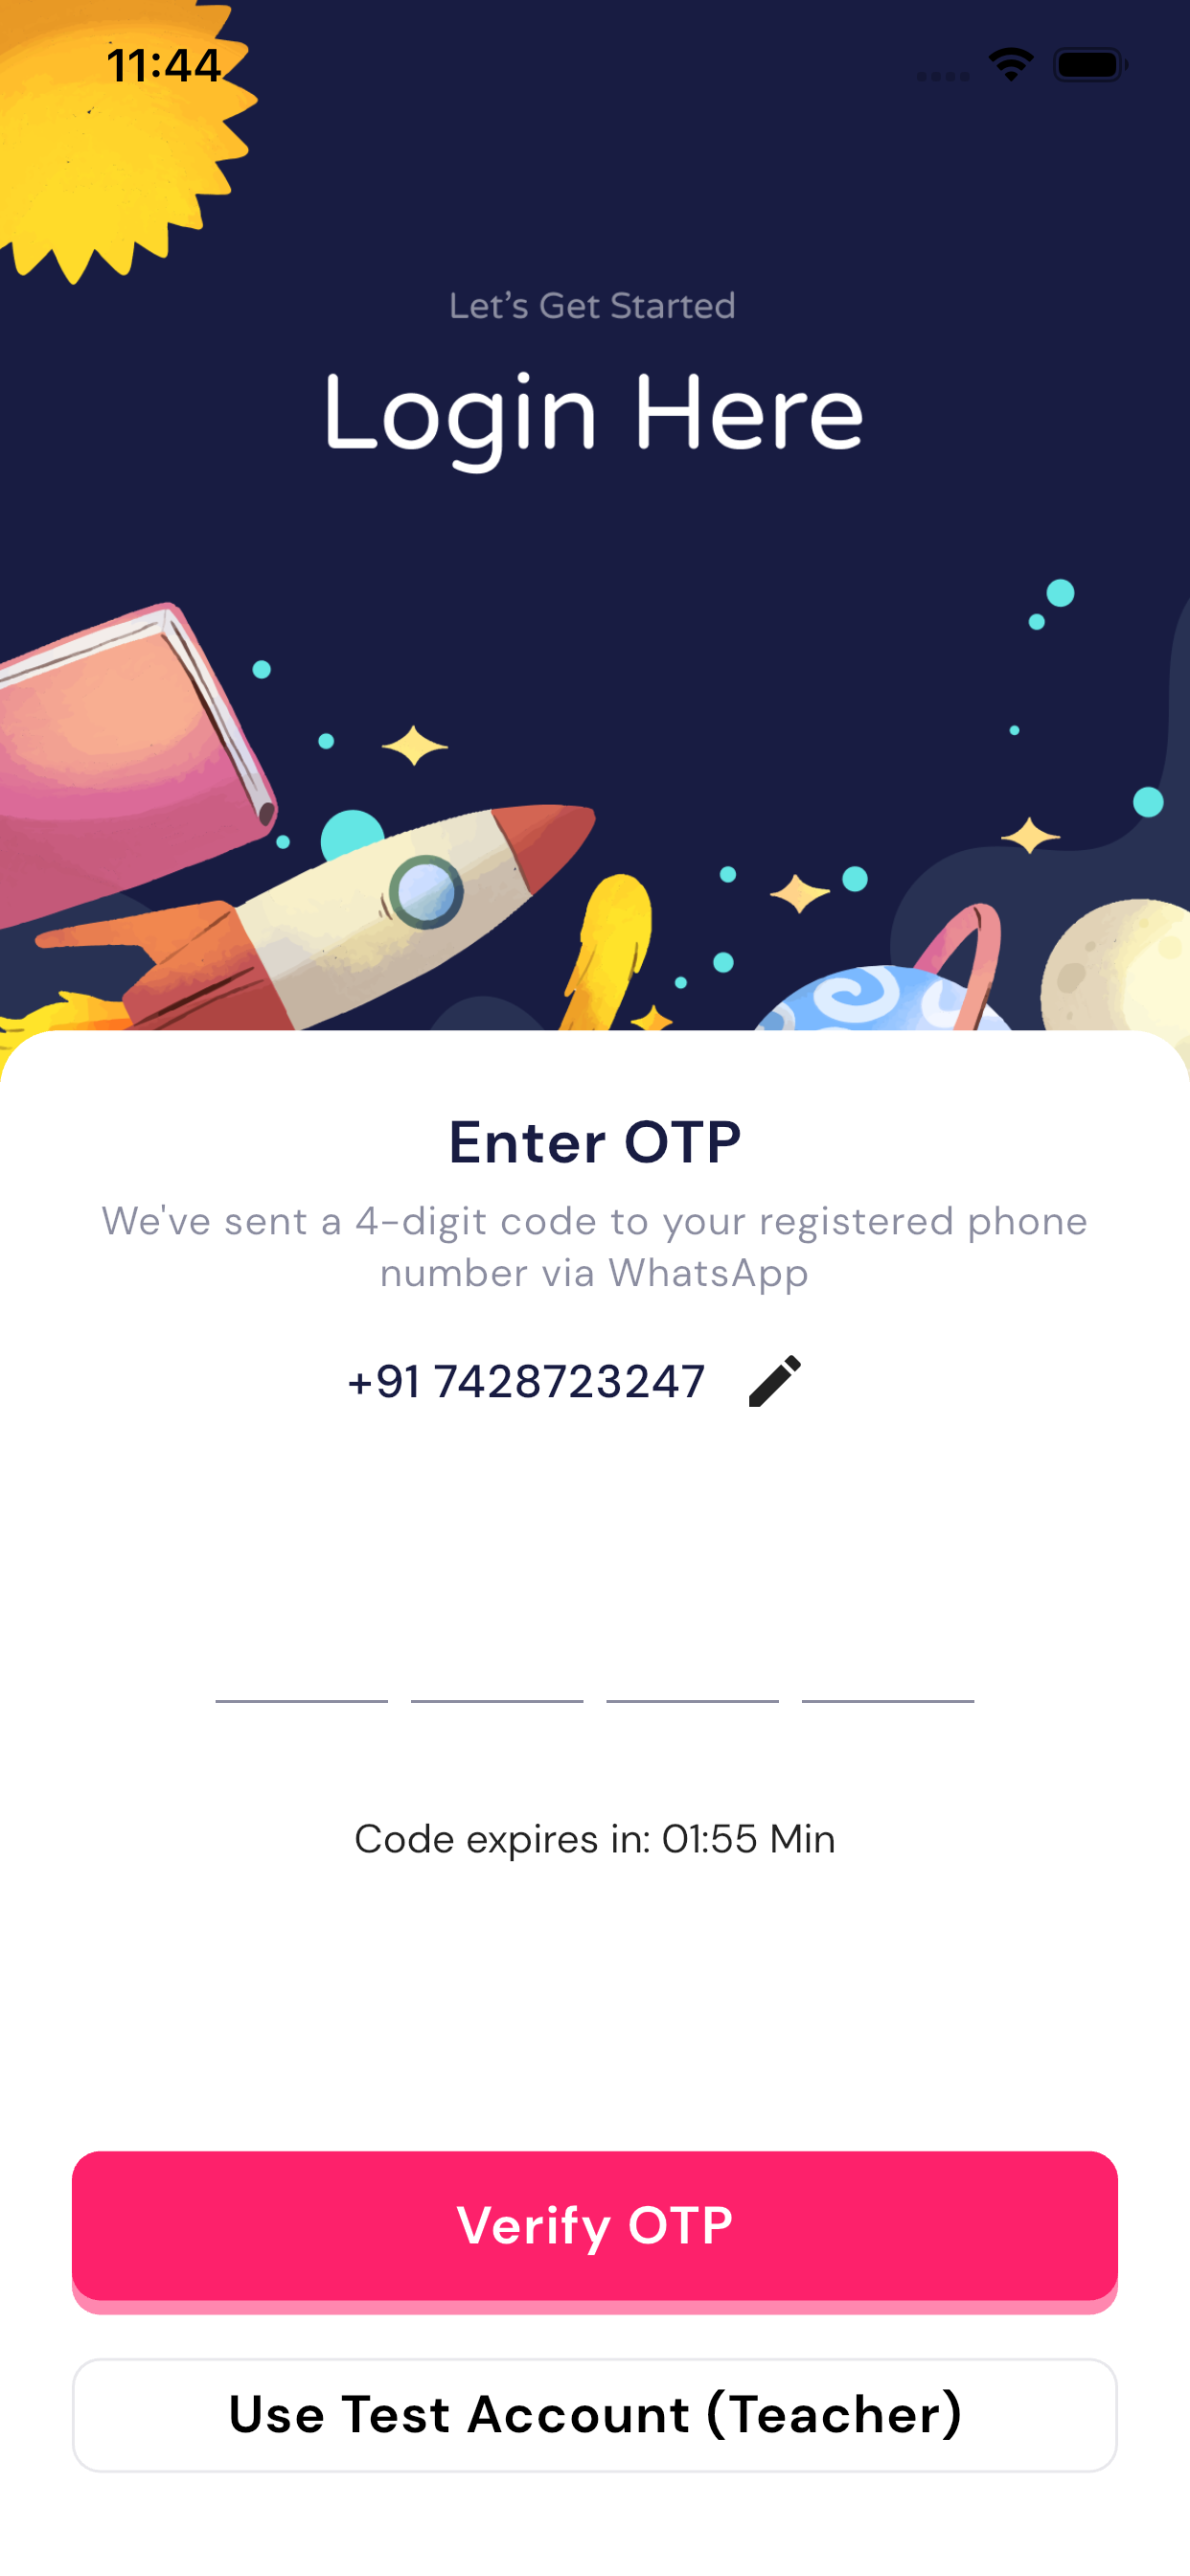
- Click on Get OTP
- An OTP will be sent on WhatsApp to the same mobile number
- Enter the OTP
- Login will be completed successfully
Role-Based Dashboard:
- Teacher login → Teacher Dashboard
- Staff login → Staff Dashboard
Testing Login Details (Demo Purpose):
- Mobile Number: +917428723247
- Default OTP: 1234
5. App Modules (Teacher Dashboard)
Teacher Dashboard Overview
After successful login using aTeacher registered mobile number, theTeacher Dashboard is displayed. This dashboard provides all important academic and administrative features in one place. Teachers can manage daily activities easily from this screen.
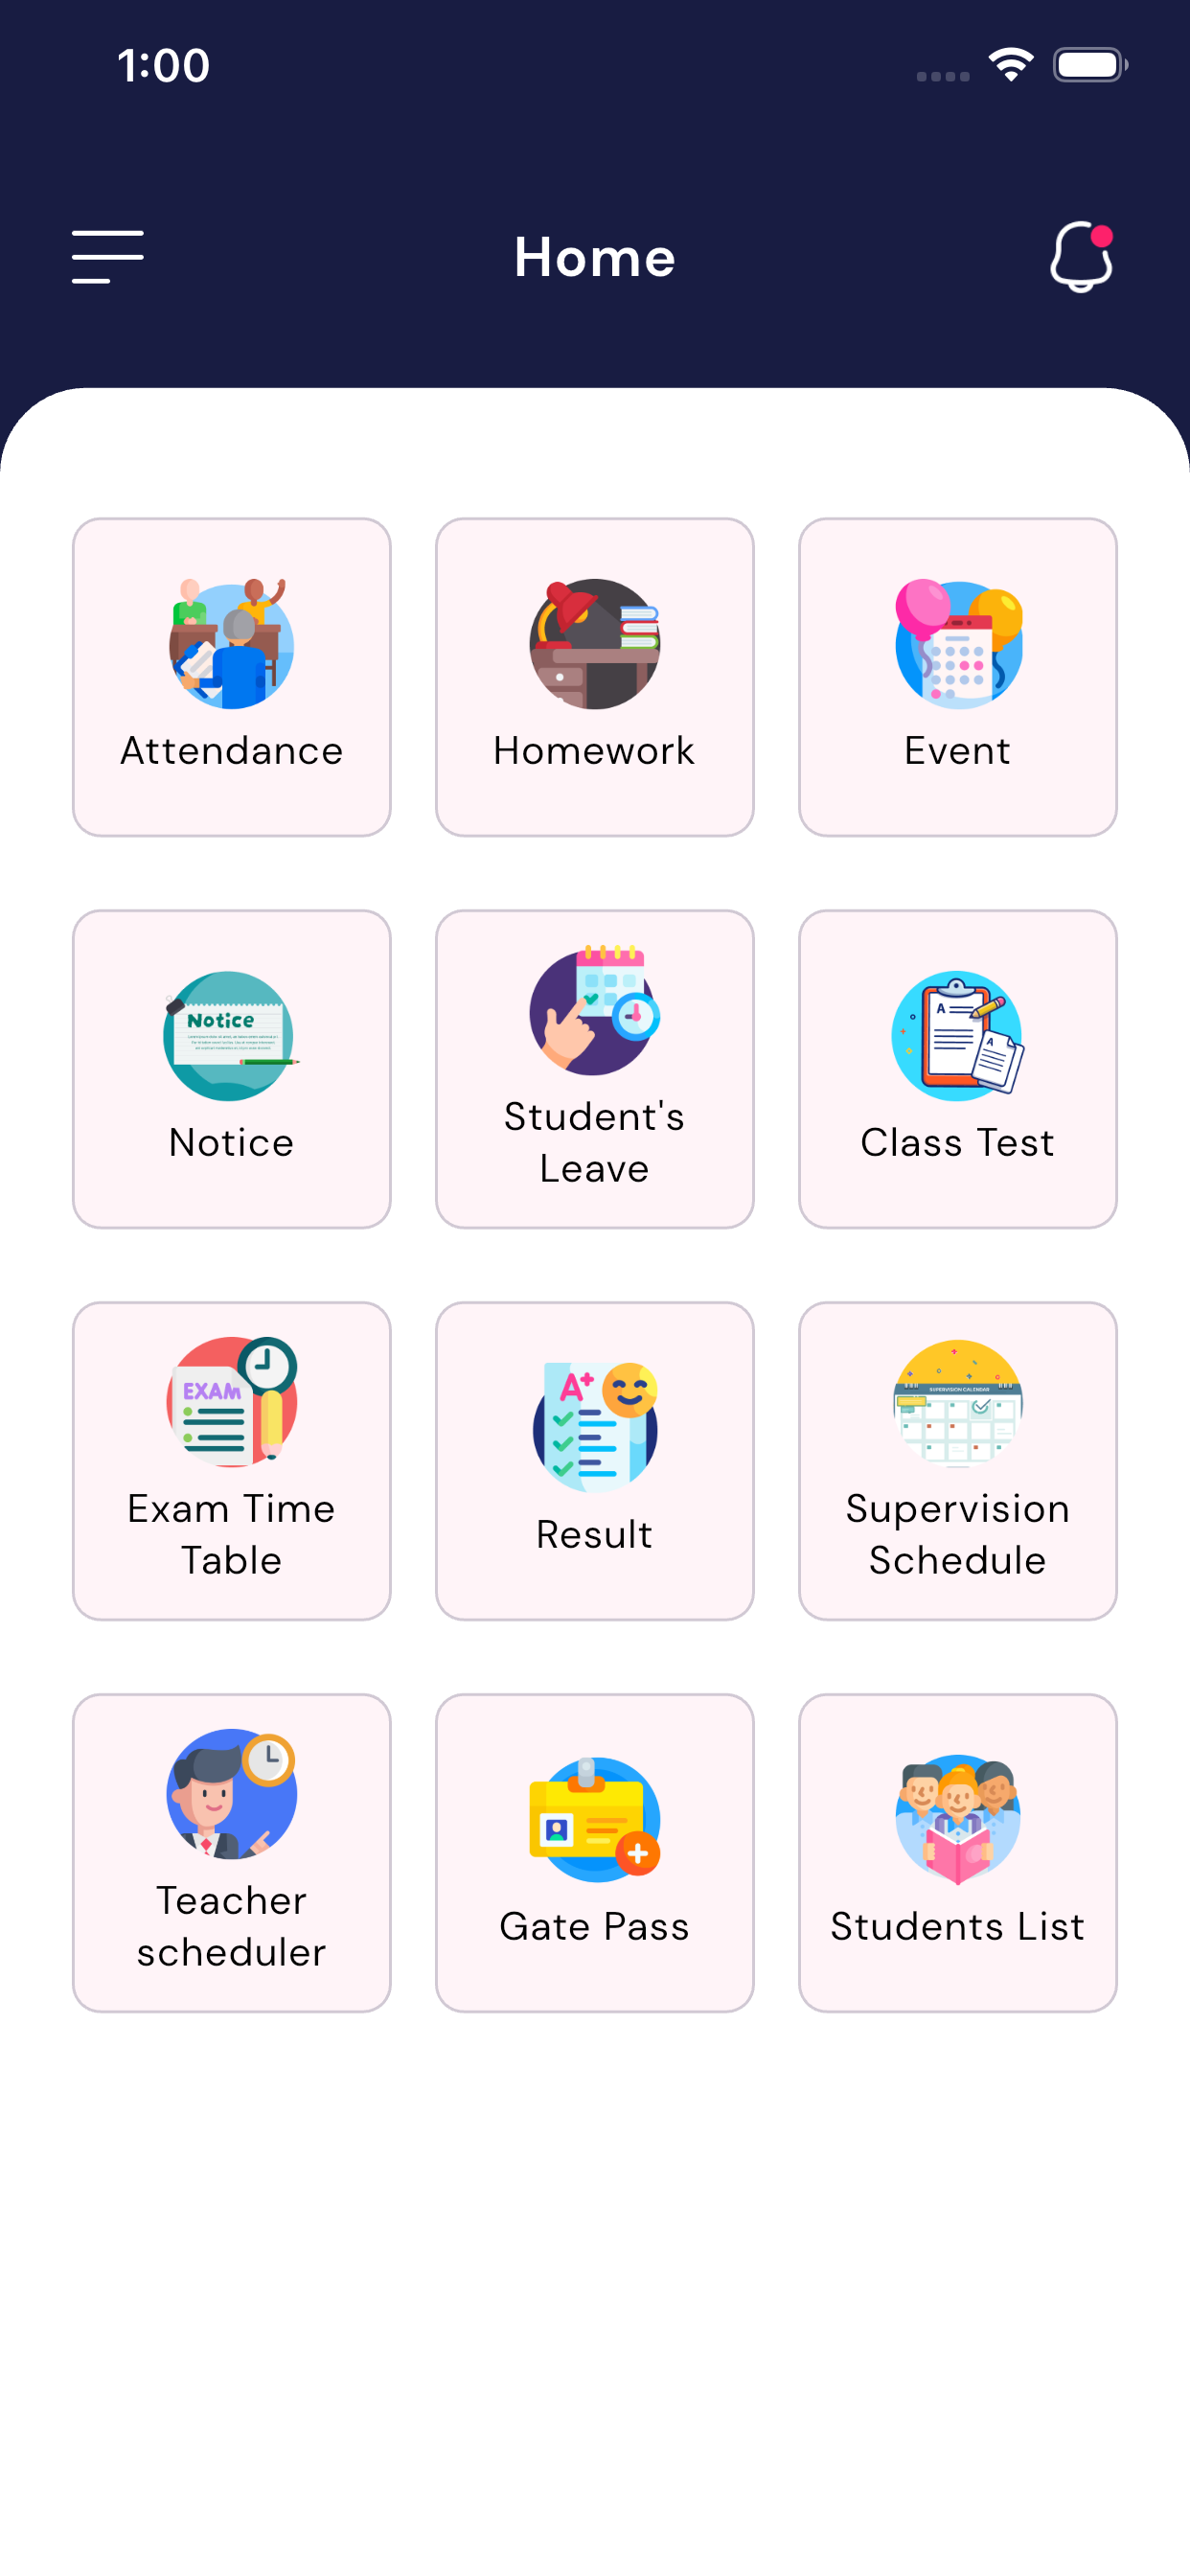
5.1 Attendance
Teachers can mark and manage student attendance.
How it works:
- Select class and section
- Mark student attendance (Present / Absent)
- Save attendance
5.1 Attendance (How to Mark Attendance)
The Attendance module allows teachers to mark and manage daily student attendance in a simple and structured way. Teachers can mark attendance for the current day and also view past attendance records using filters.
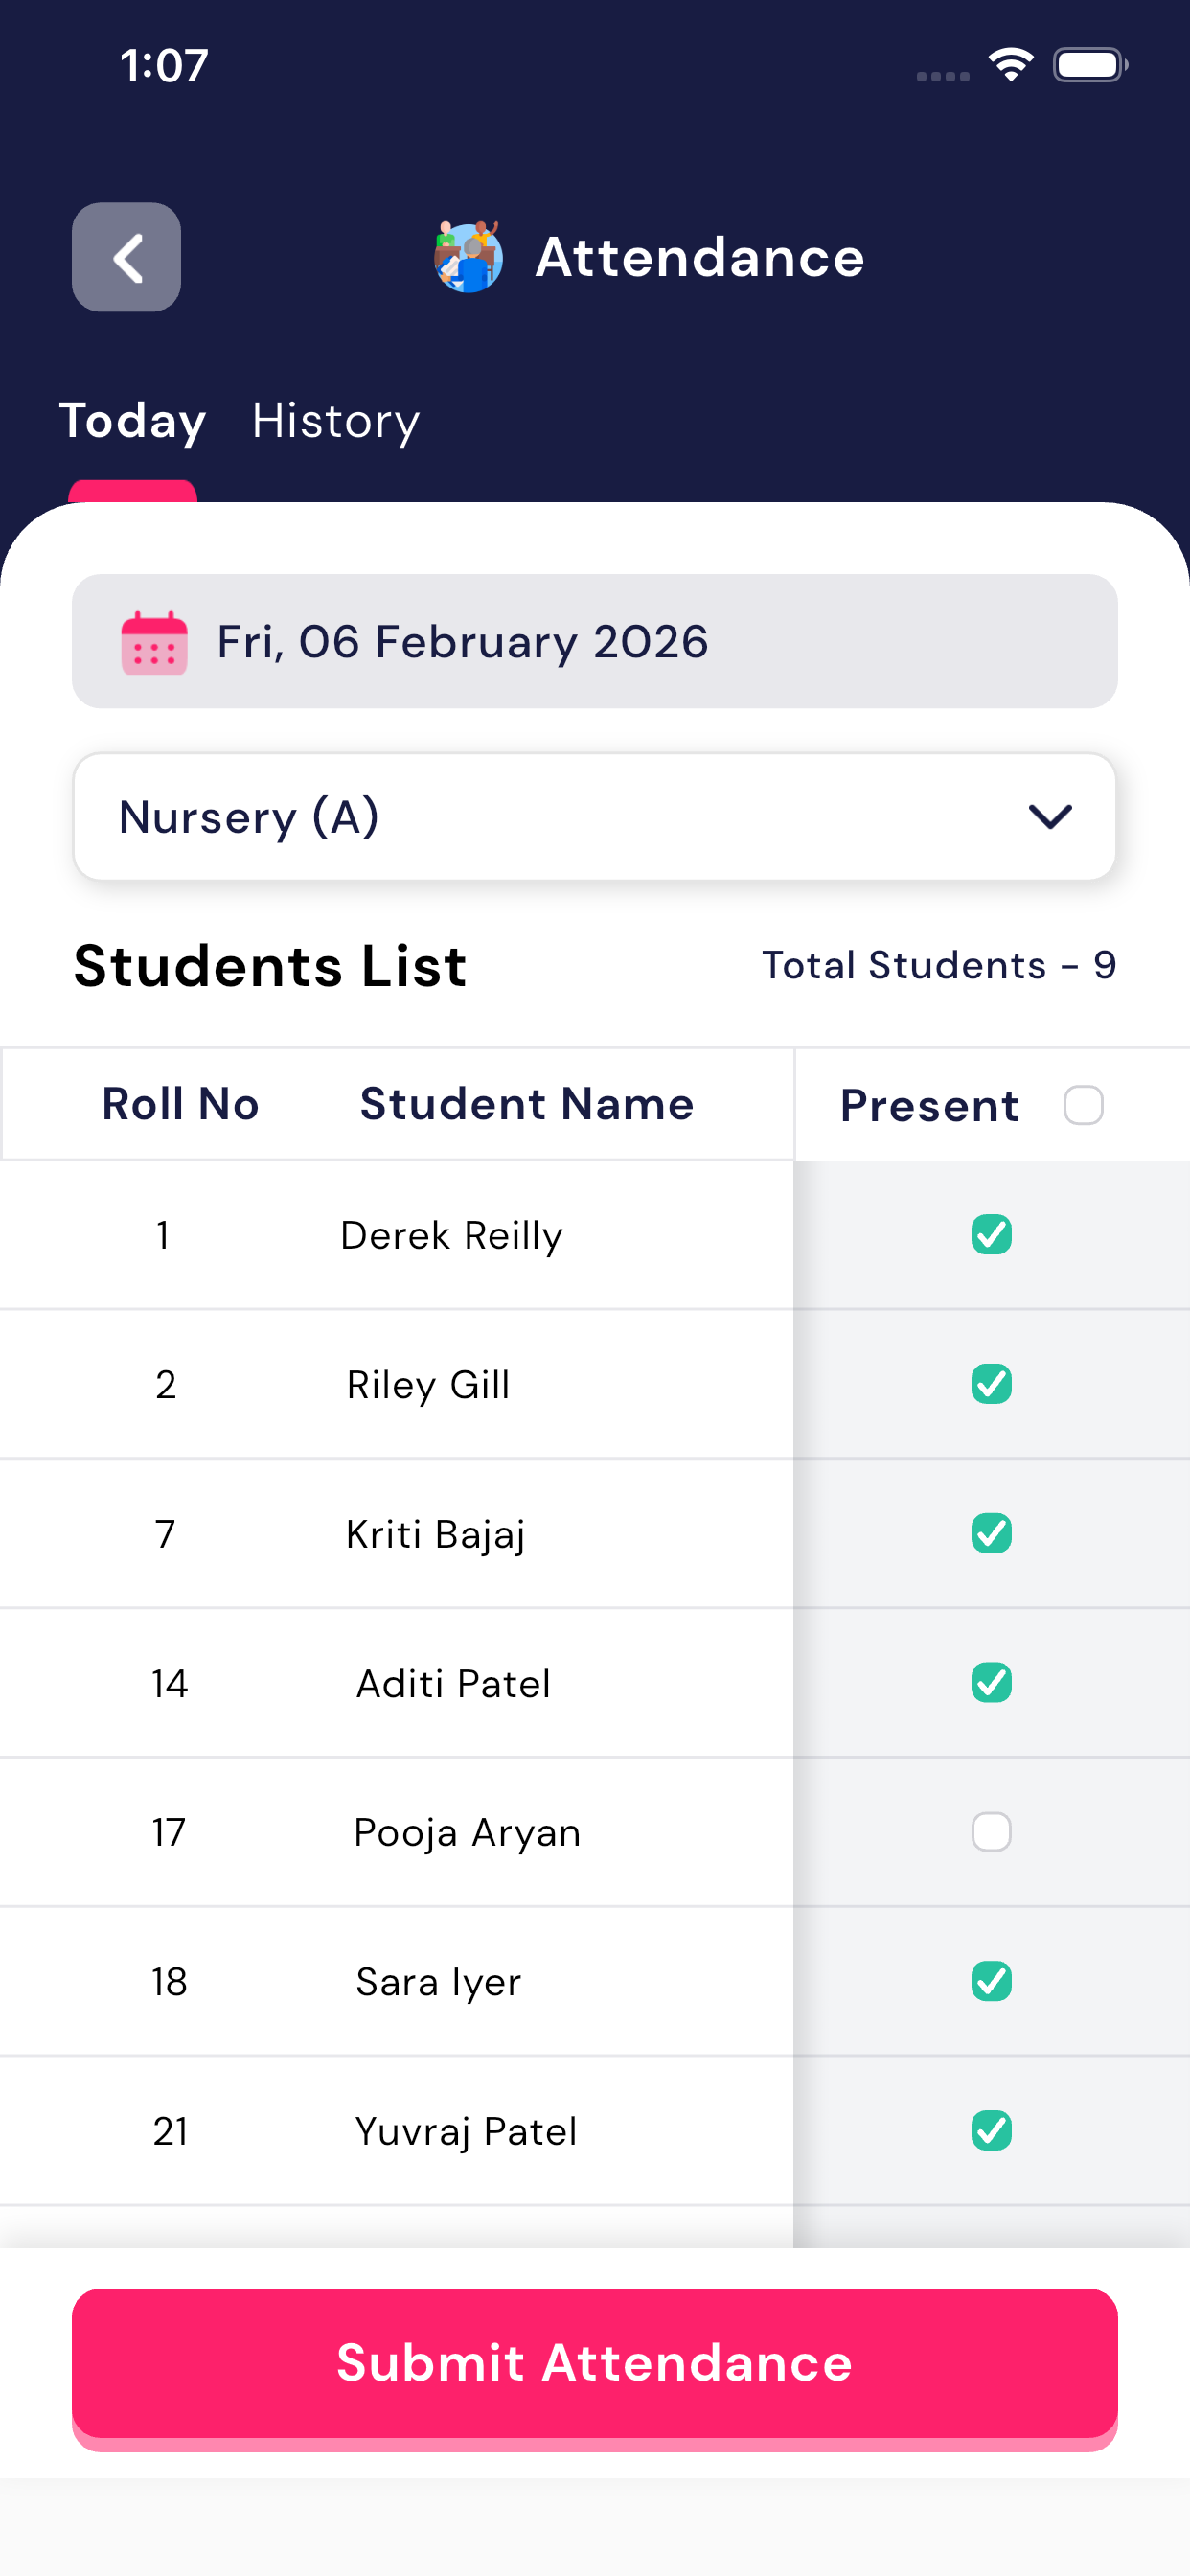
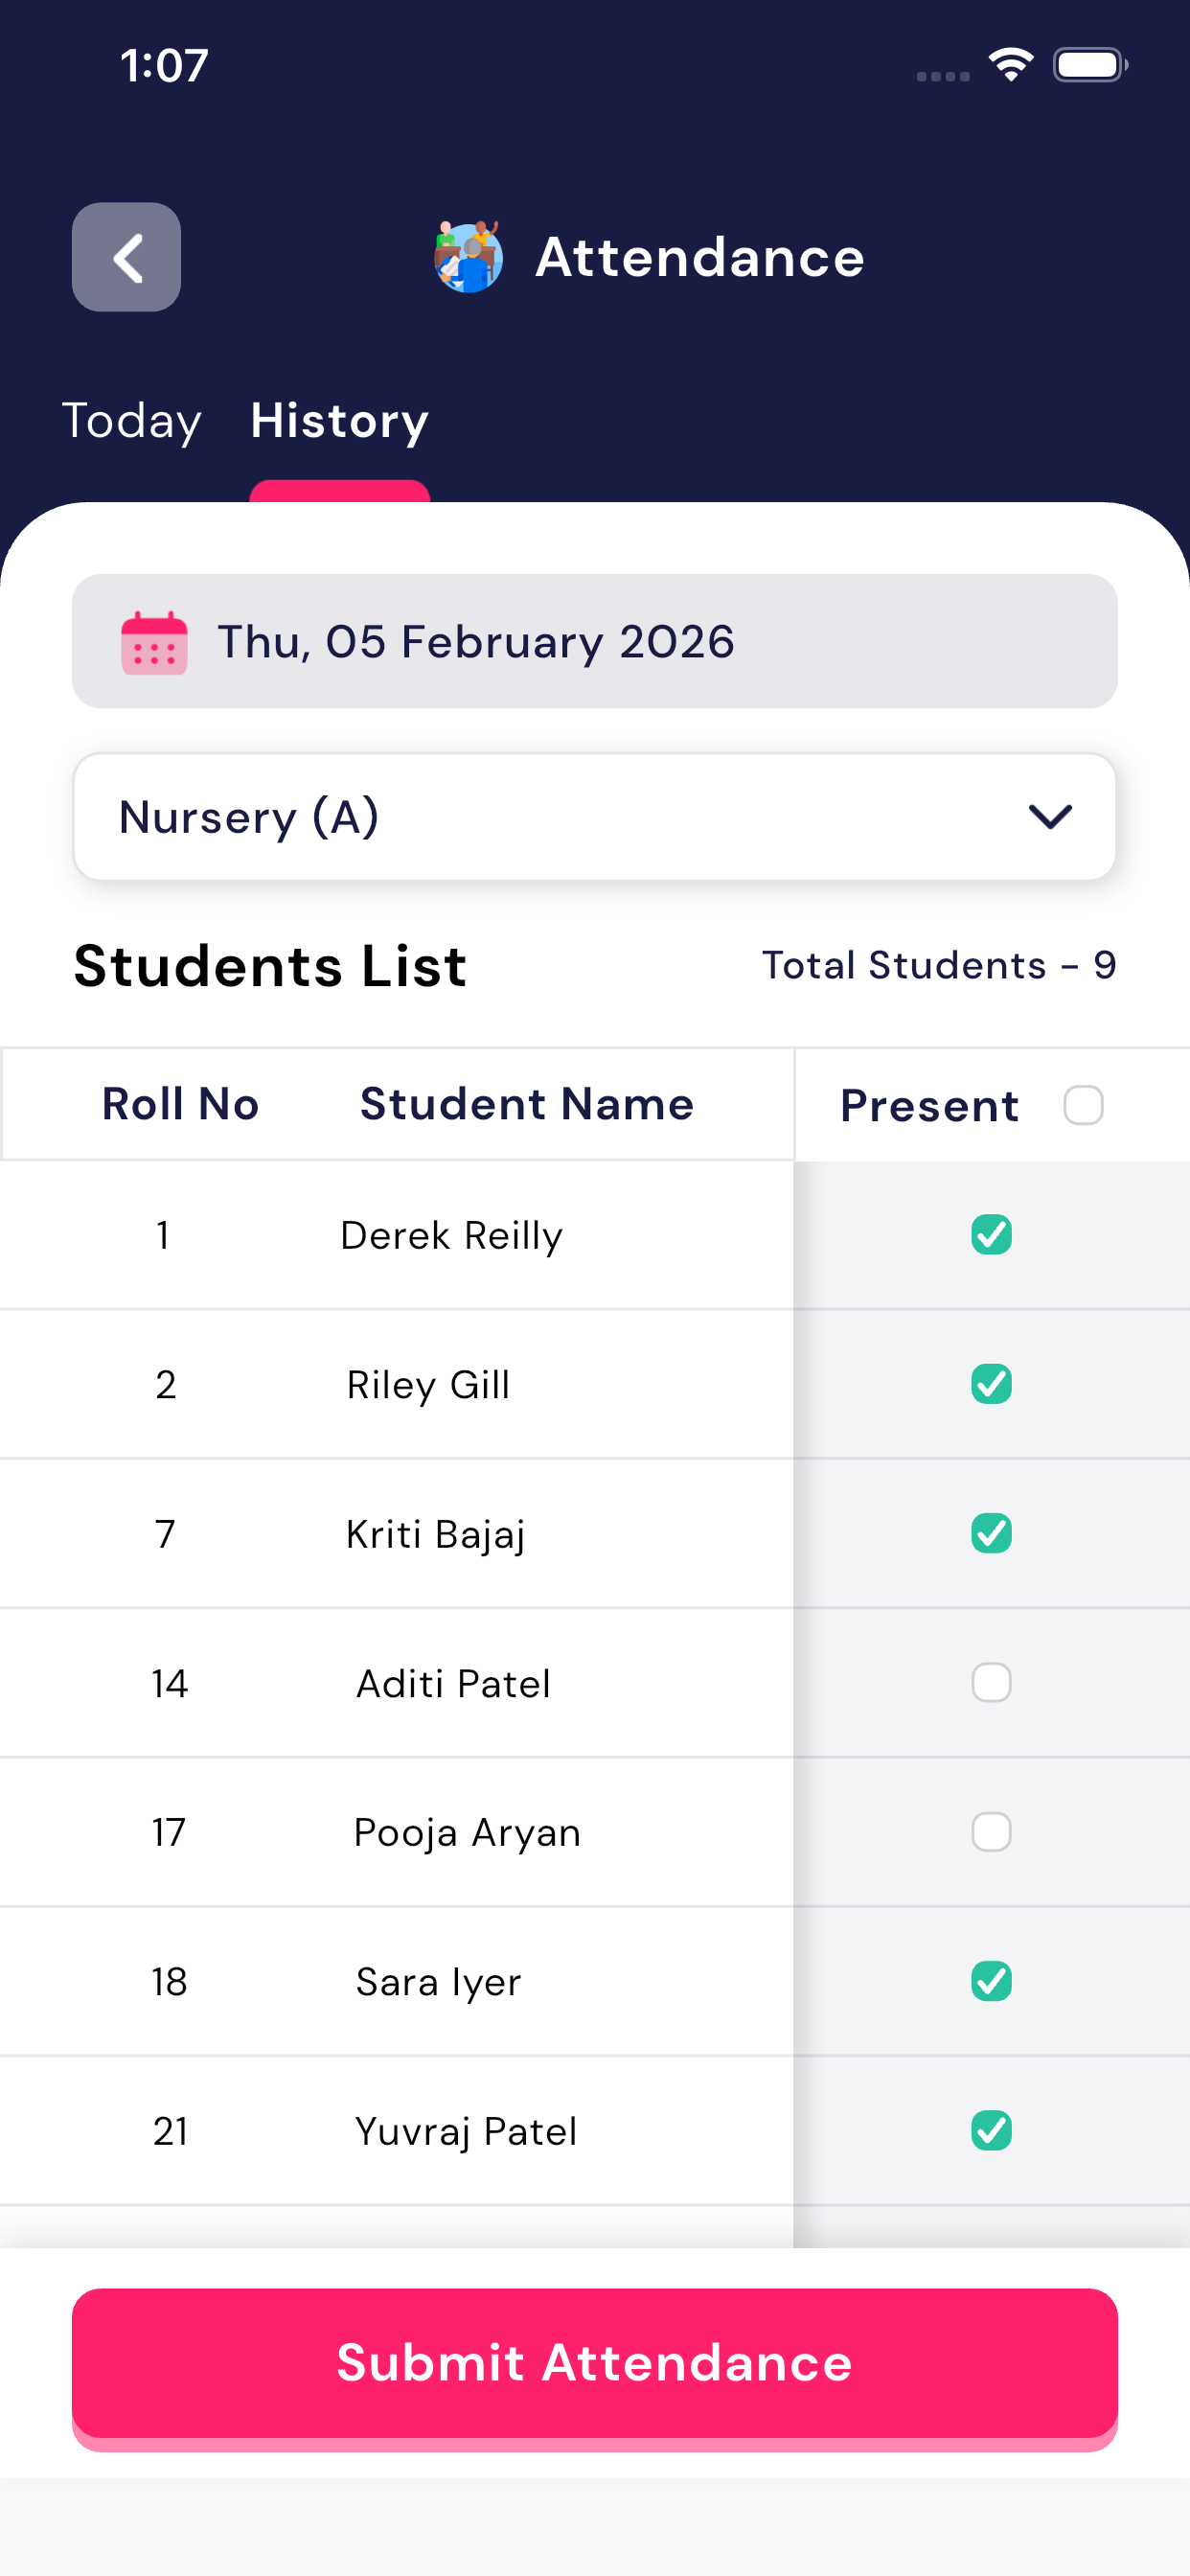
Step-by-Step: Mark Today’s Attendance
- From the Teacher Dashboard, tap onAttendance
- By default, the Today tab is selected
- Select the Date (current date is auto-selected)
- Select Class & Section (Example: Nursery – A)
- The Students List will be displayed with roll number and student name
- Tick the checkbox under Present for students who are present
- Leave unchecked, students will be considered absent.
- After marking attendance, tap onSubmit Attendance
Attendance will be saved successfully for the selected class and date.
Using Filters (Class & Date)
Teachers can easily filter attendance records:
- Date Filter: Select a specific date using the calendar option
- Class Filter: Choose class and section from the dropdown
These filters help teachers mark attendance correctly and avoid mistakes.
Attendance History (View Past Records)
- Open the Attendance module
- Tap on the History tab
- Select the required Date
- Select Class & Section
- View previously submitted attendance records
(Image: Attendance History Screen)

5.2 Homework
The Homework module allows teachers to easily create, manage, and review homework for students in a class-wise and subject-wise manner. This section explains the complete homework flow step by step, so teachers can use it confidently without confusion.
Purpose of Homework Module
This module helps teachers:
- Assign homework to students class-wise and subject-wise
- Set homework for different dates (today, past, or upcoming)
- Track which students have completed or not completed homework
- Add remarks for students whose homework is pending
Homework Tabs Overview
At the top of the Homework screen, there arethree tabs:
- Today
- Shows homework assigned for the current date
- If no homework is added for today, the message“No homework available for today” is displayed
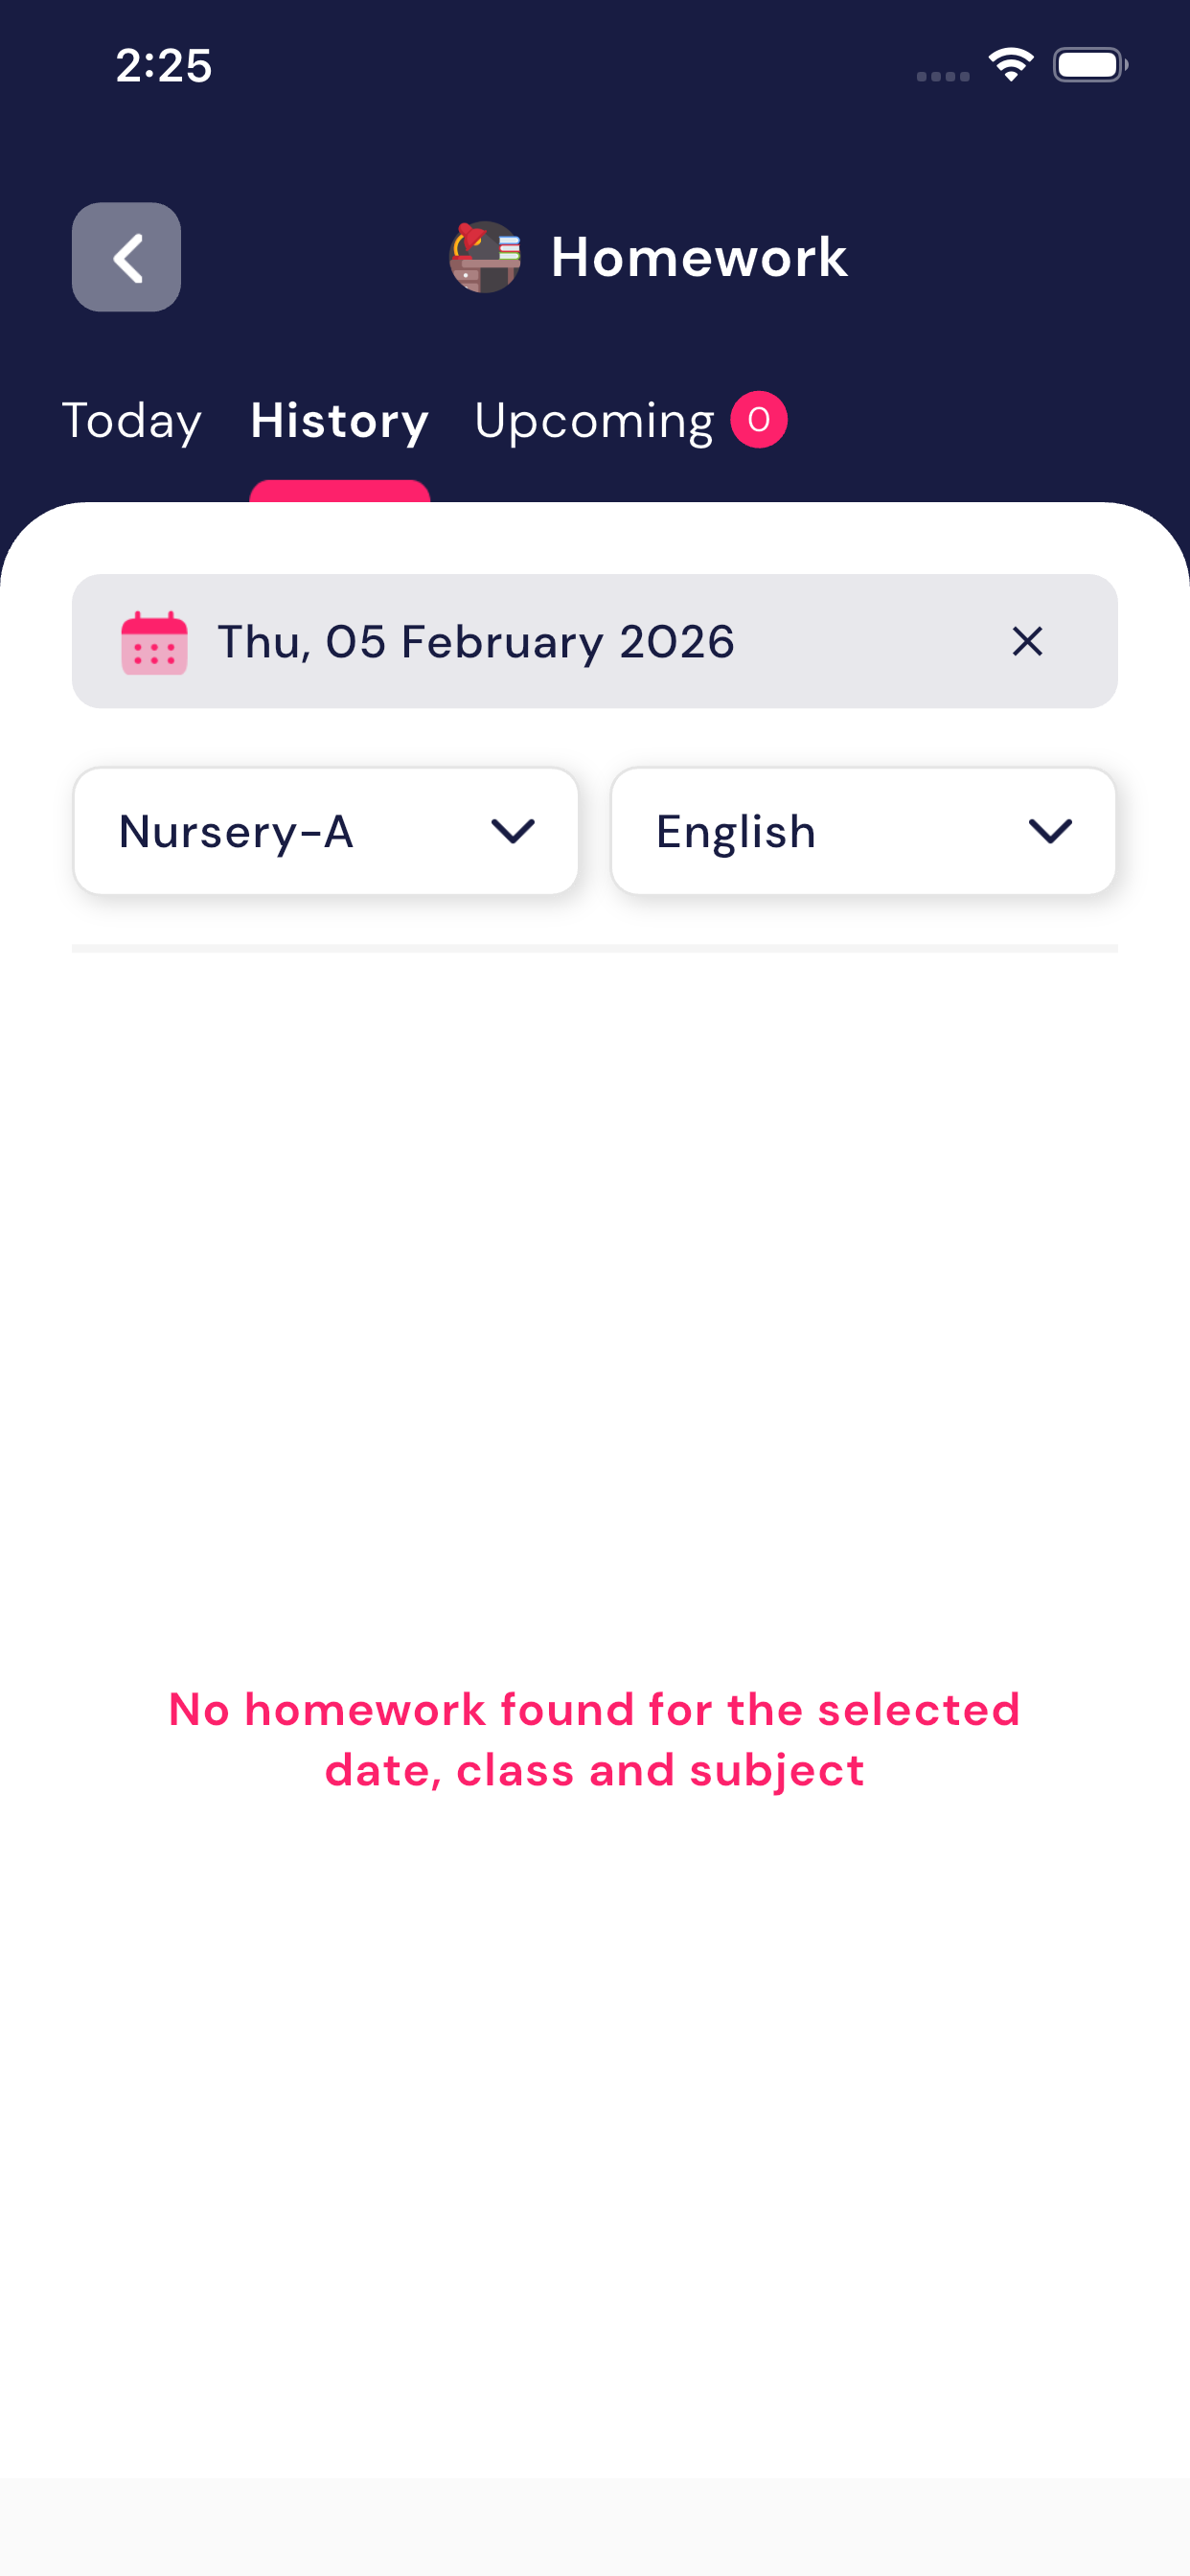
- History
- Shows homework assigned on previous dates
- Teachers can review old homework details anytime
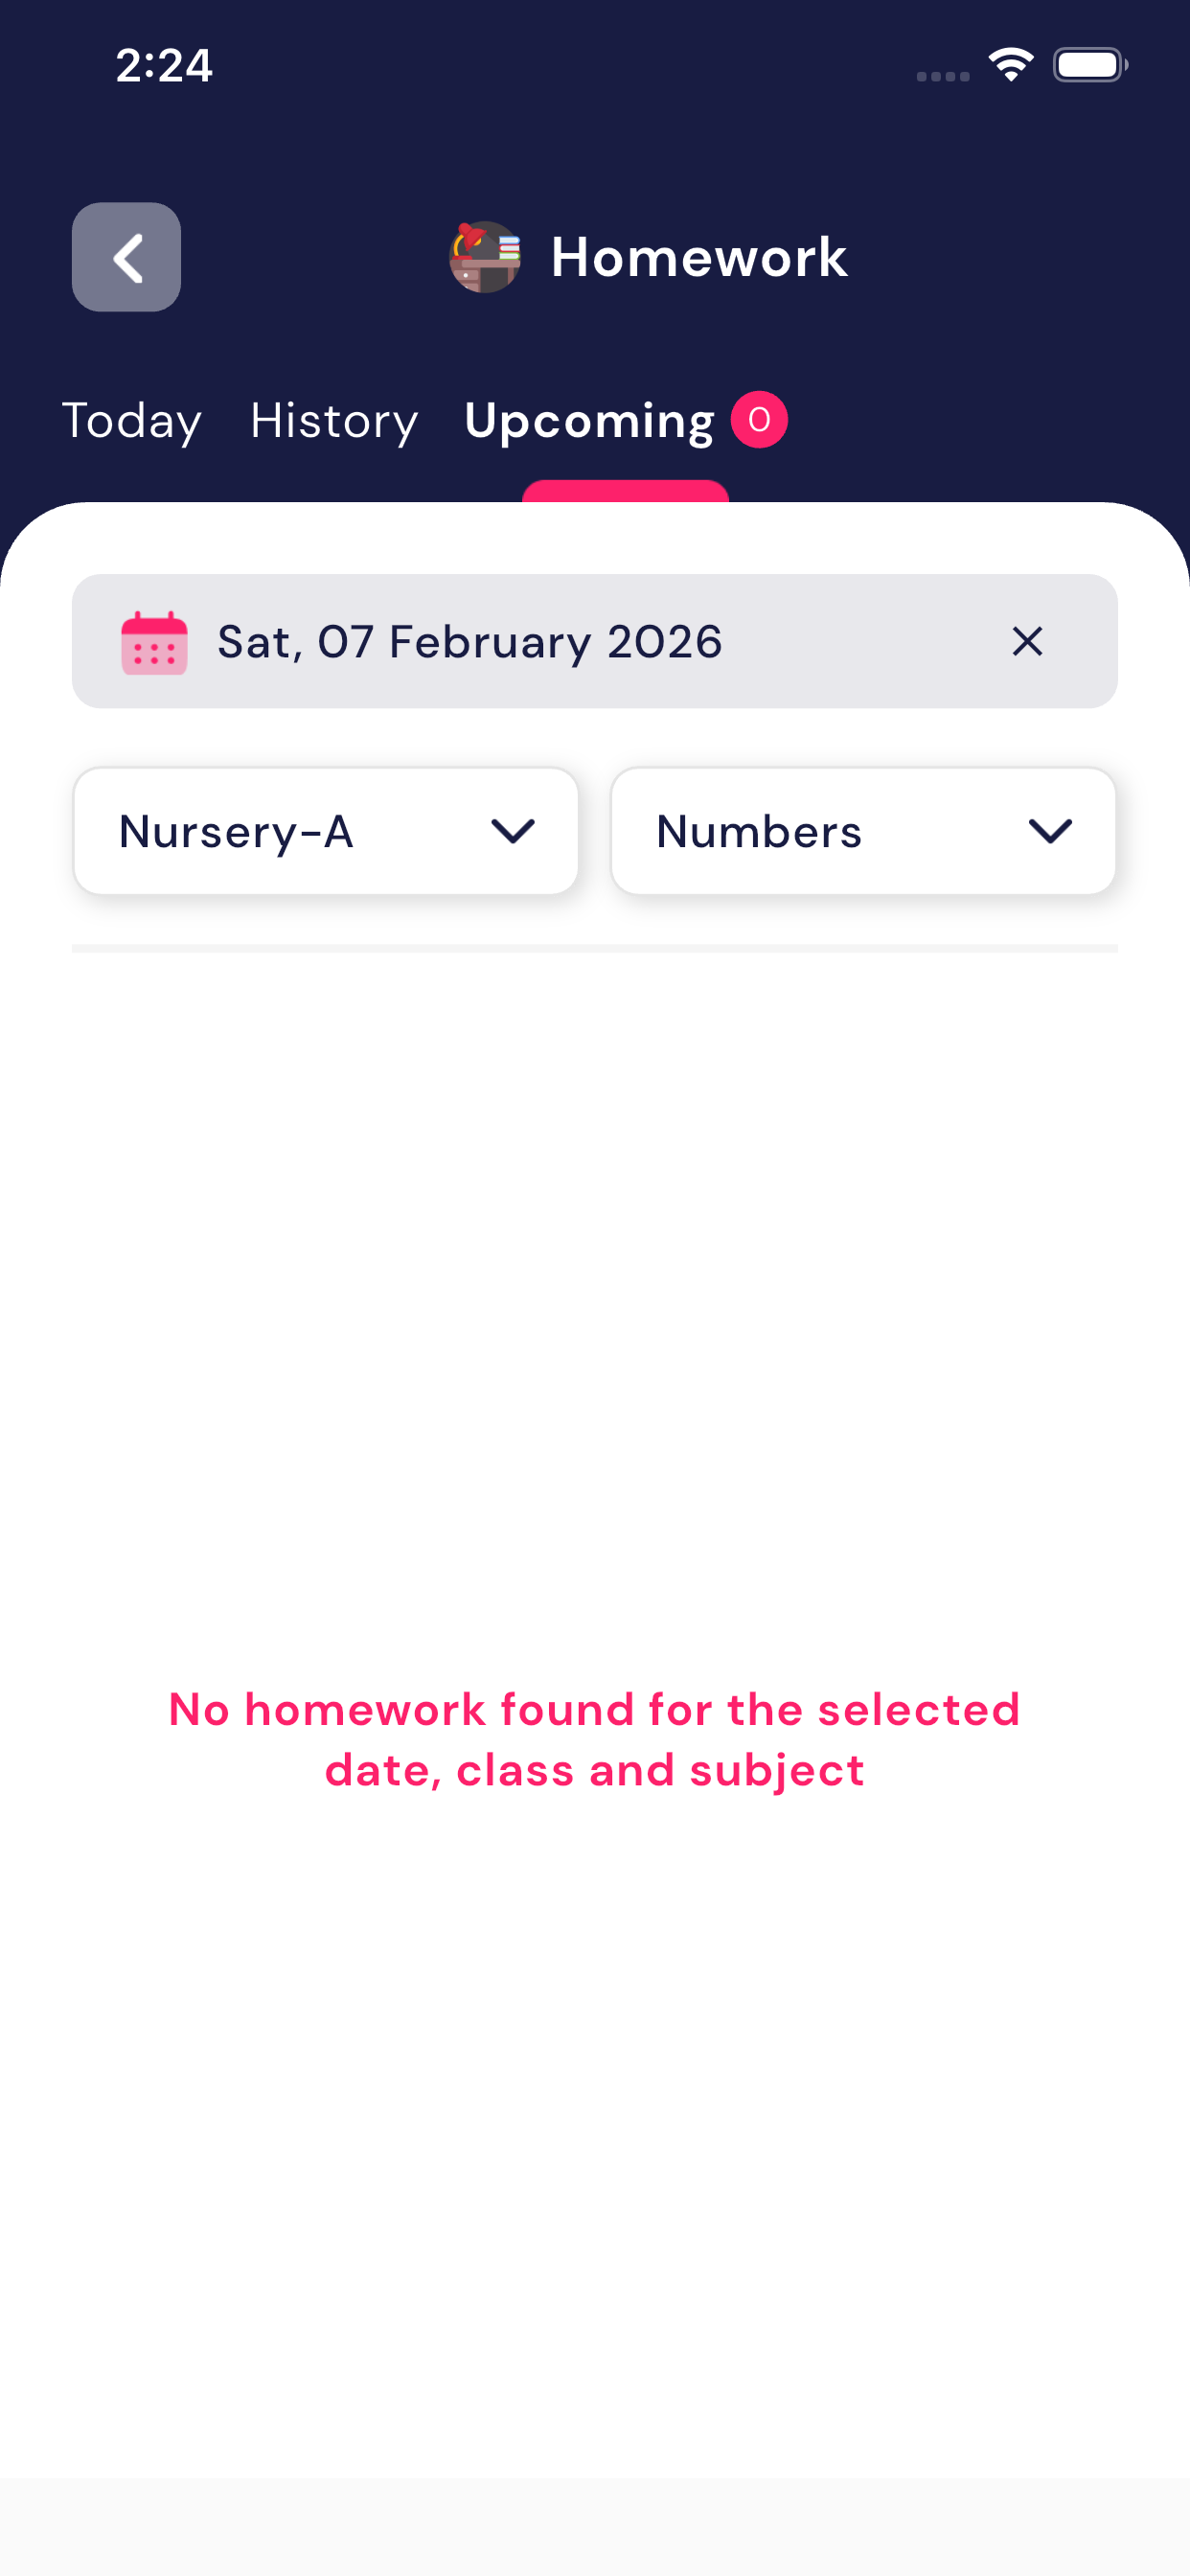
- Upcoming
- Shows homework scheduled for future dates
- Useful for planning and advanced homework assignments
Filters Available
Teachers can filter homework using the following options:
- Class – Select the required class (e.g., Nursery A)
- Subject – Select the subject (e.g., English, Maths)
- Date – Select a specific date
Based on the selected filters, the homework list is updated automatically.
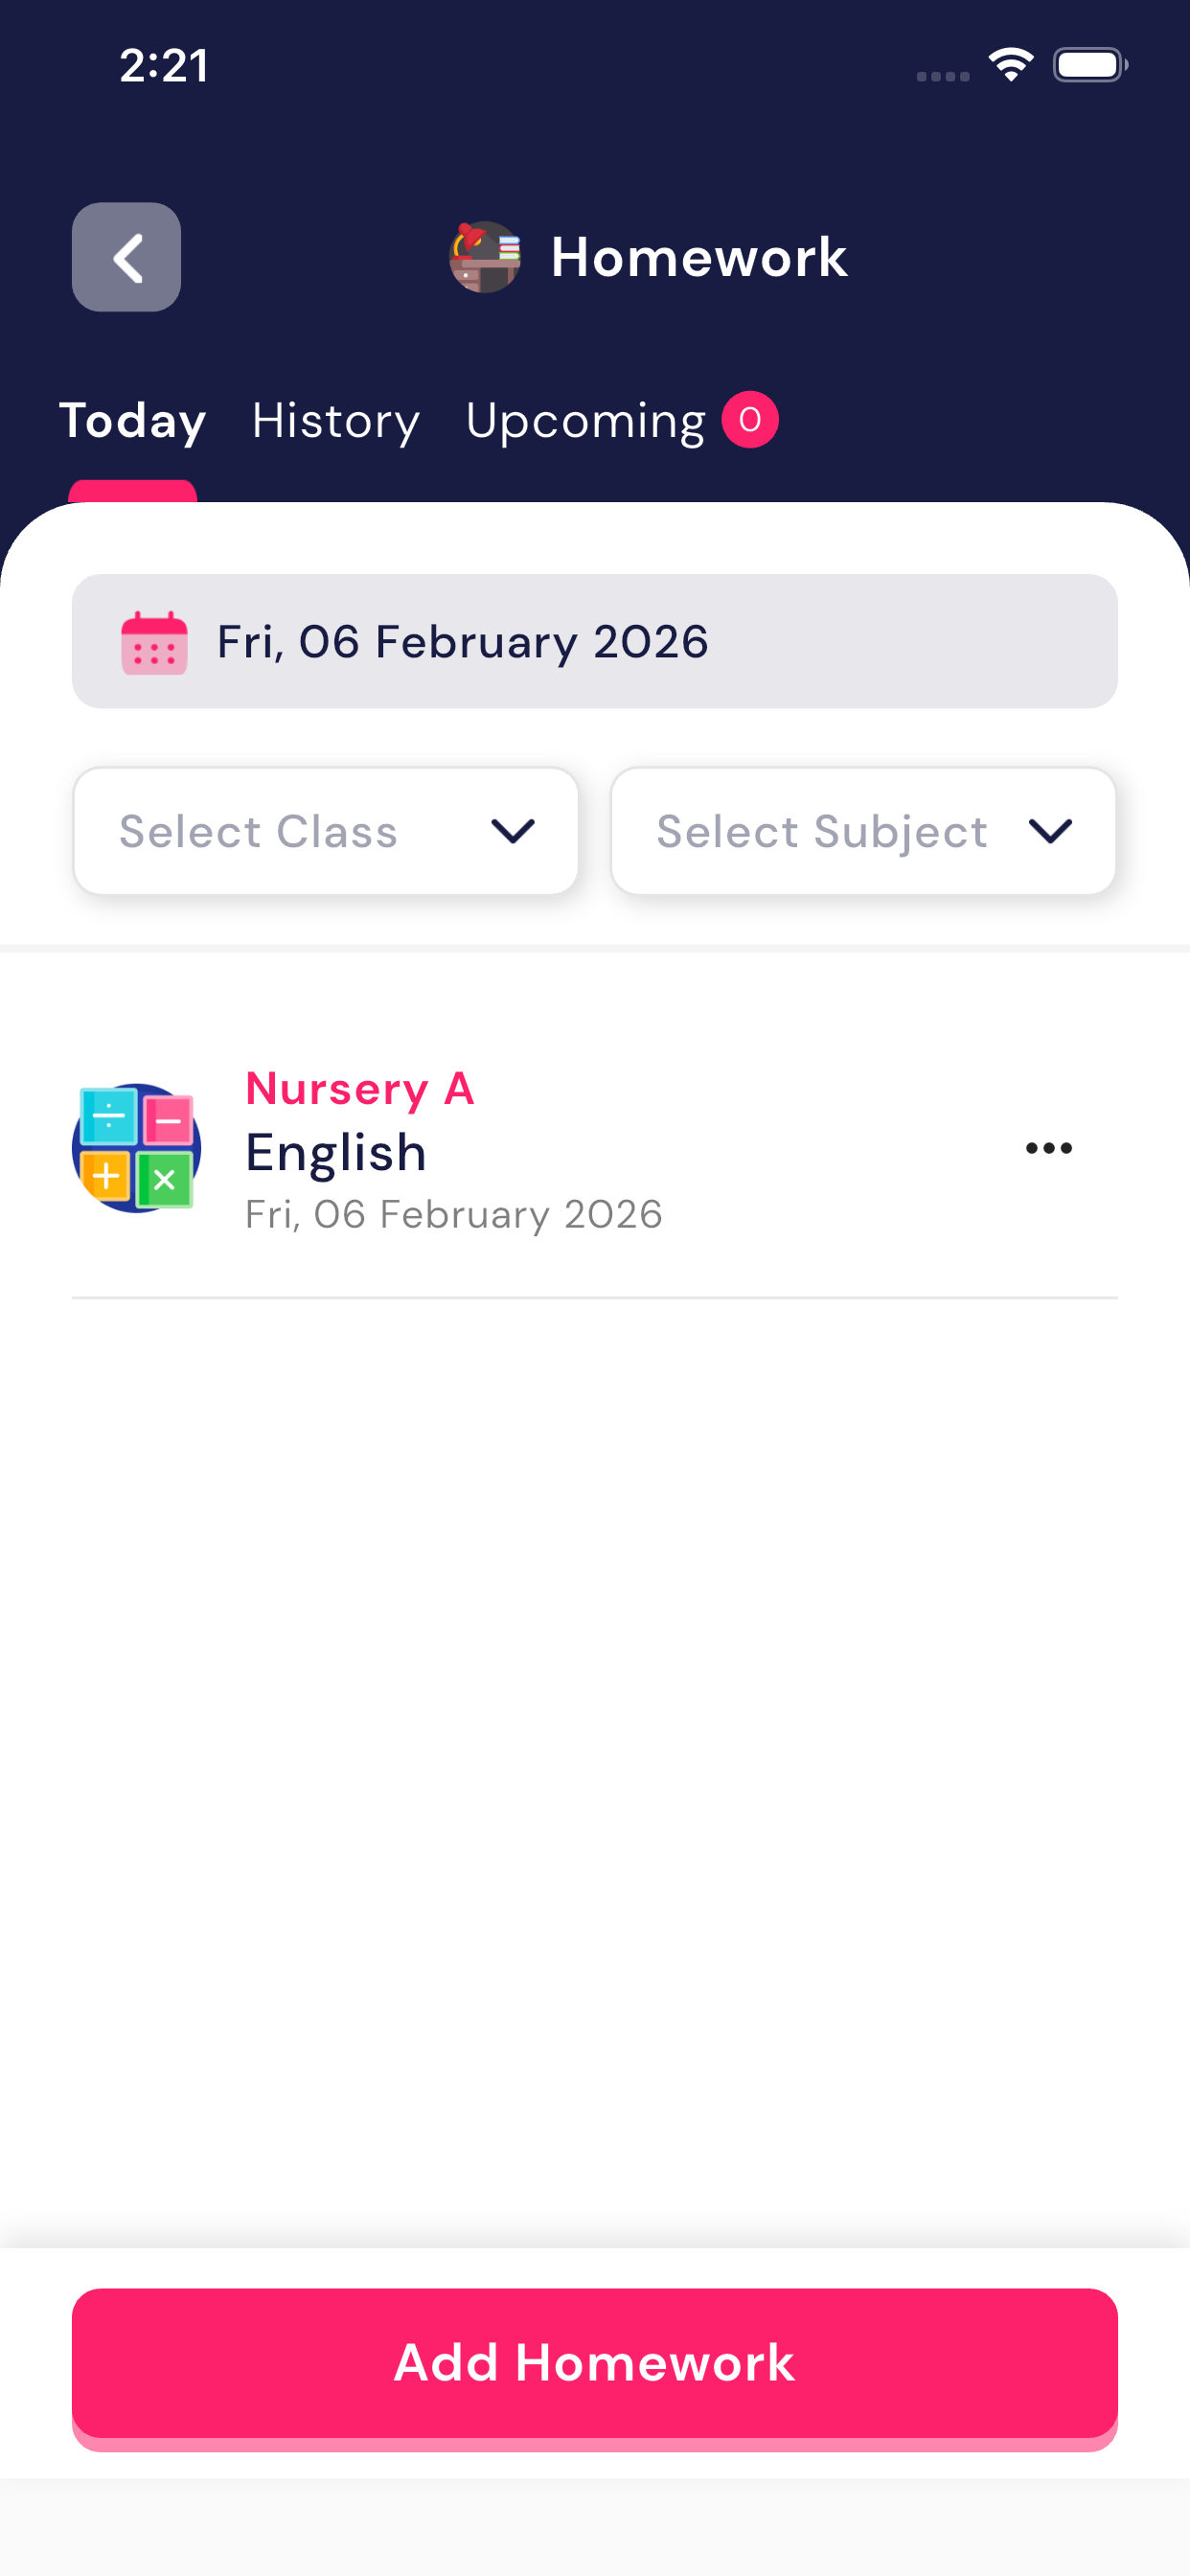
Add New Homework (Step-by-Step)
To add homework, follow these steps:
- Open the Homework module
- Tap on the Add Homework button
- Fill in the required details:
- Class – Select the class
- Subject – Select the subject
- Homework Title – Short title for the homework
- Description – Detailed explanation of the homework
- Due Date – Select the submission date
- Website URL (Optional) – Add any reference link if needed
- Upload Image (Optional) – Attach homework-related image
- Tap on Publish to assign homework to students
Once published, the homework becomes visible to students immediately.
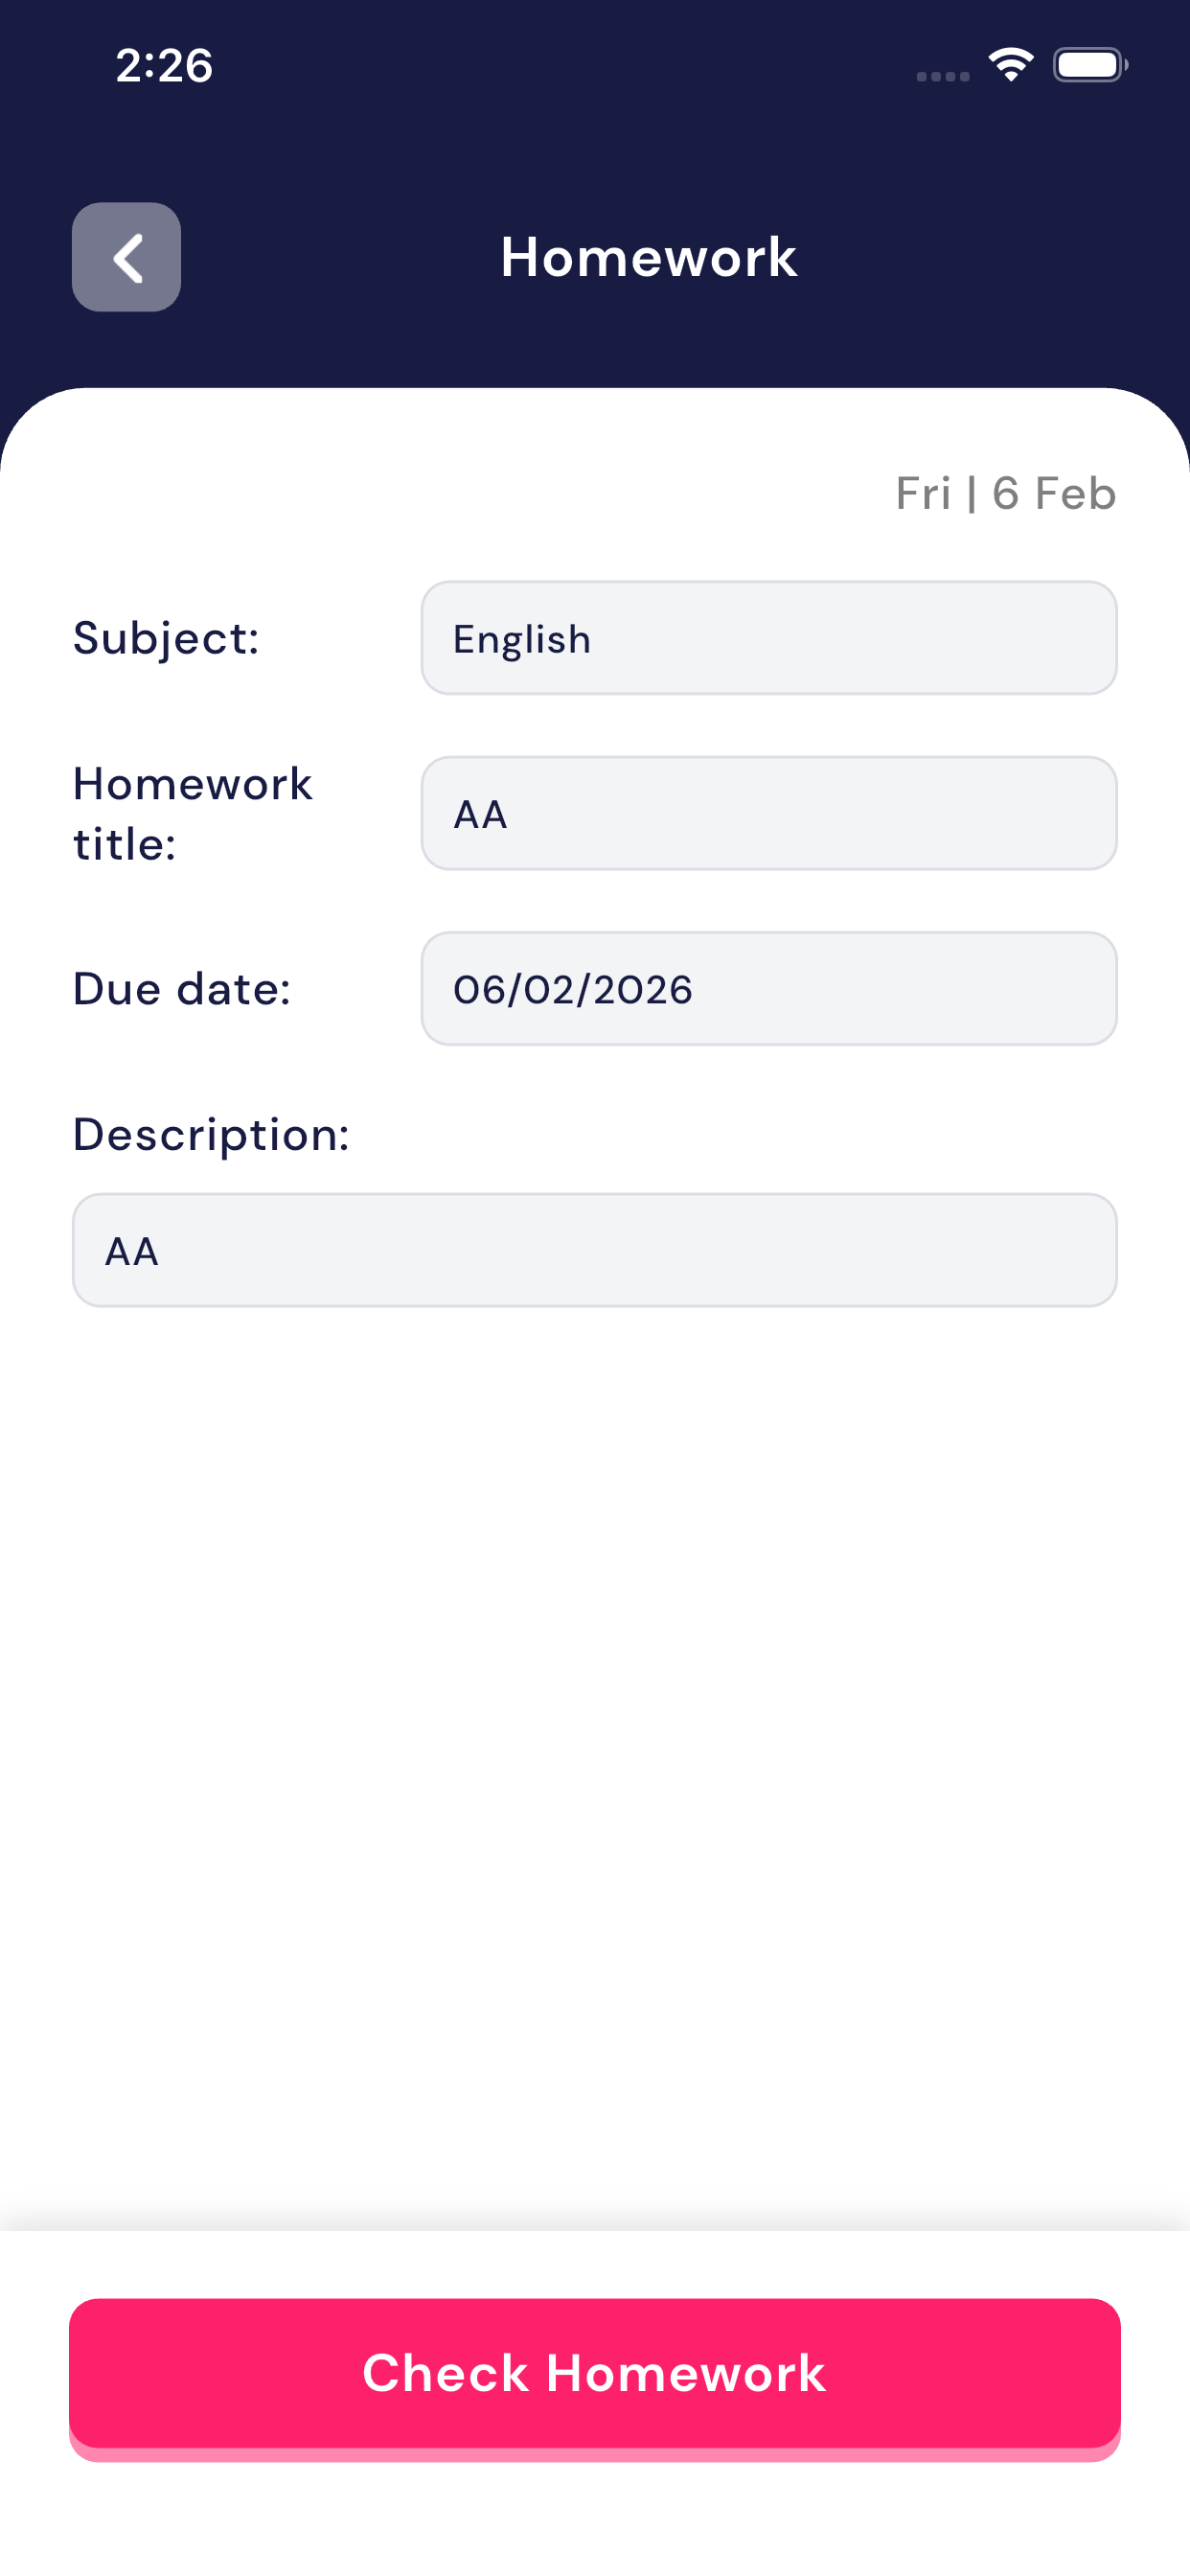
View Homework Details
After homework is added, teachers can:
- View homework title, subject, due date, and description
- Open homework details by tapping on it
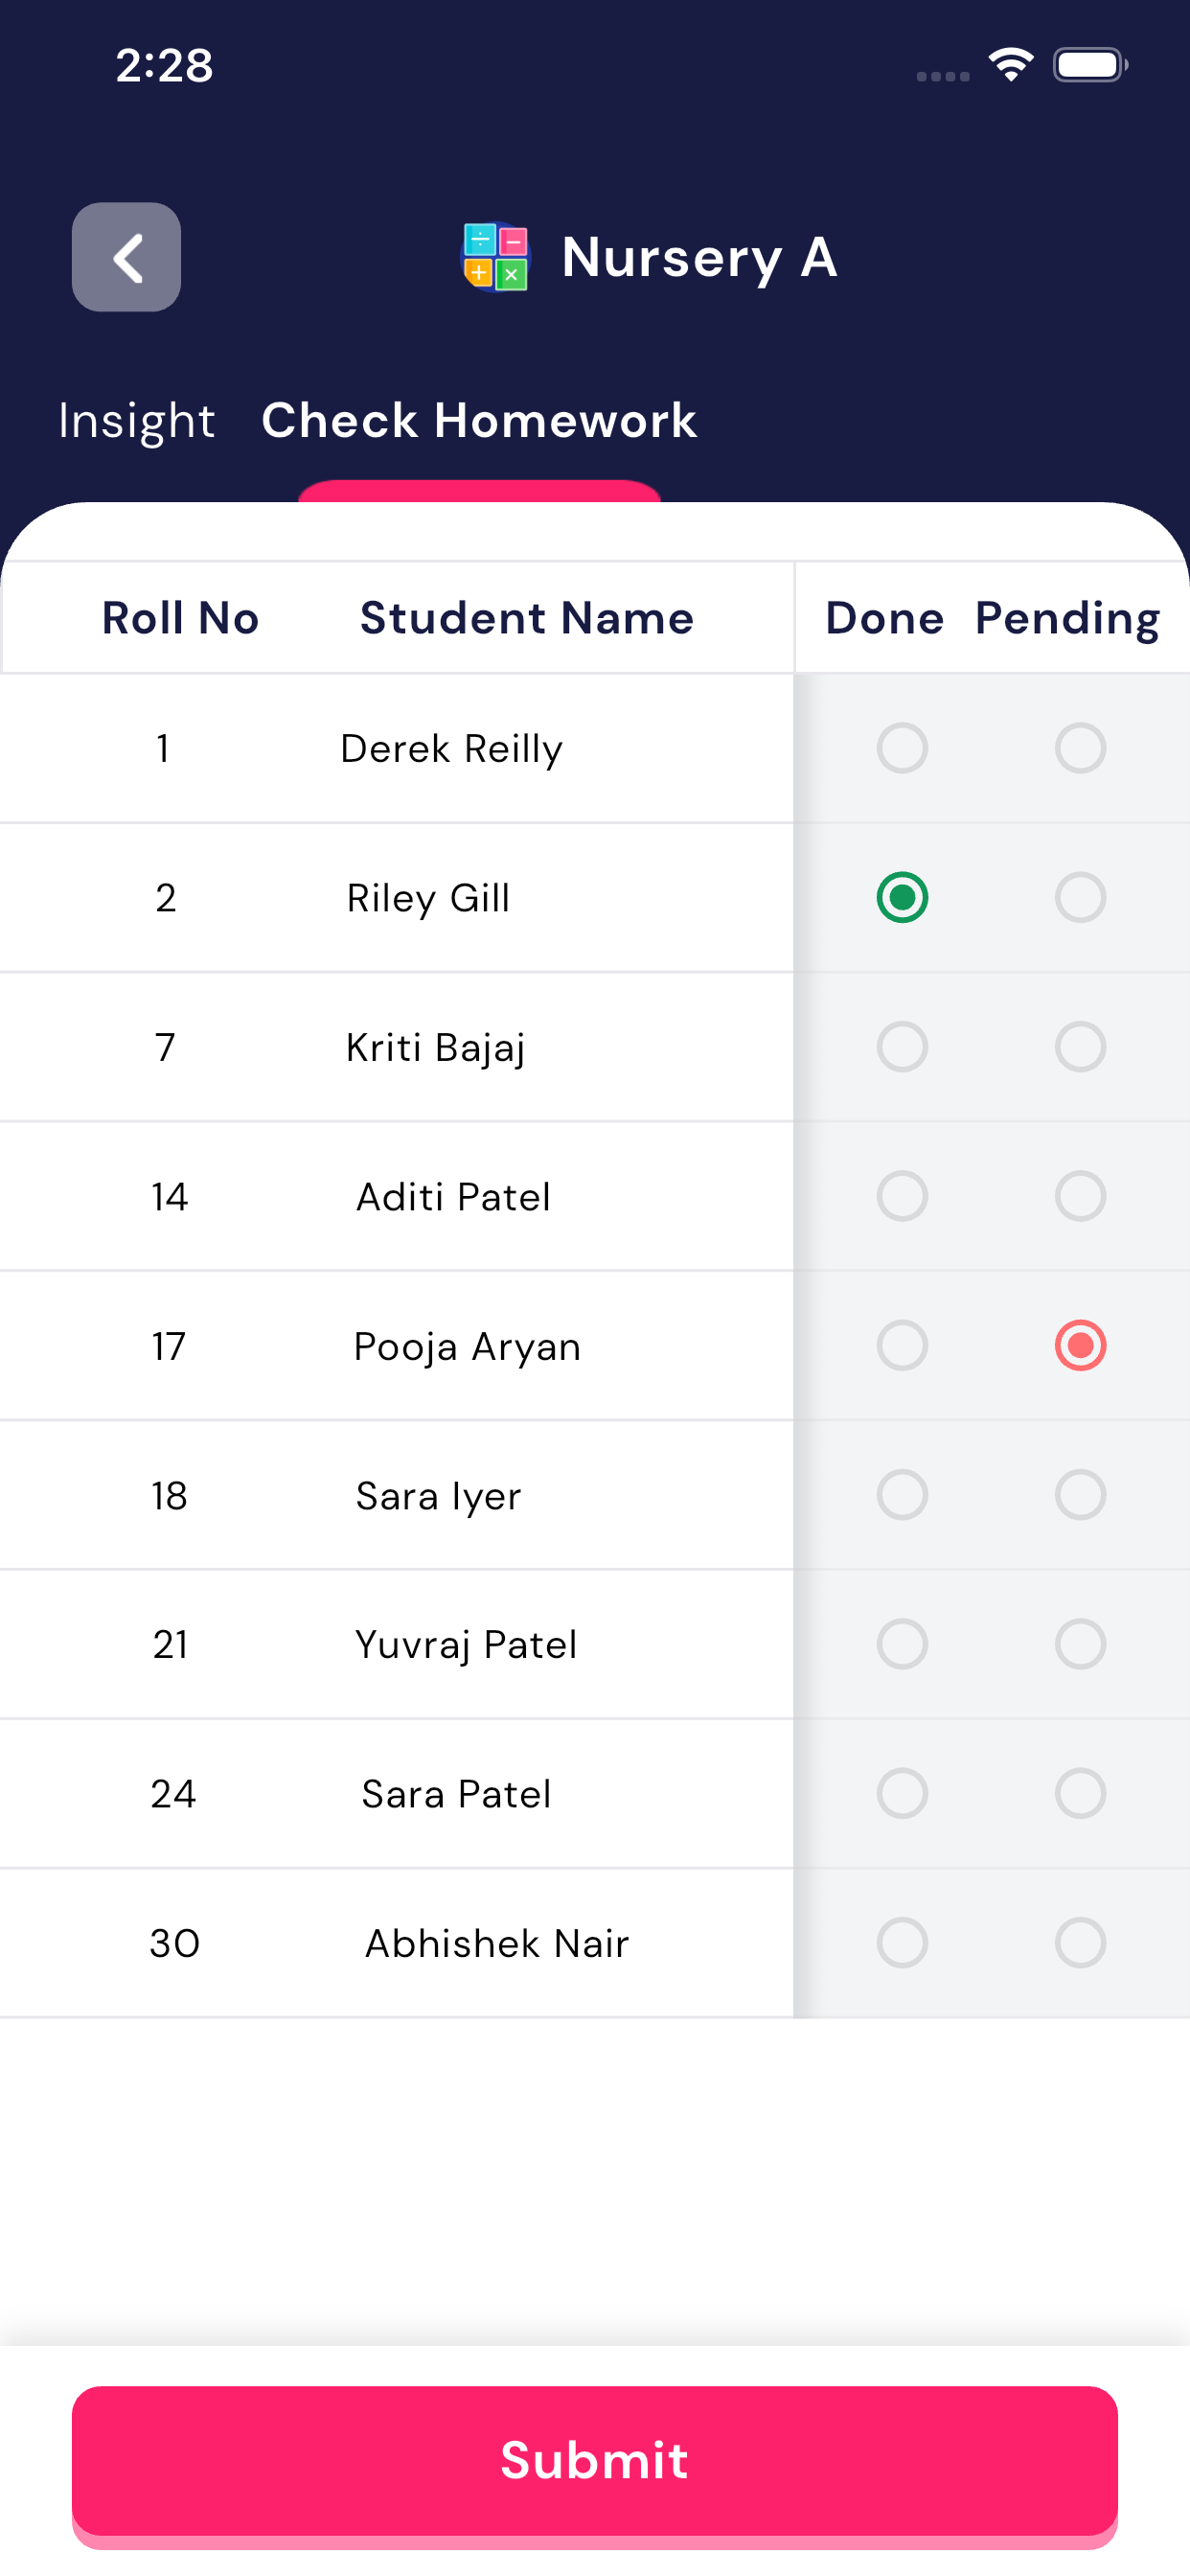
Check Homework (Student-wise)
Teachers can check student homework status usingCheck Homework option:
- Student list is displayed withRoll No and Student Name
- For each student, teacher can mark:
- Done – Homework completed
- Pending – Homework not completed
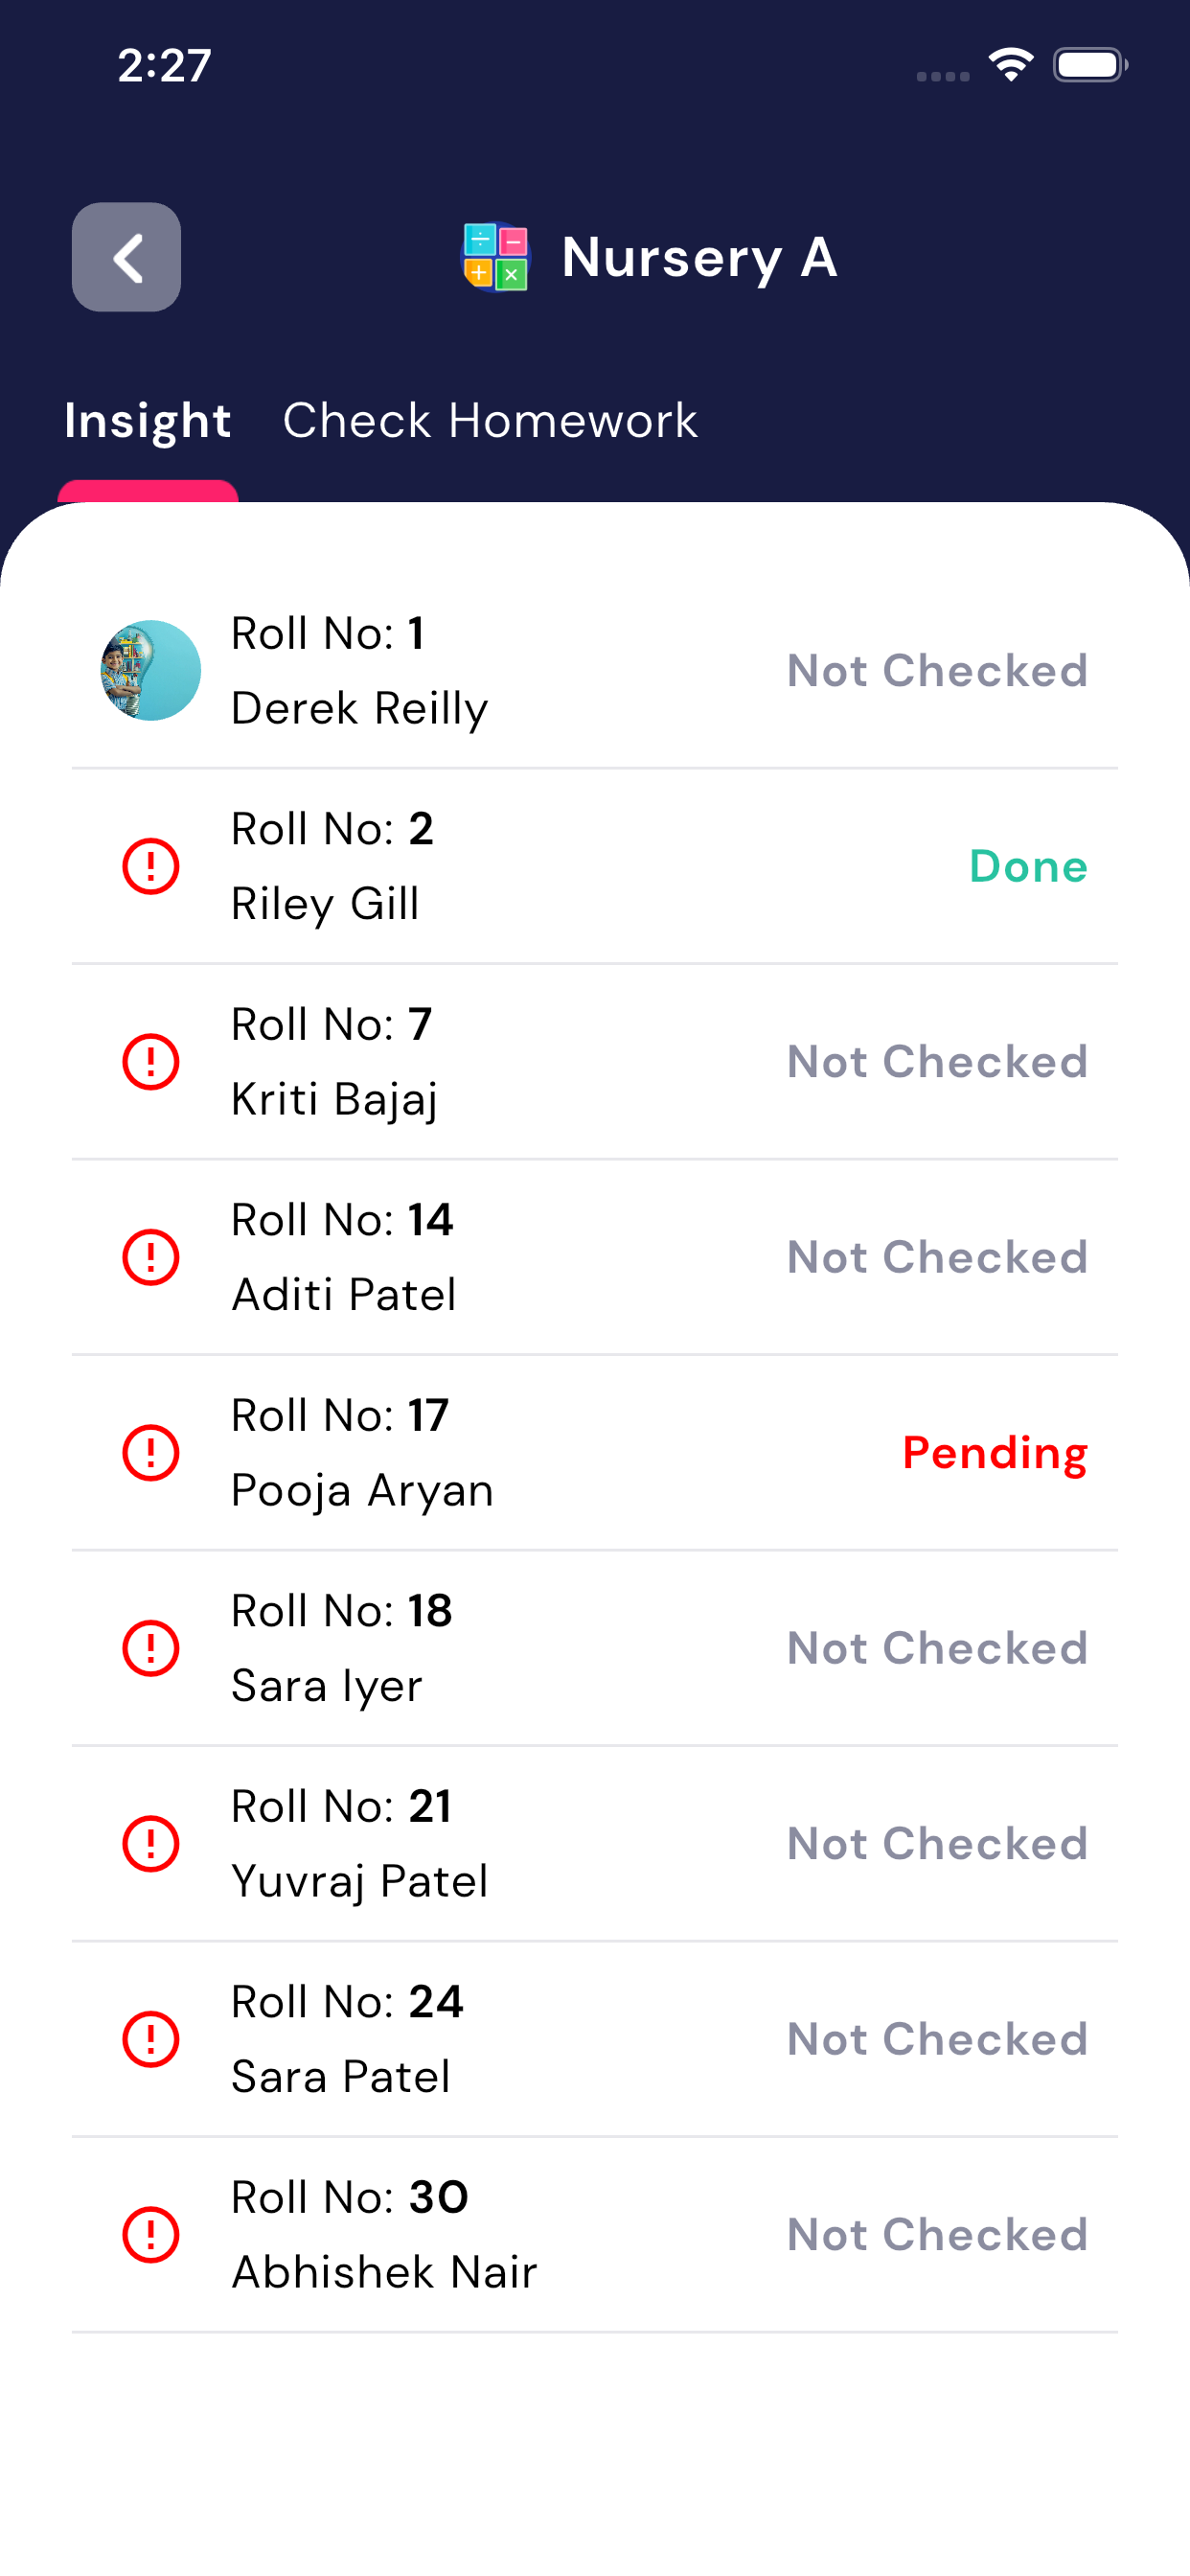
Add Remarks for Pending Homework
If a student’s homework is pending:
- Select the Pending option
- A Remark popup will appear
- Enter the remark (example: “Incomplete work” or “Not submitted”)
- Tap Confirm to save the remark
Remarks help parents and students understand the reason for pending homework.
Submit Homework Status
After checking all students:
- Tap on the Submit button
- Homework status (Done / Pending) is saved successfully
Teachers can also review the summary showing:
- Total students
- Number of students who completed homework
- Number of students with pending homework
Key Benefits for Teachers
- Easy homework management in one place
- Class-wise, subject-wise, and date-wise control
- Clear visibility of student performance
- Simple and quick homework checking process
This structured homework flow ensures teachers can add, manage, and review homework efficiently without any difficulty.
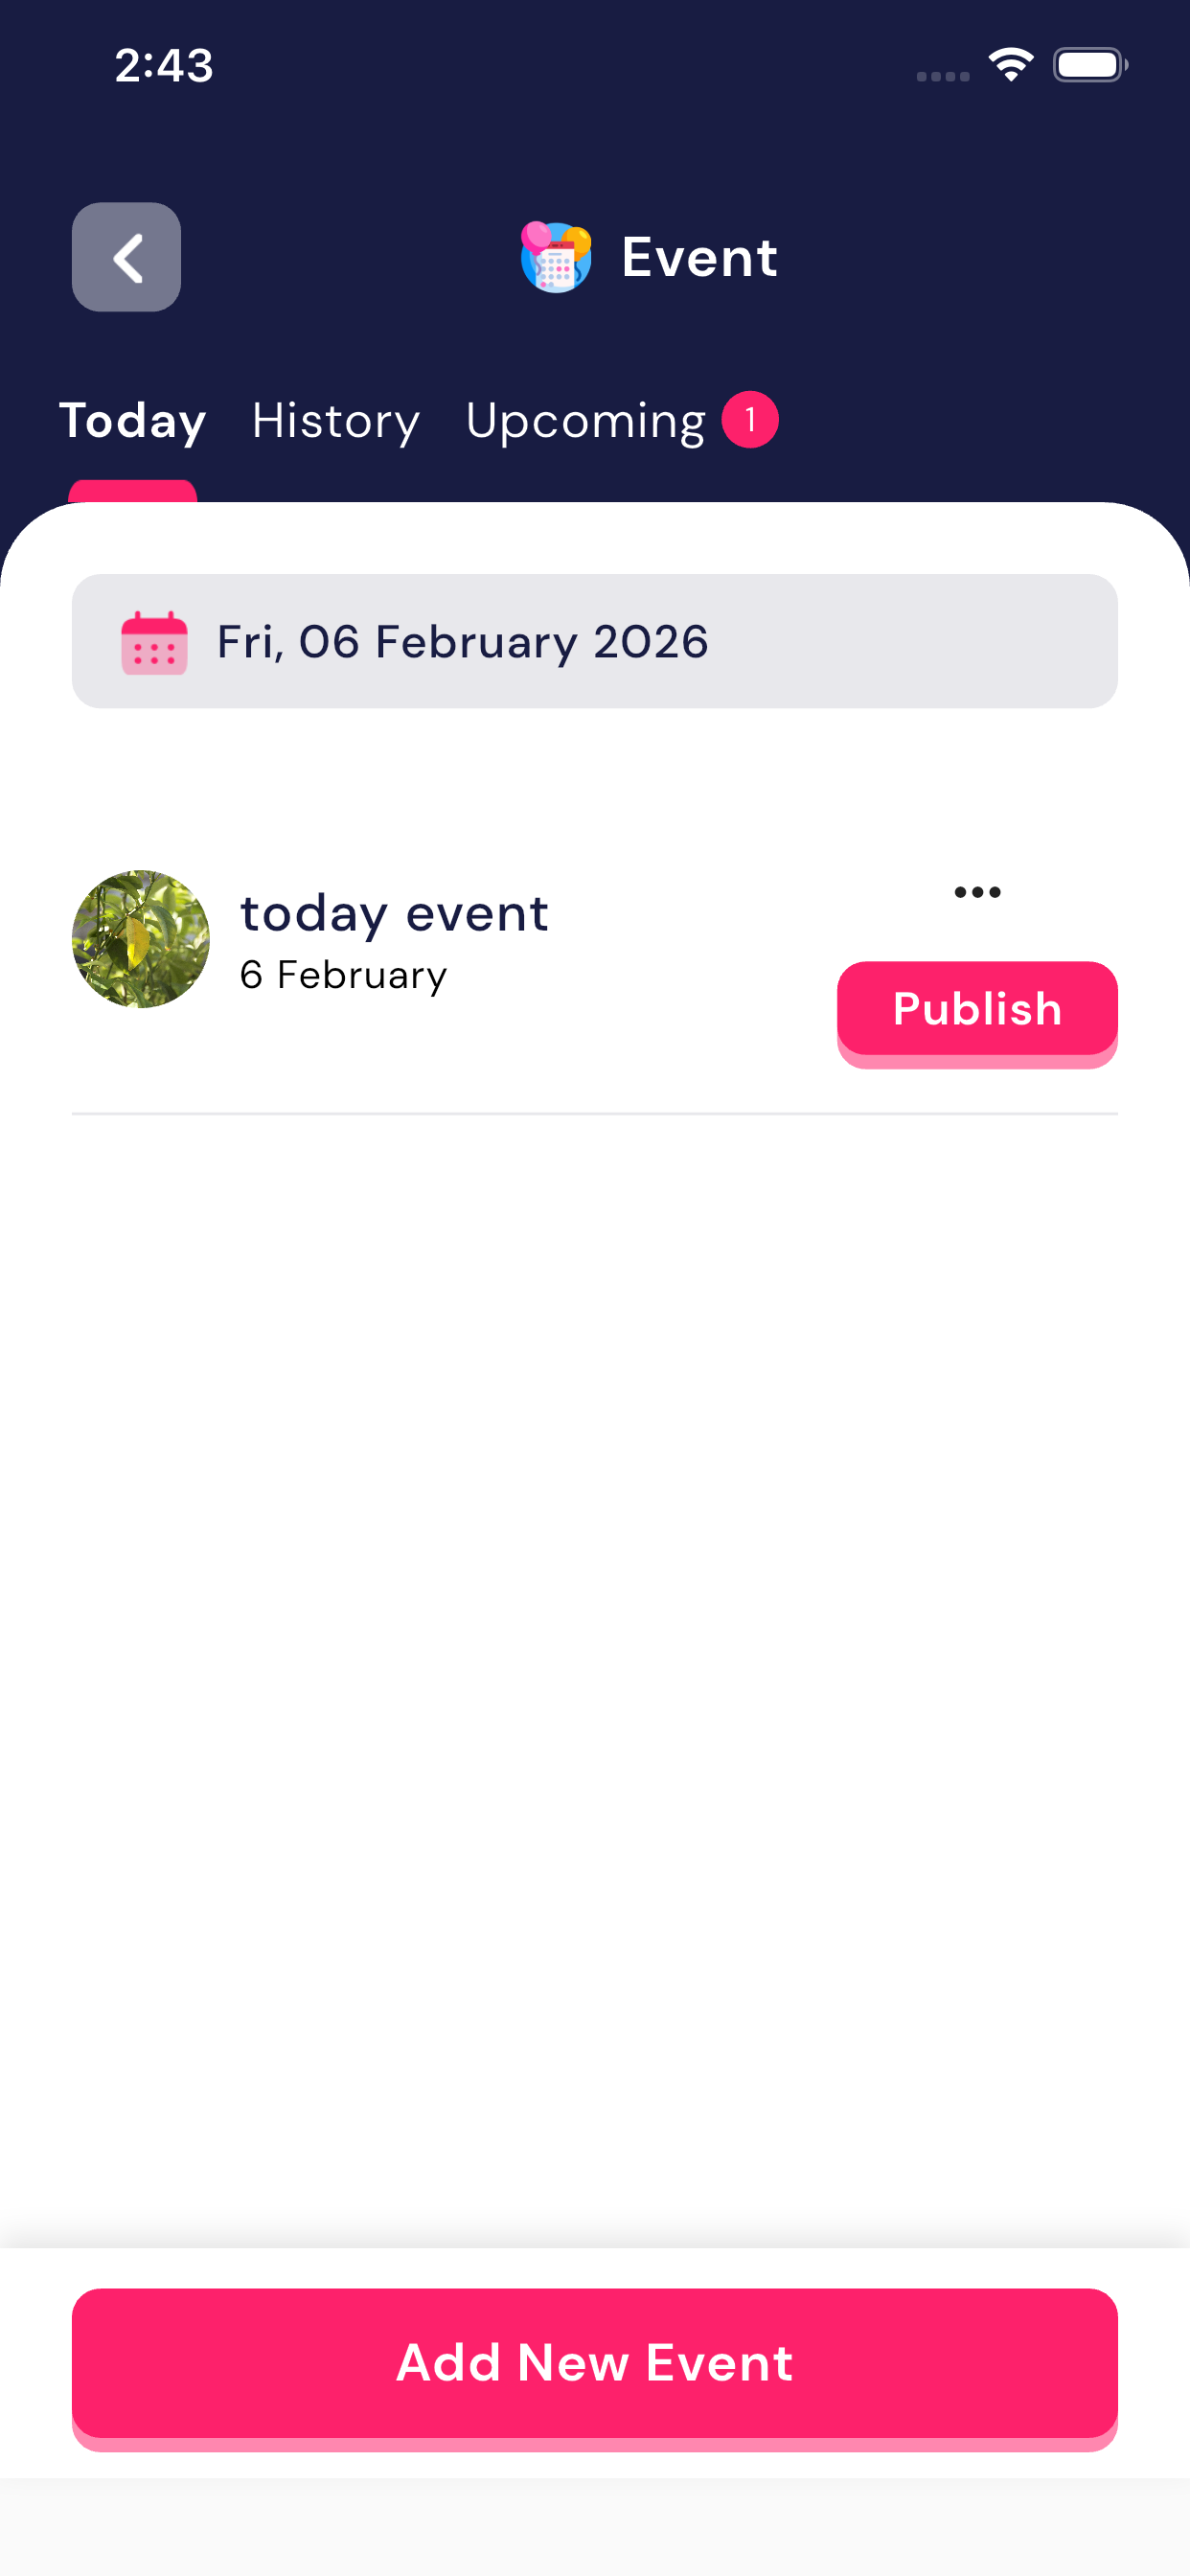
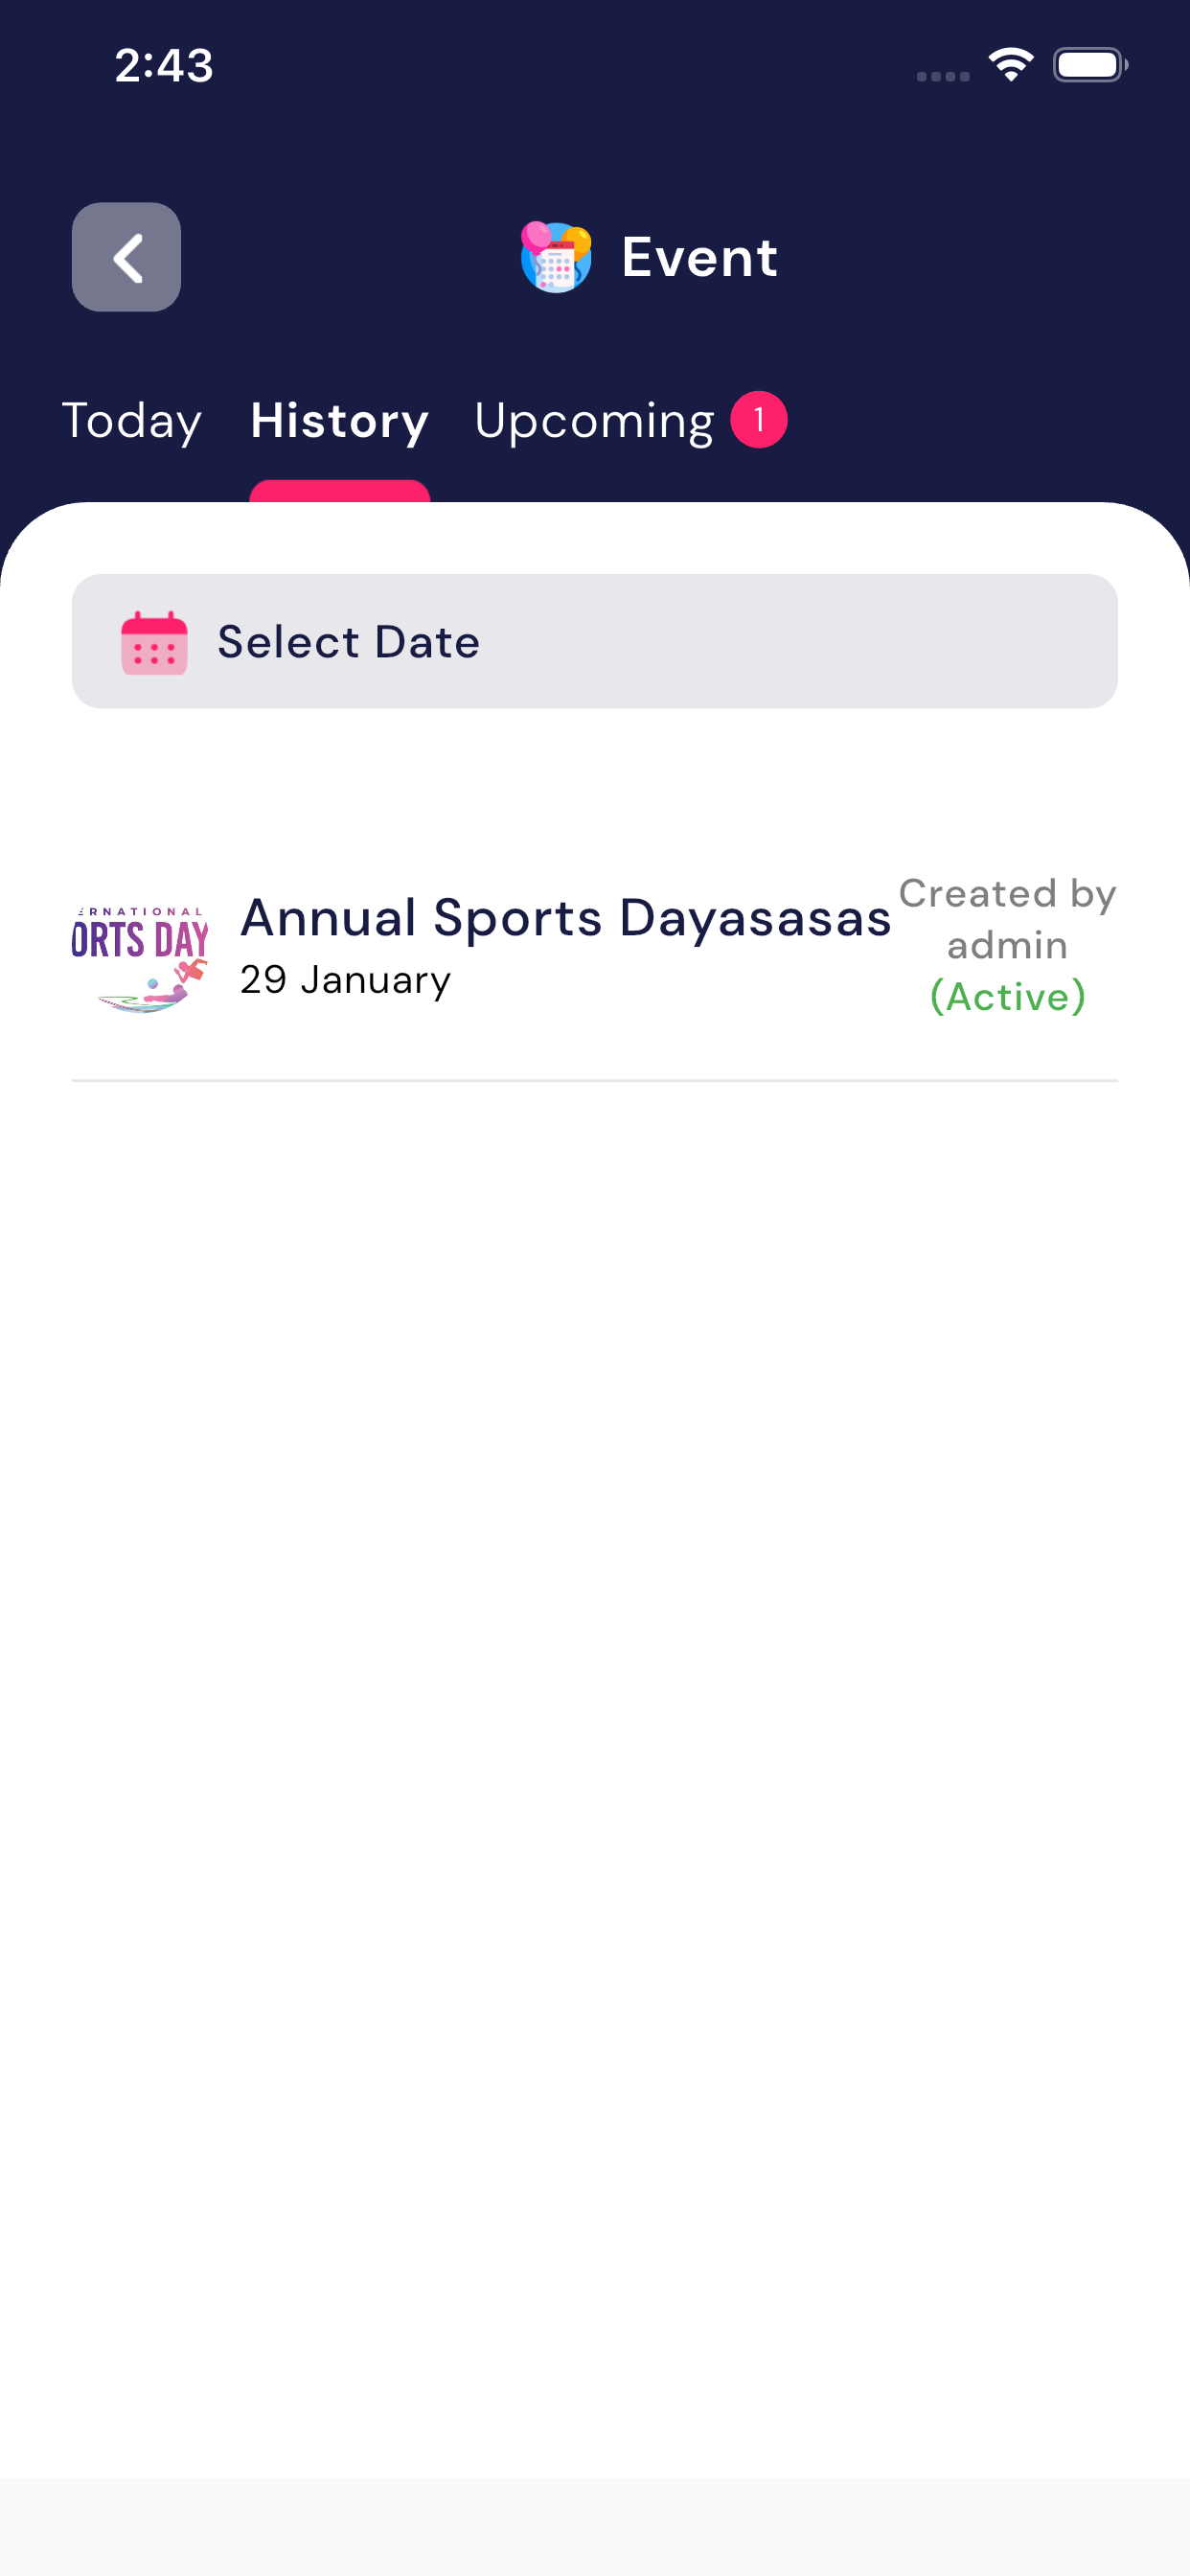
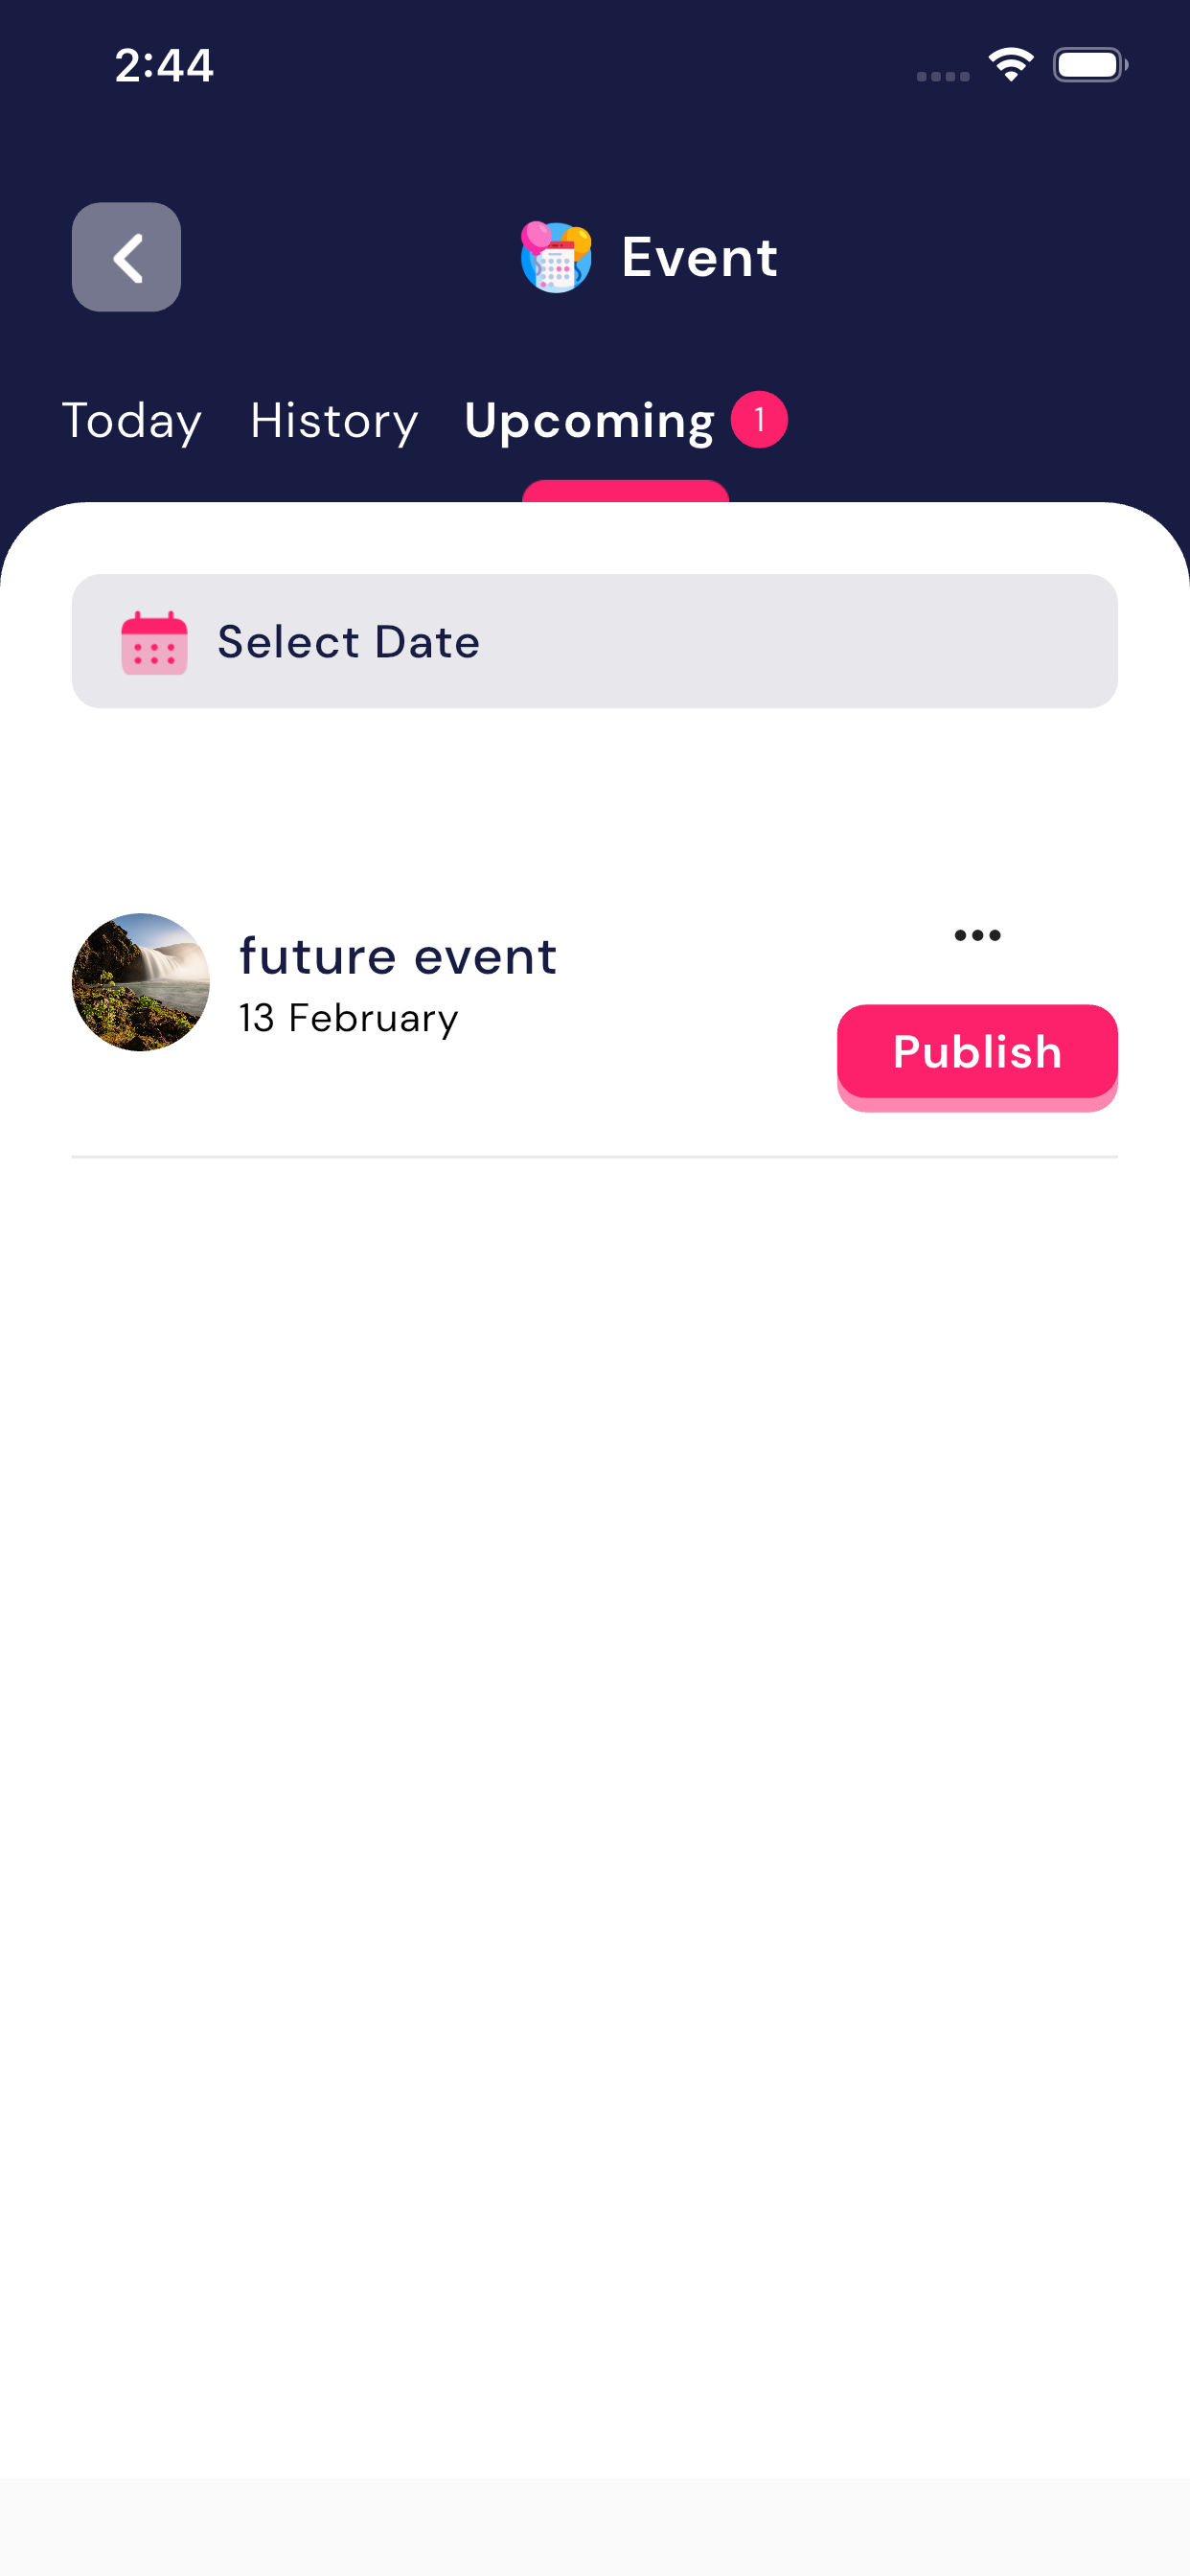
5.3 Event
The Event module allows teachers toadd, update, and view school events. All events created here arevisible to the entire school (teachers, staff, and students where applicable).
This module helps schools communicate important activities like sports day, cultural programs, holidays, meetings, etc.
Event Tabs Explanation
- Today
- Displays events scheduled for today’s date
- If no events are available, the message“No events scheduled for today” is shown
- History
- Shows past events
- Teacher can use Select Date filter to check events of a specific date
- Upcoming
- Displays future events
- If no upcoming events are available, a message will be shown
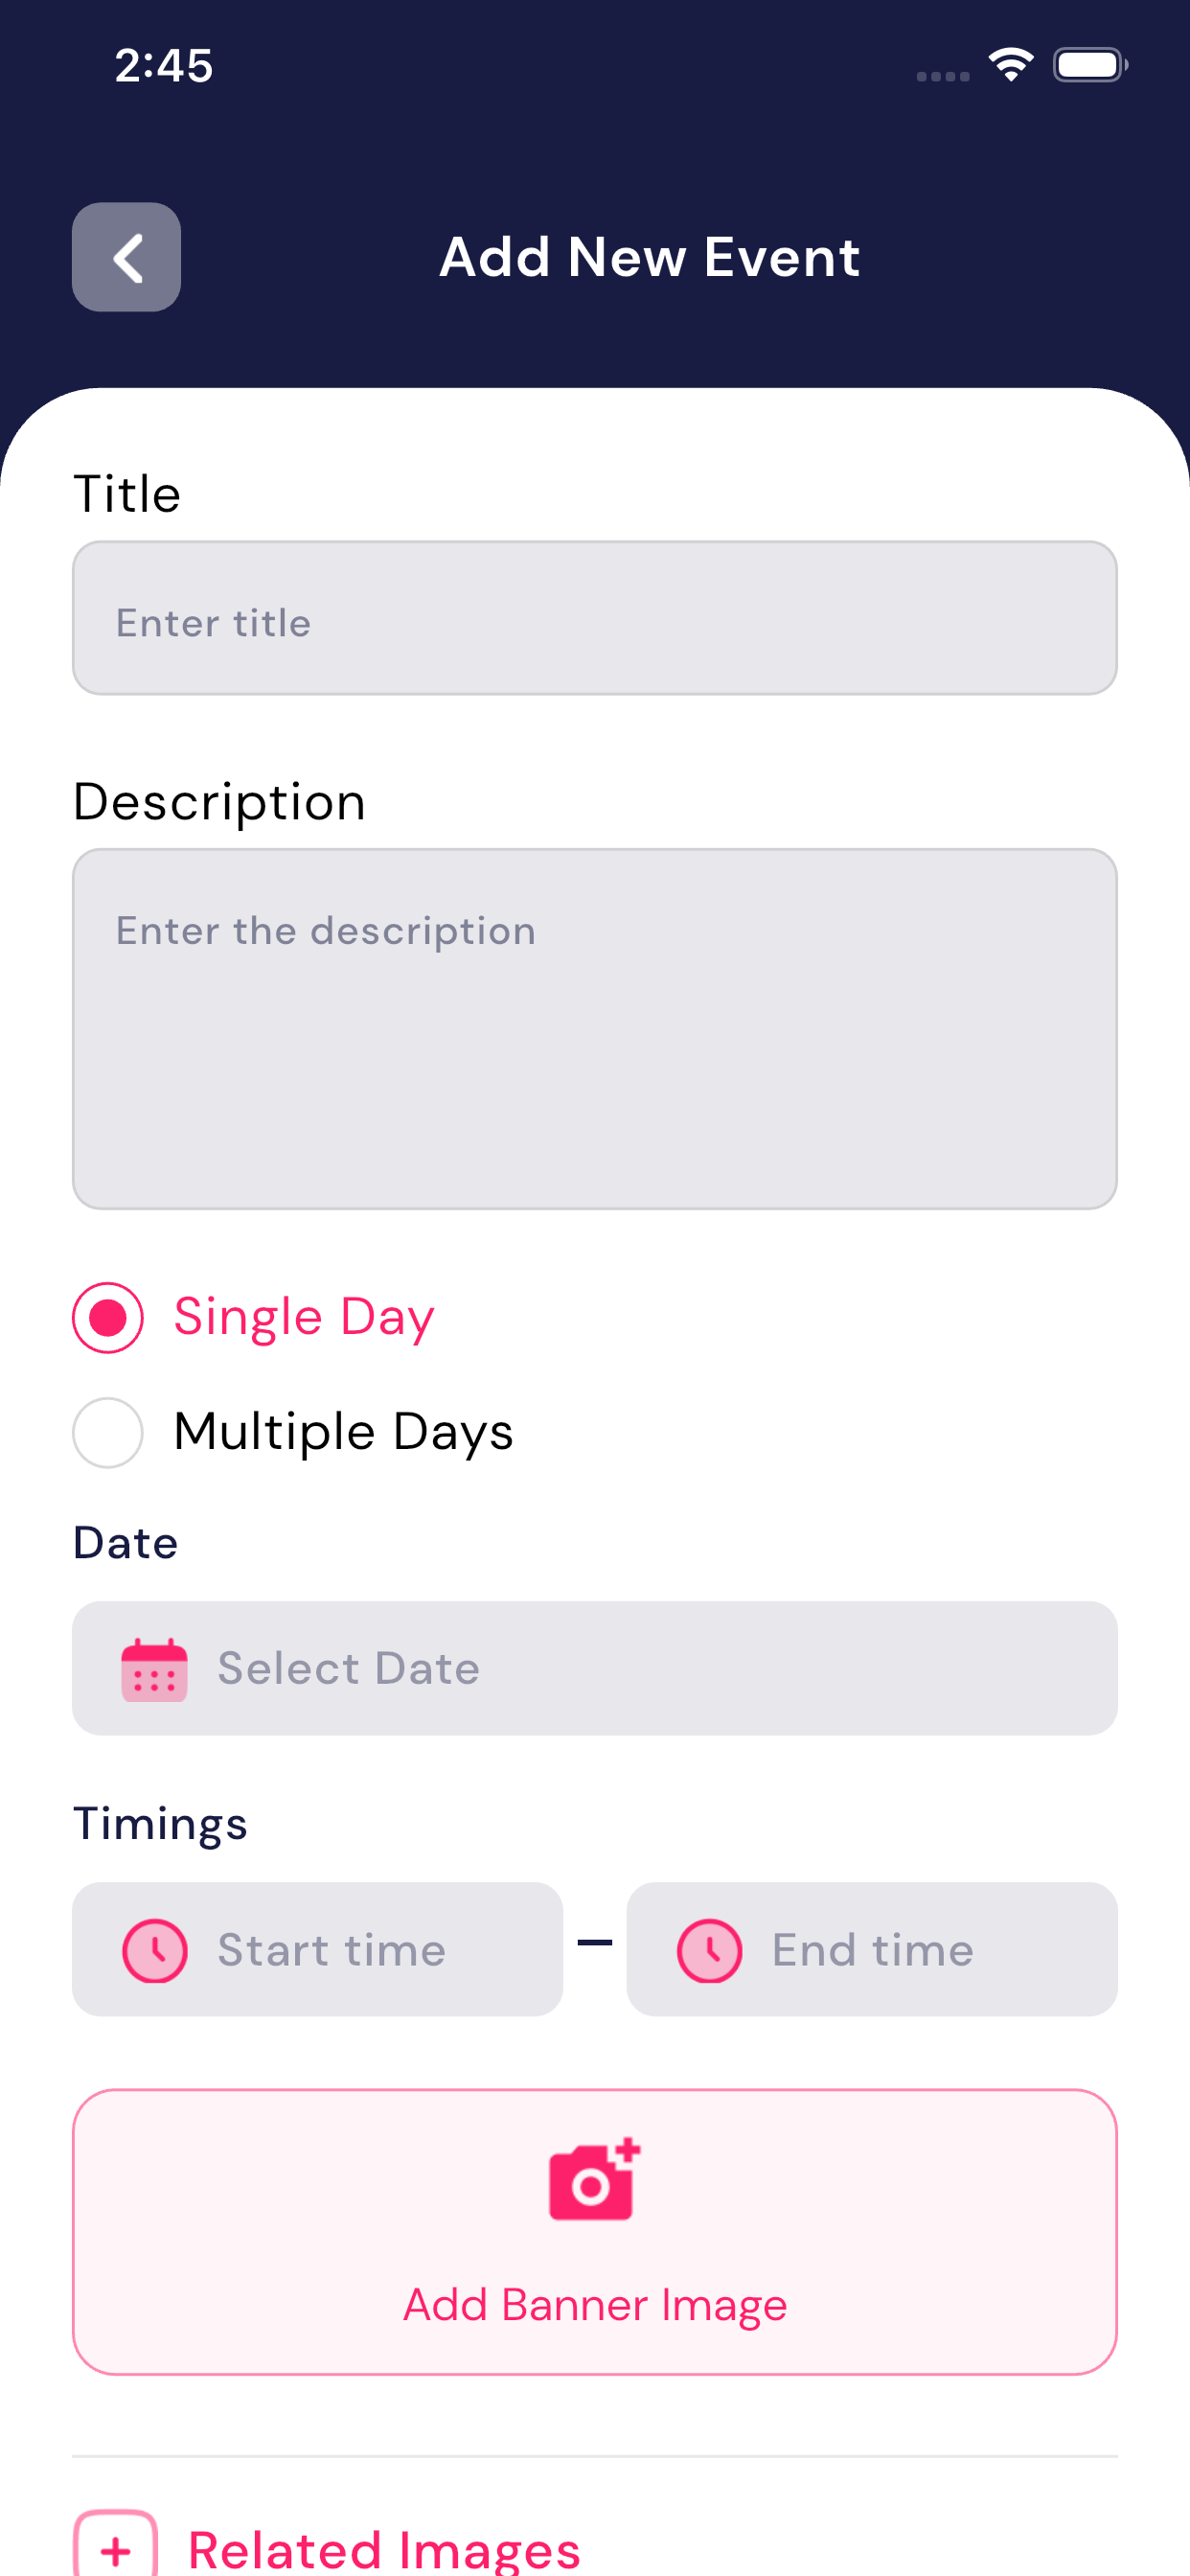
How to Add a New Event
- Open Event module from Teacher Dashboard
- Tap on Add New Event button
- Enter Title of the event (Example: Annual Sports Day)
- Enter Description of the event
- Select event type:
- Single Day – for one-day events
- Multiple Days – for events spanning more than one day
- Select Date (or date range for multiple days)
- Select Start Time and End Time
- Add Related Image(s) (optional)
- Tap on Save / Update Event
Event will be successfully created and visible to all school users.
How to Update an Event
- Open Event module
- Select the event fromToday / History / Upcoming tab
- Tap on the Edit / Update option
- Update required details:
- Title
- Description
- Date / Time
- Images
- Save the changes
Updated event details will be reflected for all users.
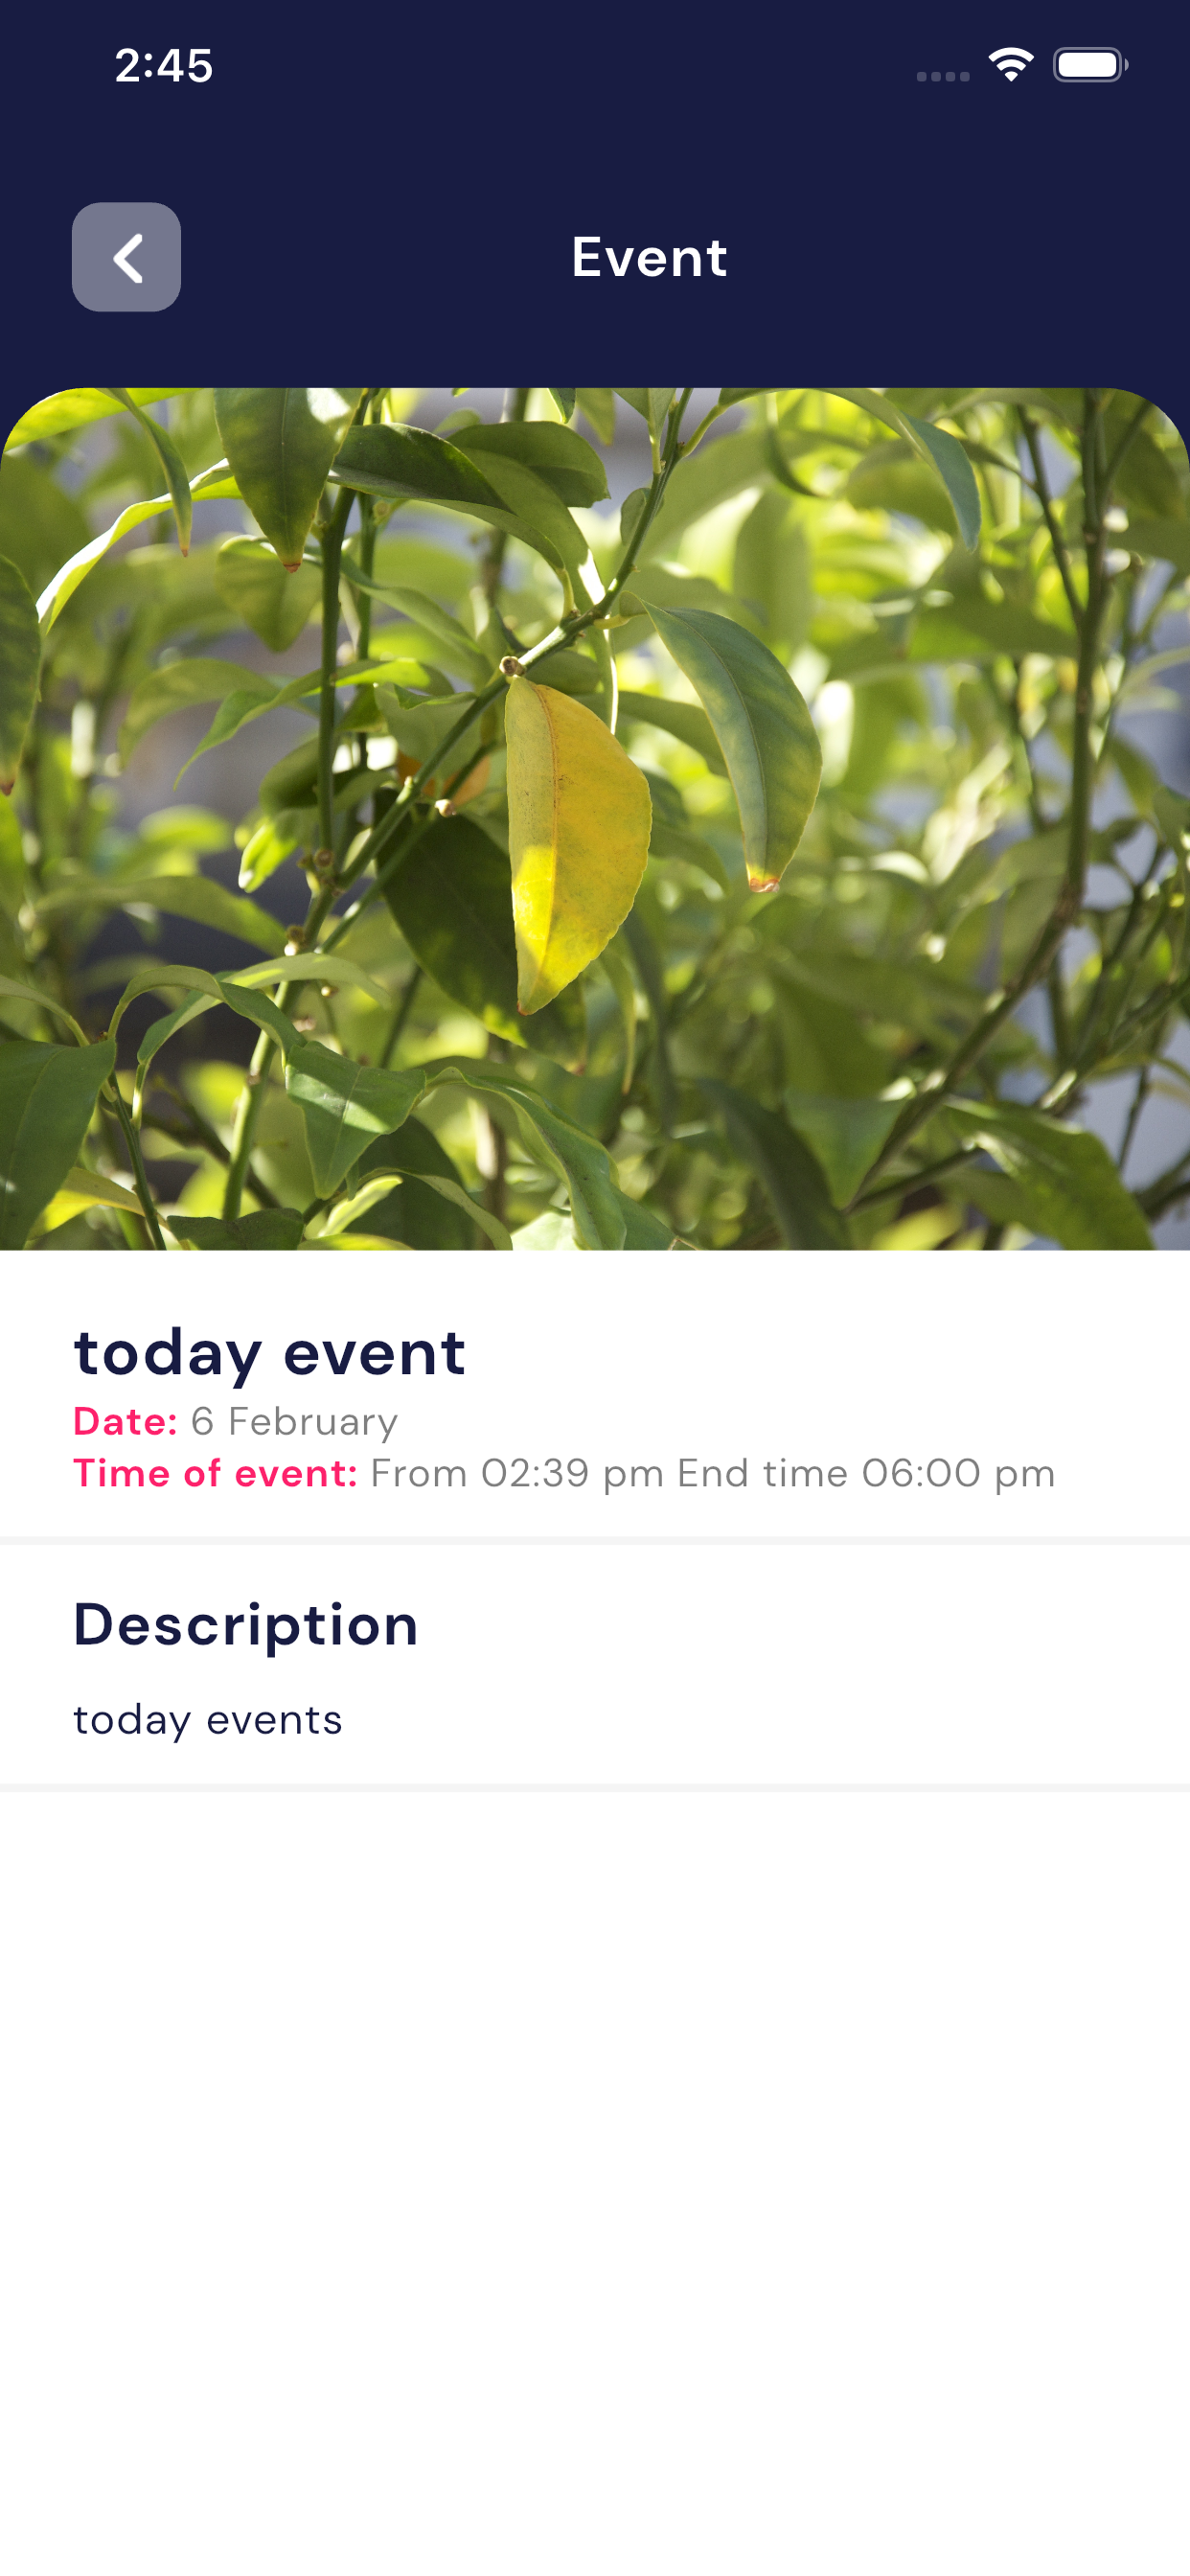
How to View Event Details
- Open Event module
- Tap on any event from the list
- Event details screen will show:
- Event Image
- Event Title
- Date
- Time duration
- Description
Important Notes for Teachers
- Events created by teachers areschool-wide announcements
- Always verify date and time before saving the event
- Images help users understand events better (recommended)
- Past events cannot affect upcoming schedules
This module ensures clear communication of school activities.
5.4 Notice Module
Overview
The Notice Module is used by teachers to create and manage notices for their assignedclasses and students. This module helps in sharing important information such as exams, holidays, events, and general announcements in an easy and organized way.
Important Note: Teachers can create noticesonly for selected classes or students. Notices cannot be created for the entire school at once by teacher.
Tabs Explanation
1. Today Notices
- Shows all notices that are valid fortoday’s date.
- Notices are displayed date-wise.
- You can tap on any notice to view full details.
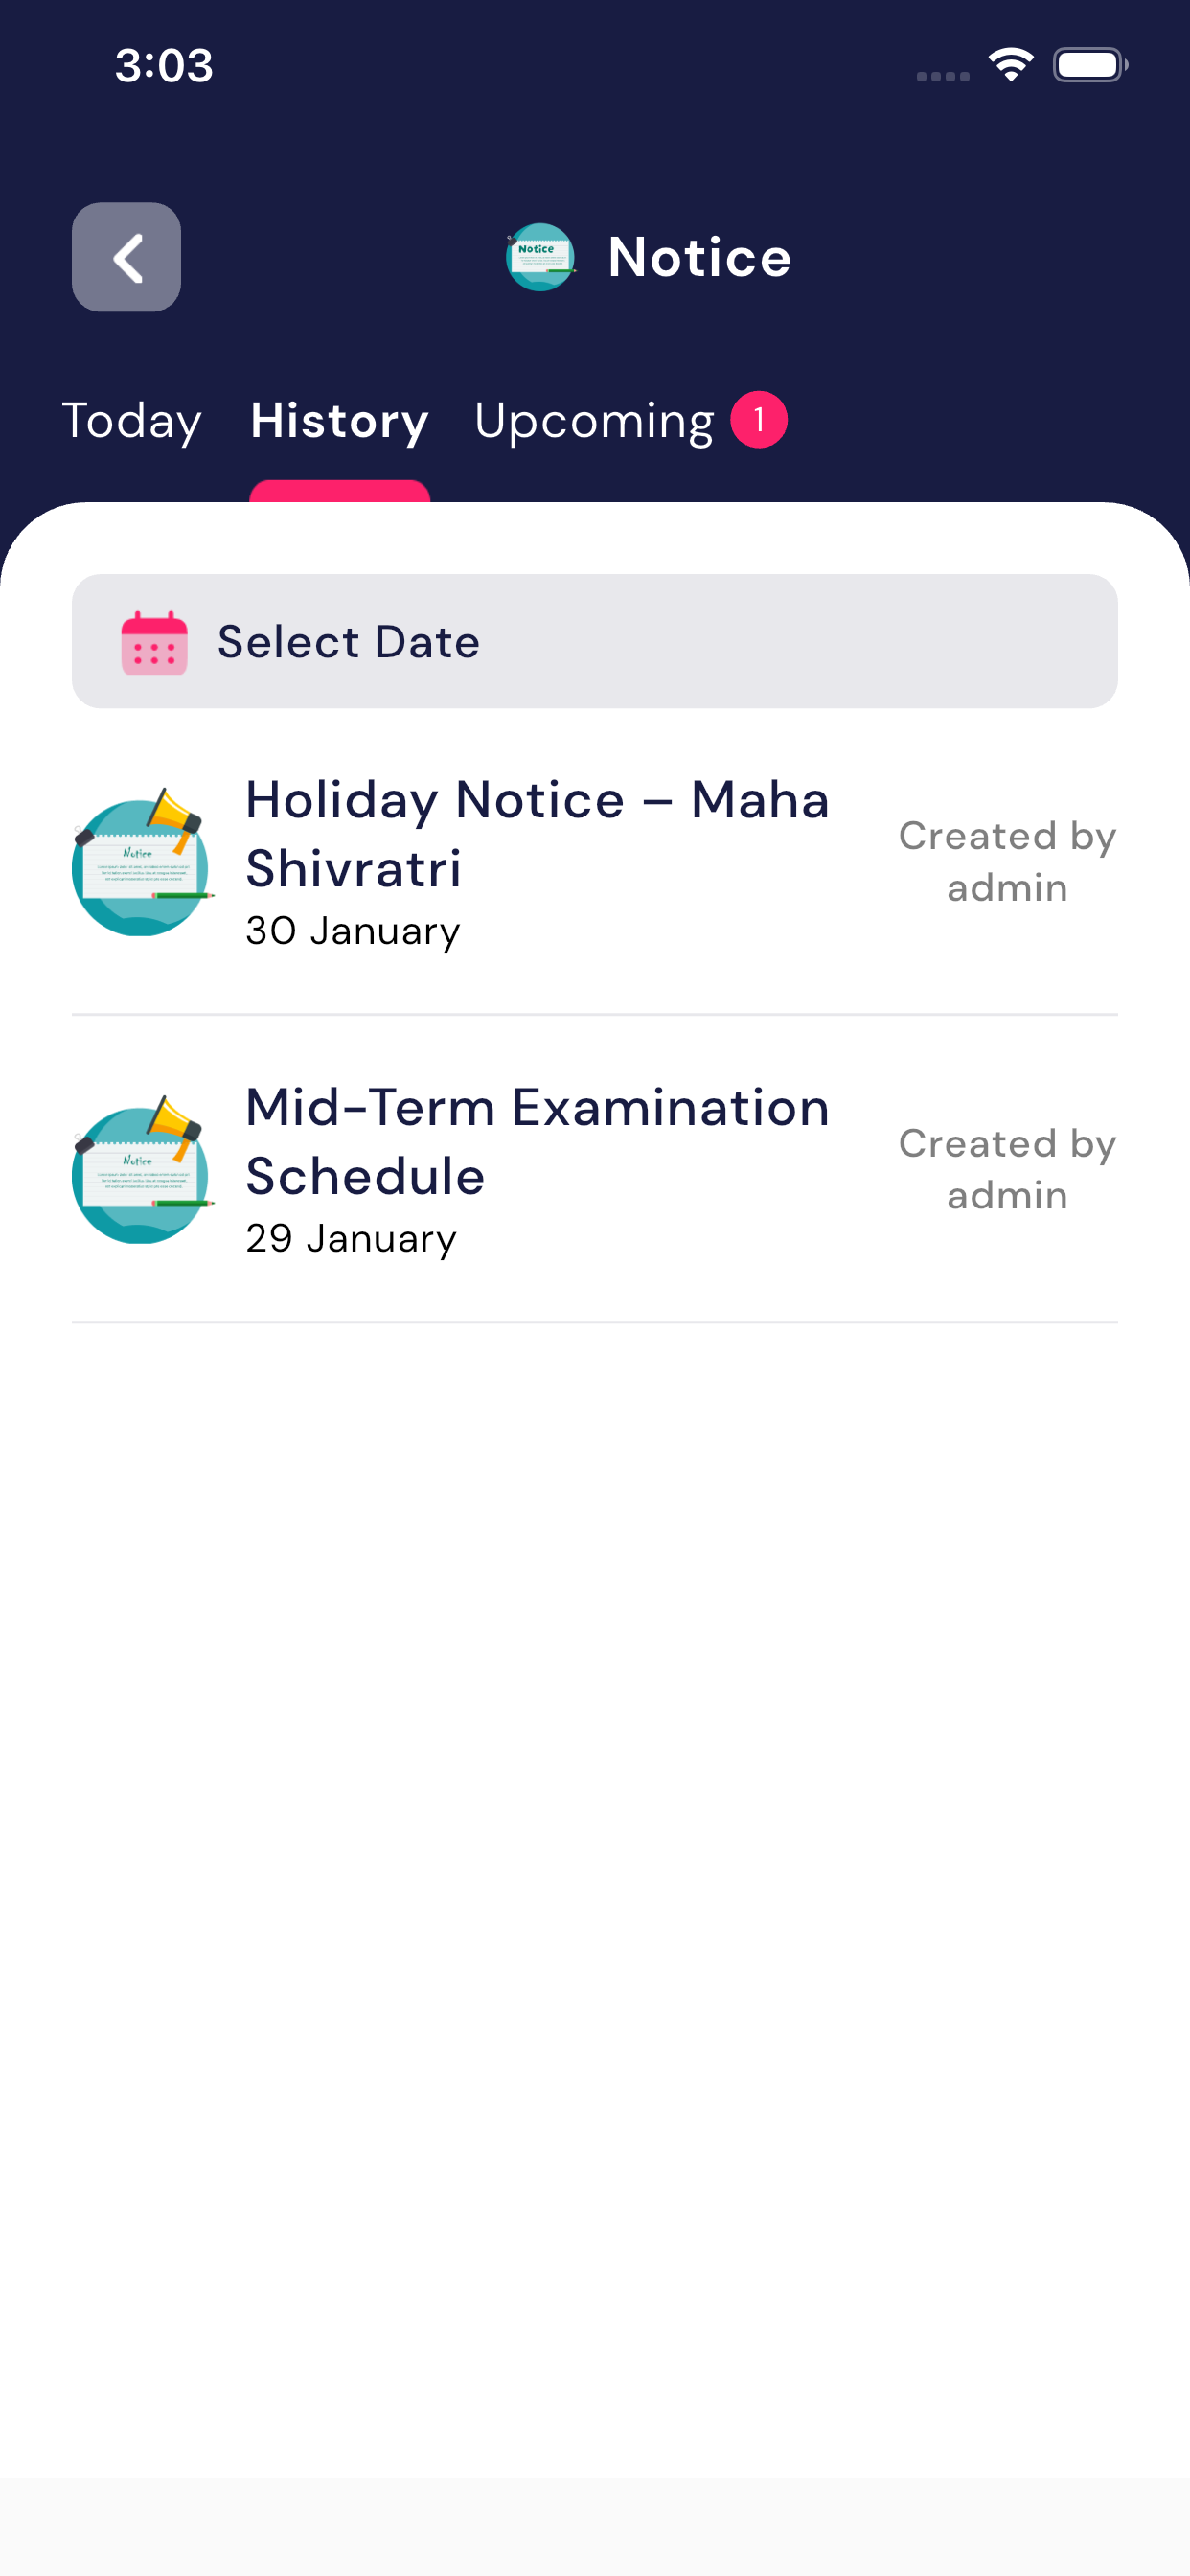
2. History Notices
- Displays past notices whose dates have already passed.
- Useful for checking old announcements, exam schedules, or holiday notices.
- Notices are shown with title, date, and creator (admin/teacher).
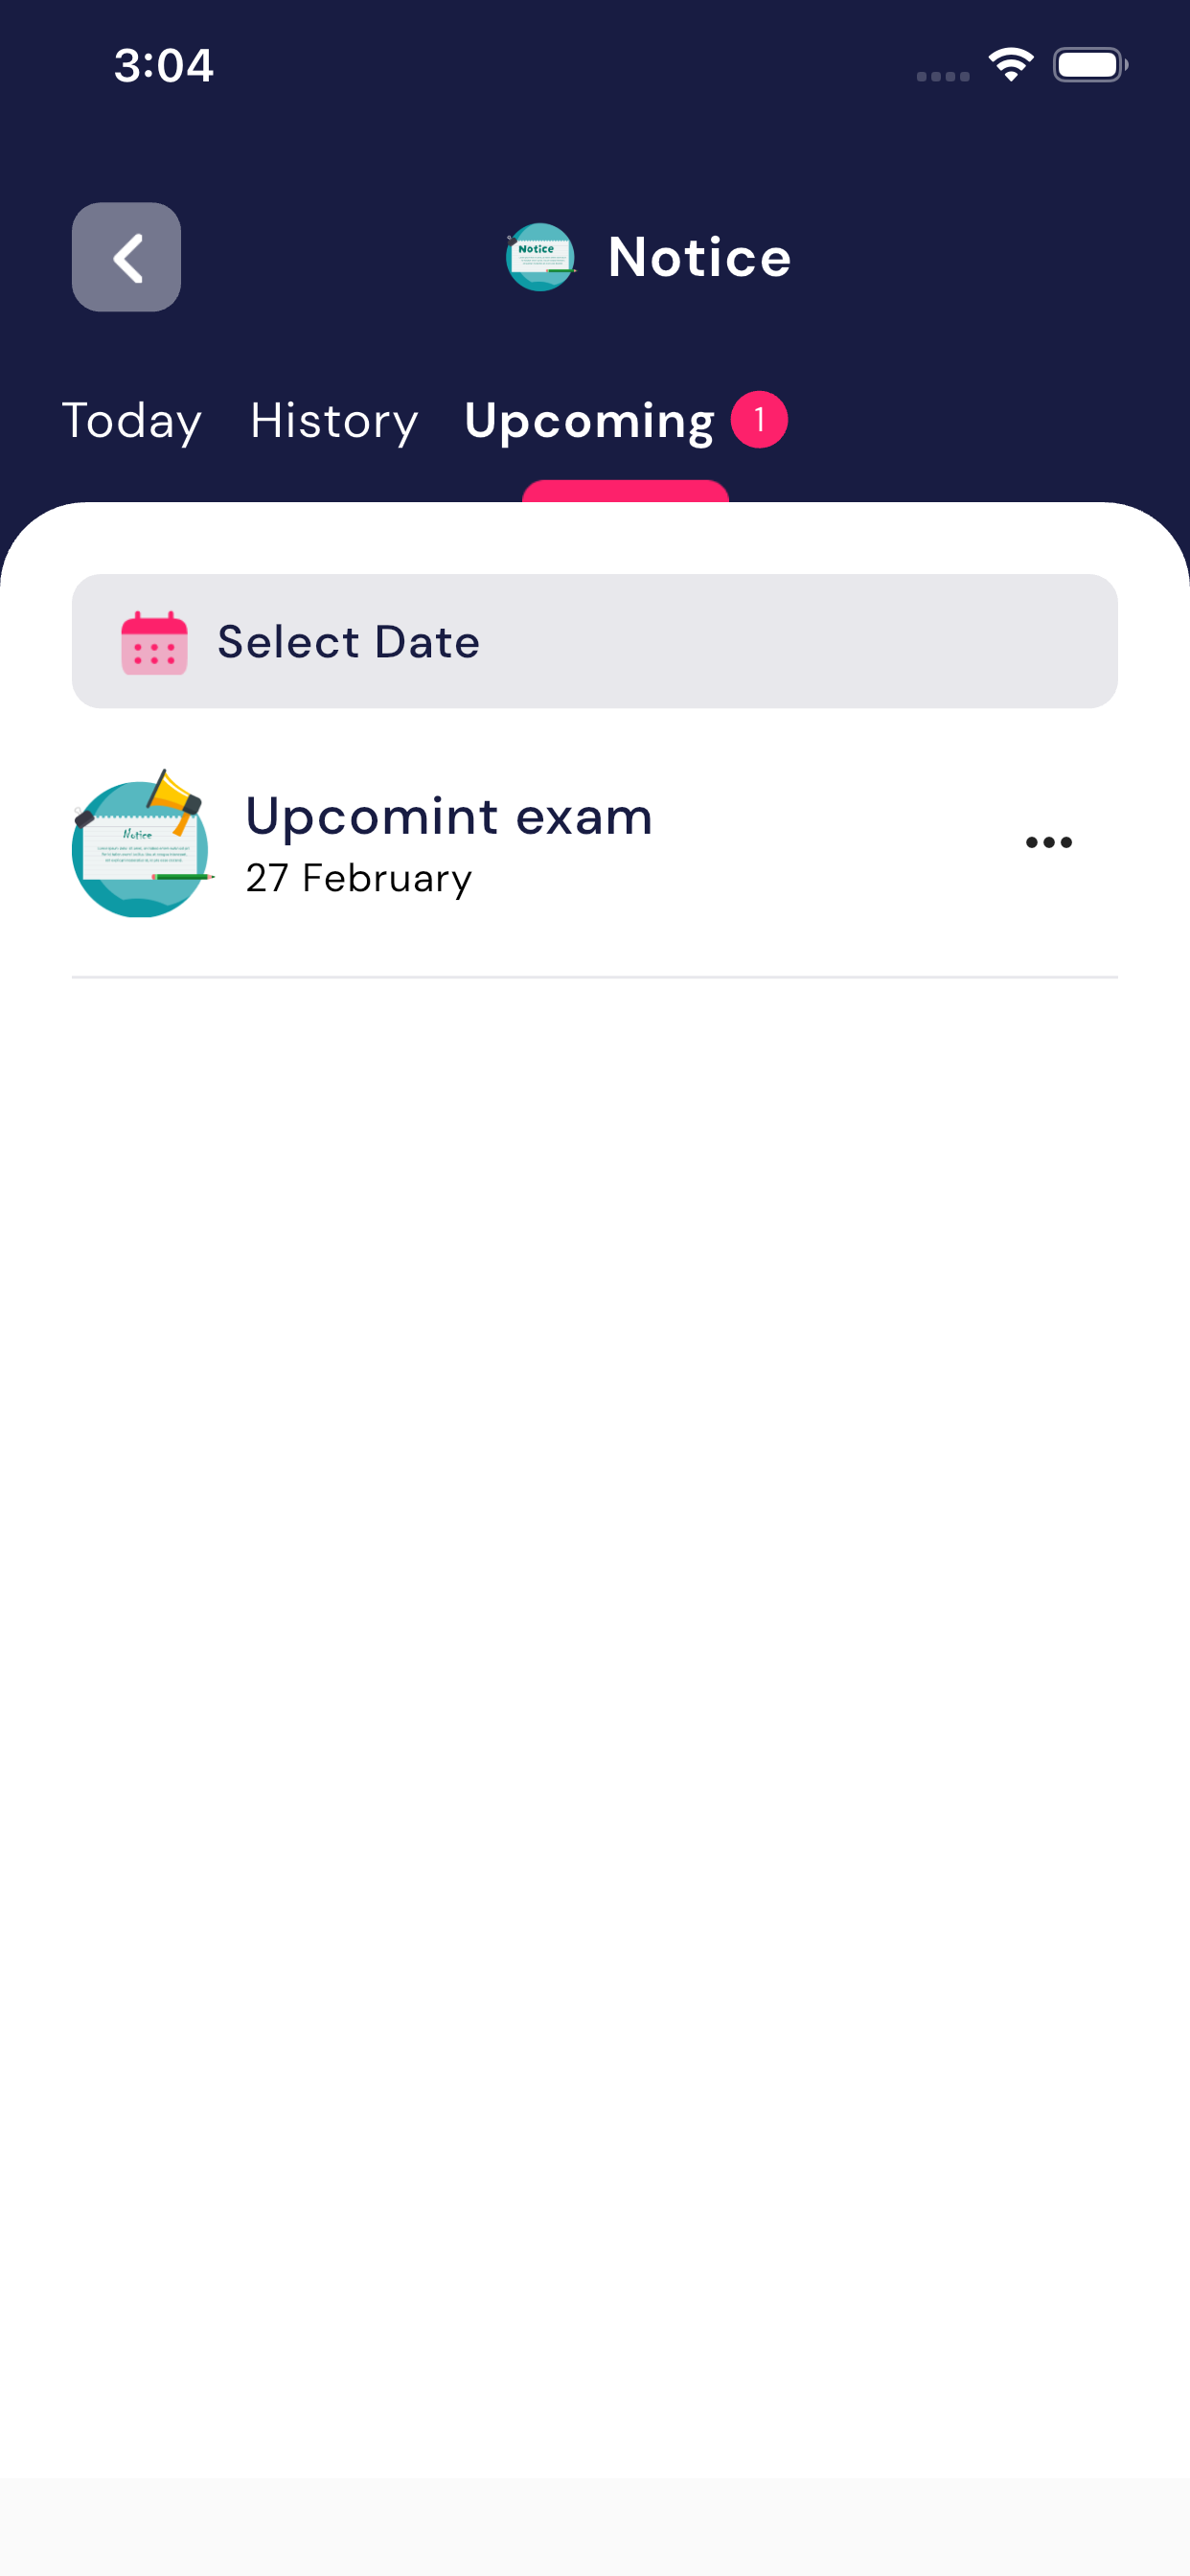
3. Upcoming Notices
- Shows notices scheduled for future dates.
- A count badge (🔴) shows the number of upcoming notices.
- Helps teachers and students prepare in advance for exams or events.
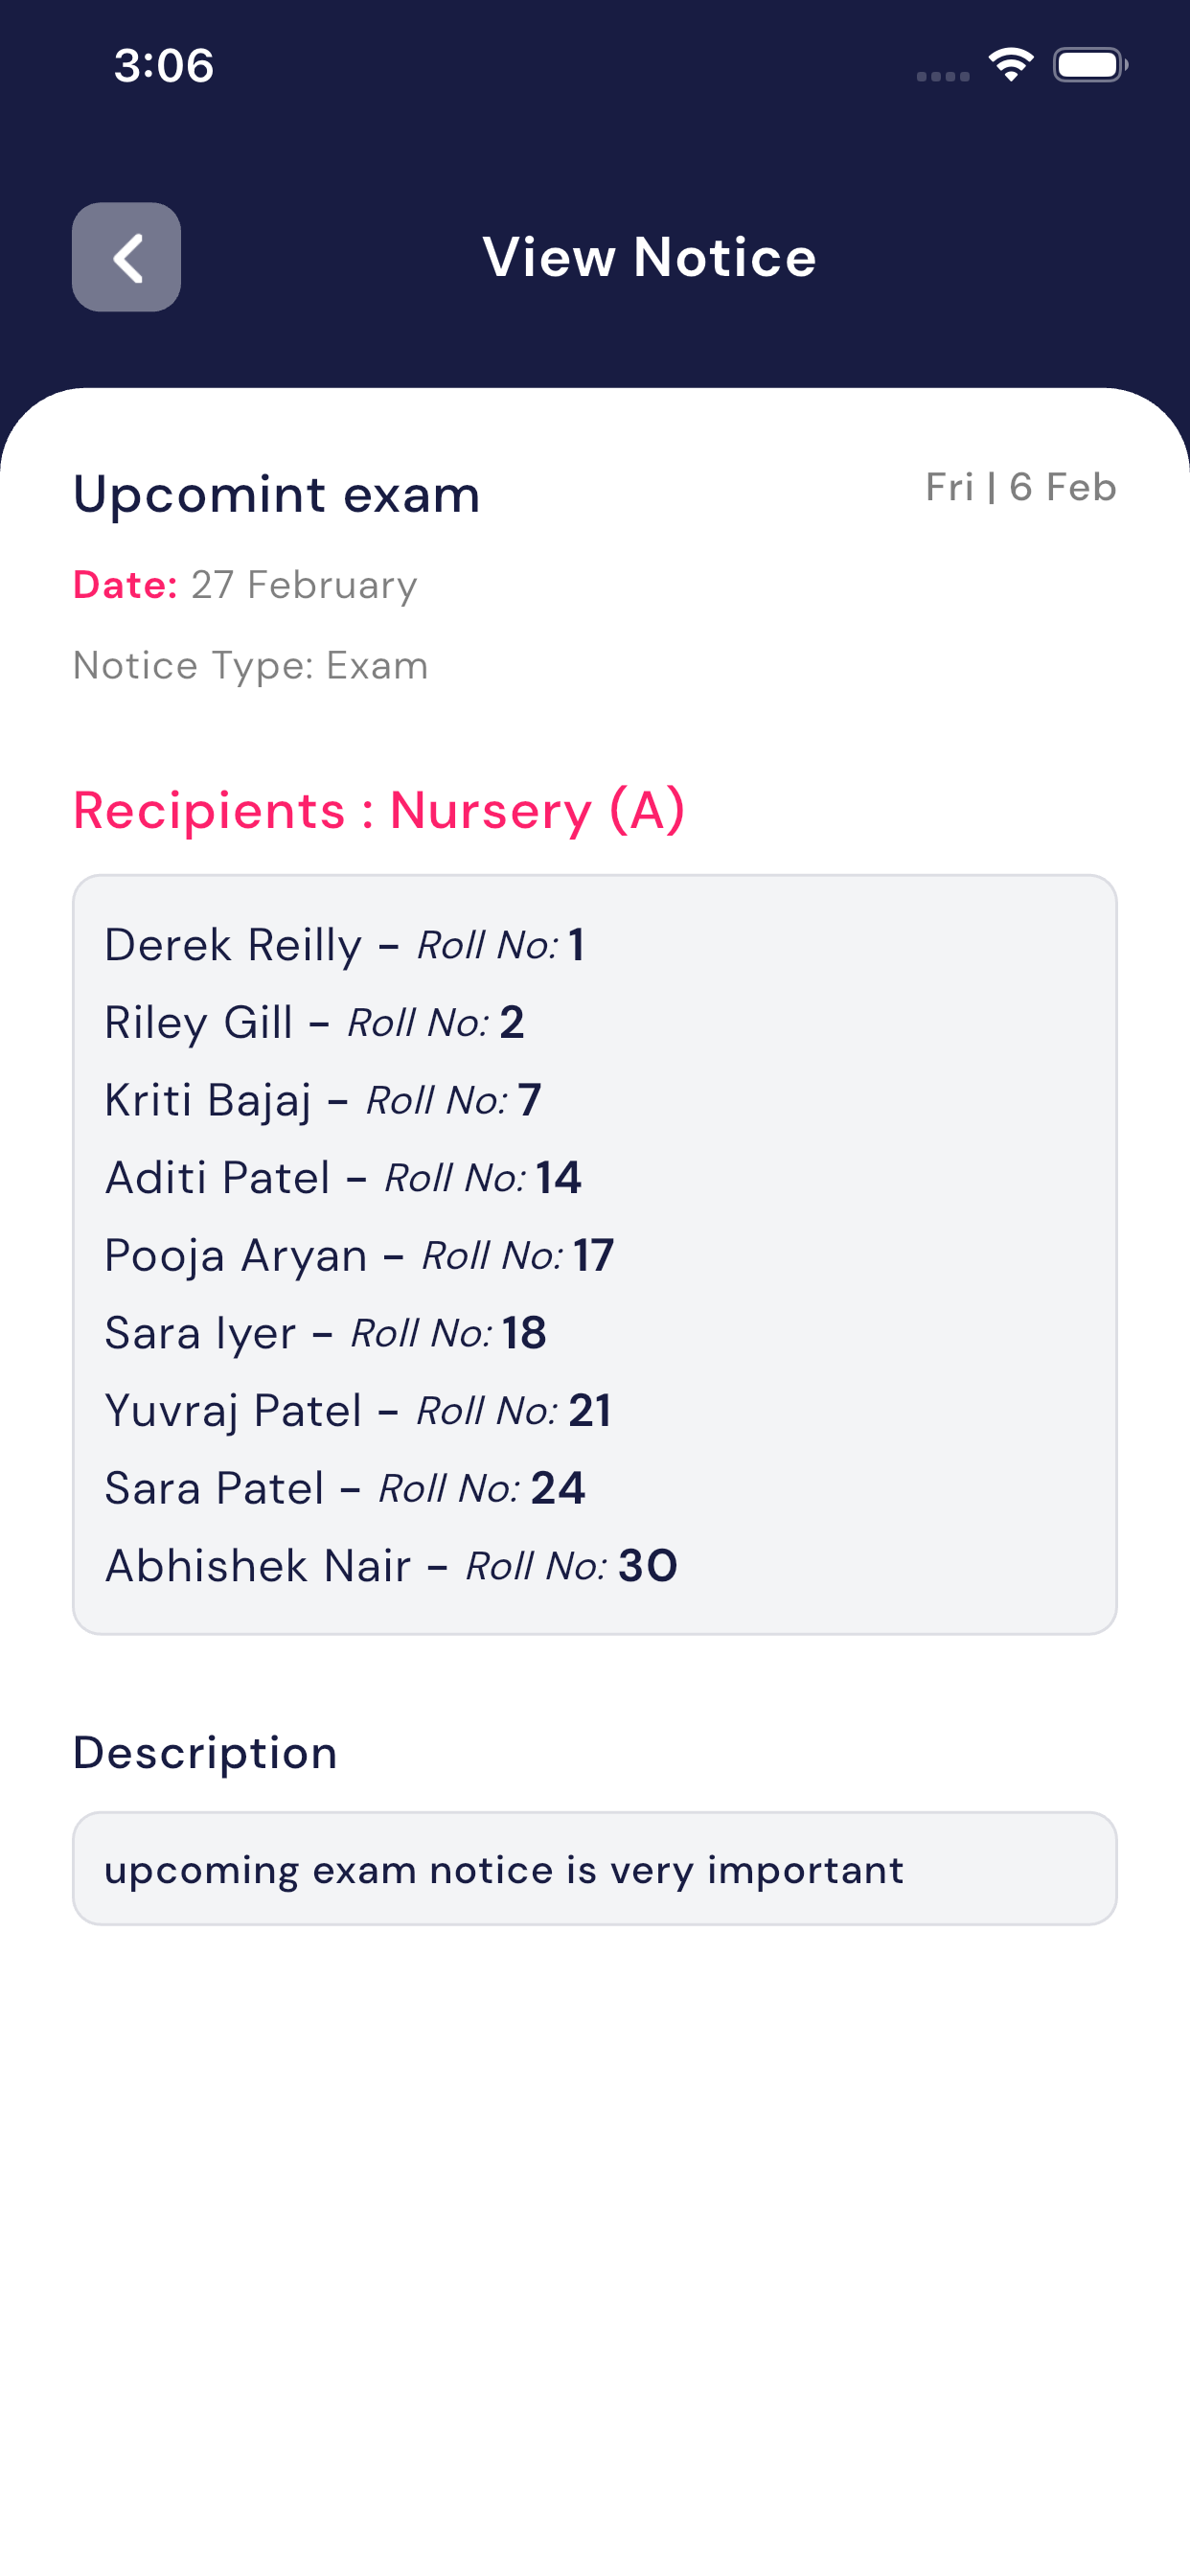
Viewing a Notice
- Tap on any notice from Today, History, or Upcoming list.
- The View Notice screen will open.
- Here you can see:
- Notice Title
- Date
- Notice Type (Important / General)
- Recipients (Class or selected students)
- Student Names with Roll Numbers
- Description (full notice details)
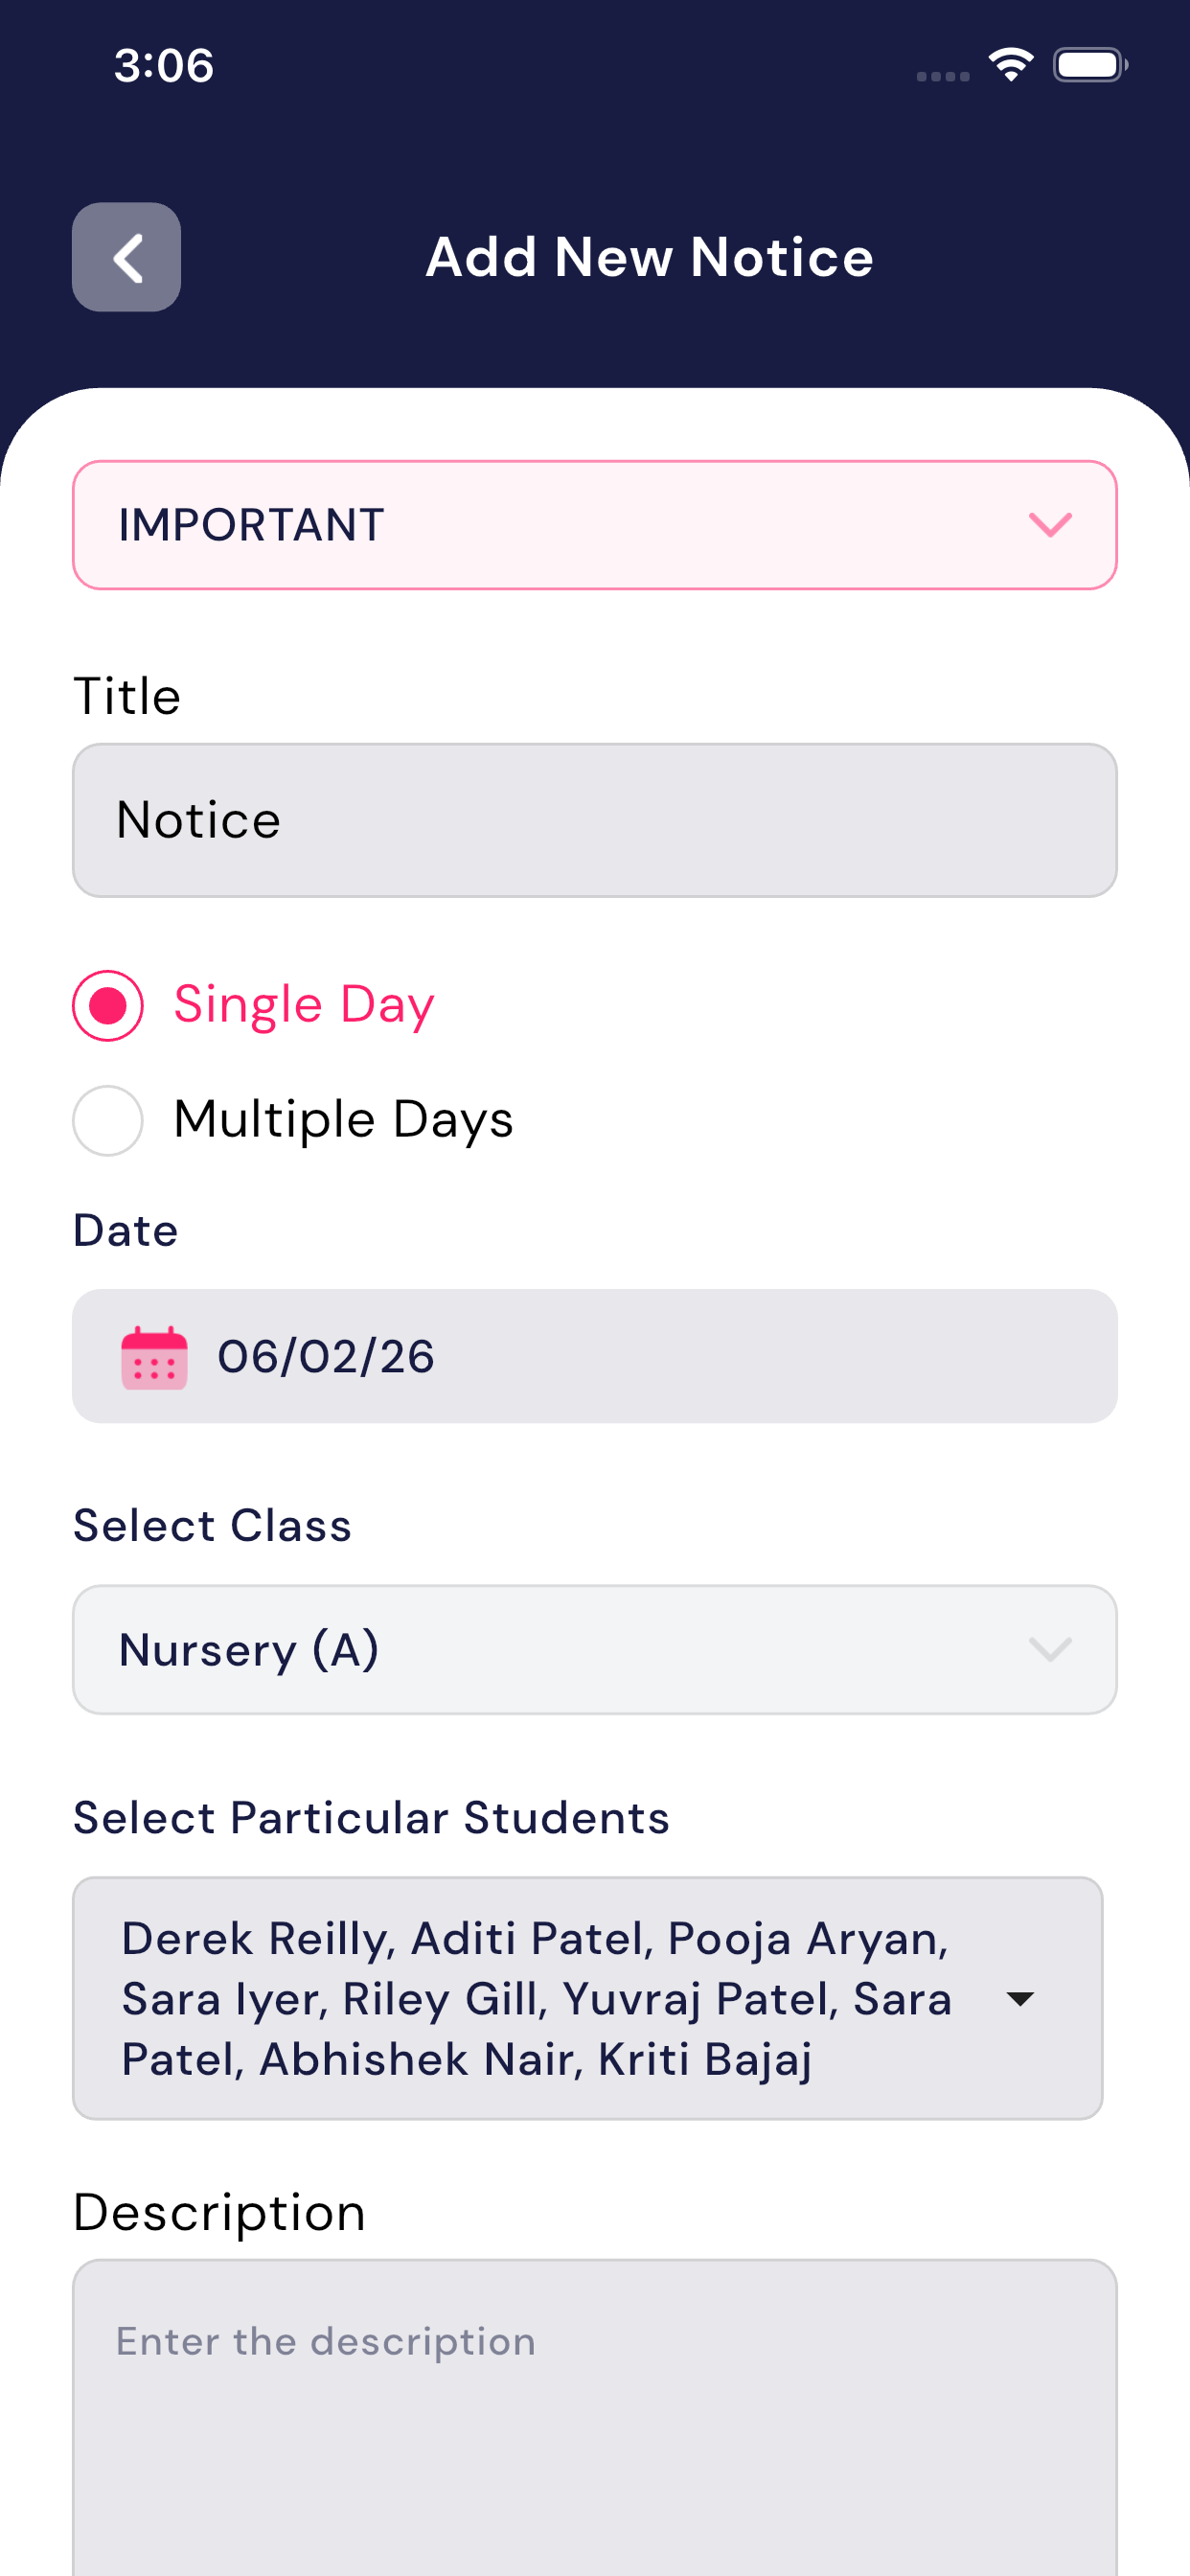
Adding a New Notice
- Tap on the Add New Notice button at the bottom of the Notice screen.
- Fill in the required details:
- Notice Title
- Notice Date
- Notice Type (e.g. Important)
- Select Class (e.g. Nursery A)
- Select Students (optional – specific students)
- Description (clear and detailed message)
- Review all details carefully.
- Tap Submit / Save to create the notice.
The notice will be visible to only the selected class or students.
Updating a Notice
- Open the notice you want to update.
- Tap on the three-dot menu (⋮).
- Select Edit / Update Notice.
- Make the required changes.
- Save the updates.
Only notices created by the teacher can be updated by the same teacher.
Key Rules & Limitations
- Teacherscannot create notices for the entire school.
- Notices are student-oriented (class-wise or student-wise).
- Make sure the notice description is clear and easy to understand.
- Always verify the date to ensure the notice appears in the correct tab (Today / Upcoming).
Best Practices
- Use clear titles like “Mid-Term Examination Schedule” or“Holiday Notice – Maha Shivratri”.
- Keep descriptions simple and informative.
- For urgent matters, mark the notice type asImportant.
- Check the Upcoming tab regularly to avoid missing scheduled notices.

5.5 Student’s Leave
Overview
The Student’s Leave module allows students to request leave and teachers toapprove or reject those requests. Teachers can also view complete leave history of each student. This process helps maintain proper attendance records and clear communication.
Important:
- Every leave request must beapproved or rejected by the teacher.
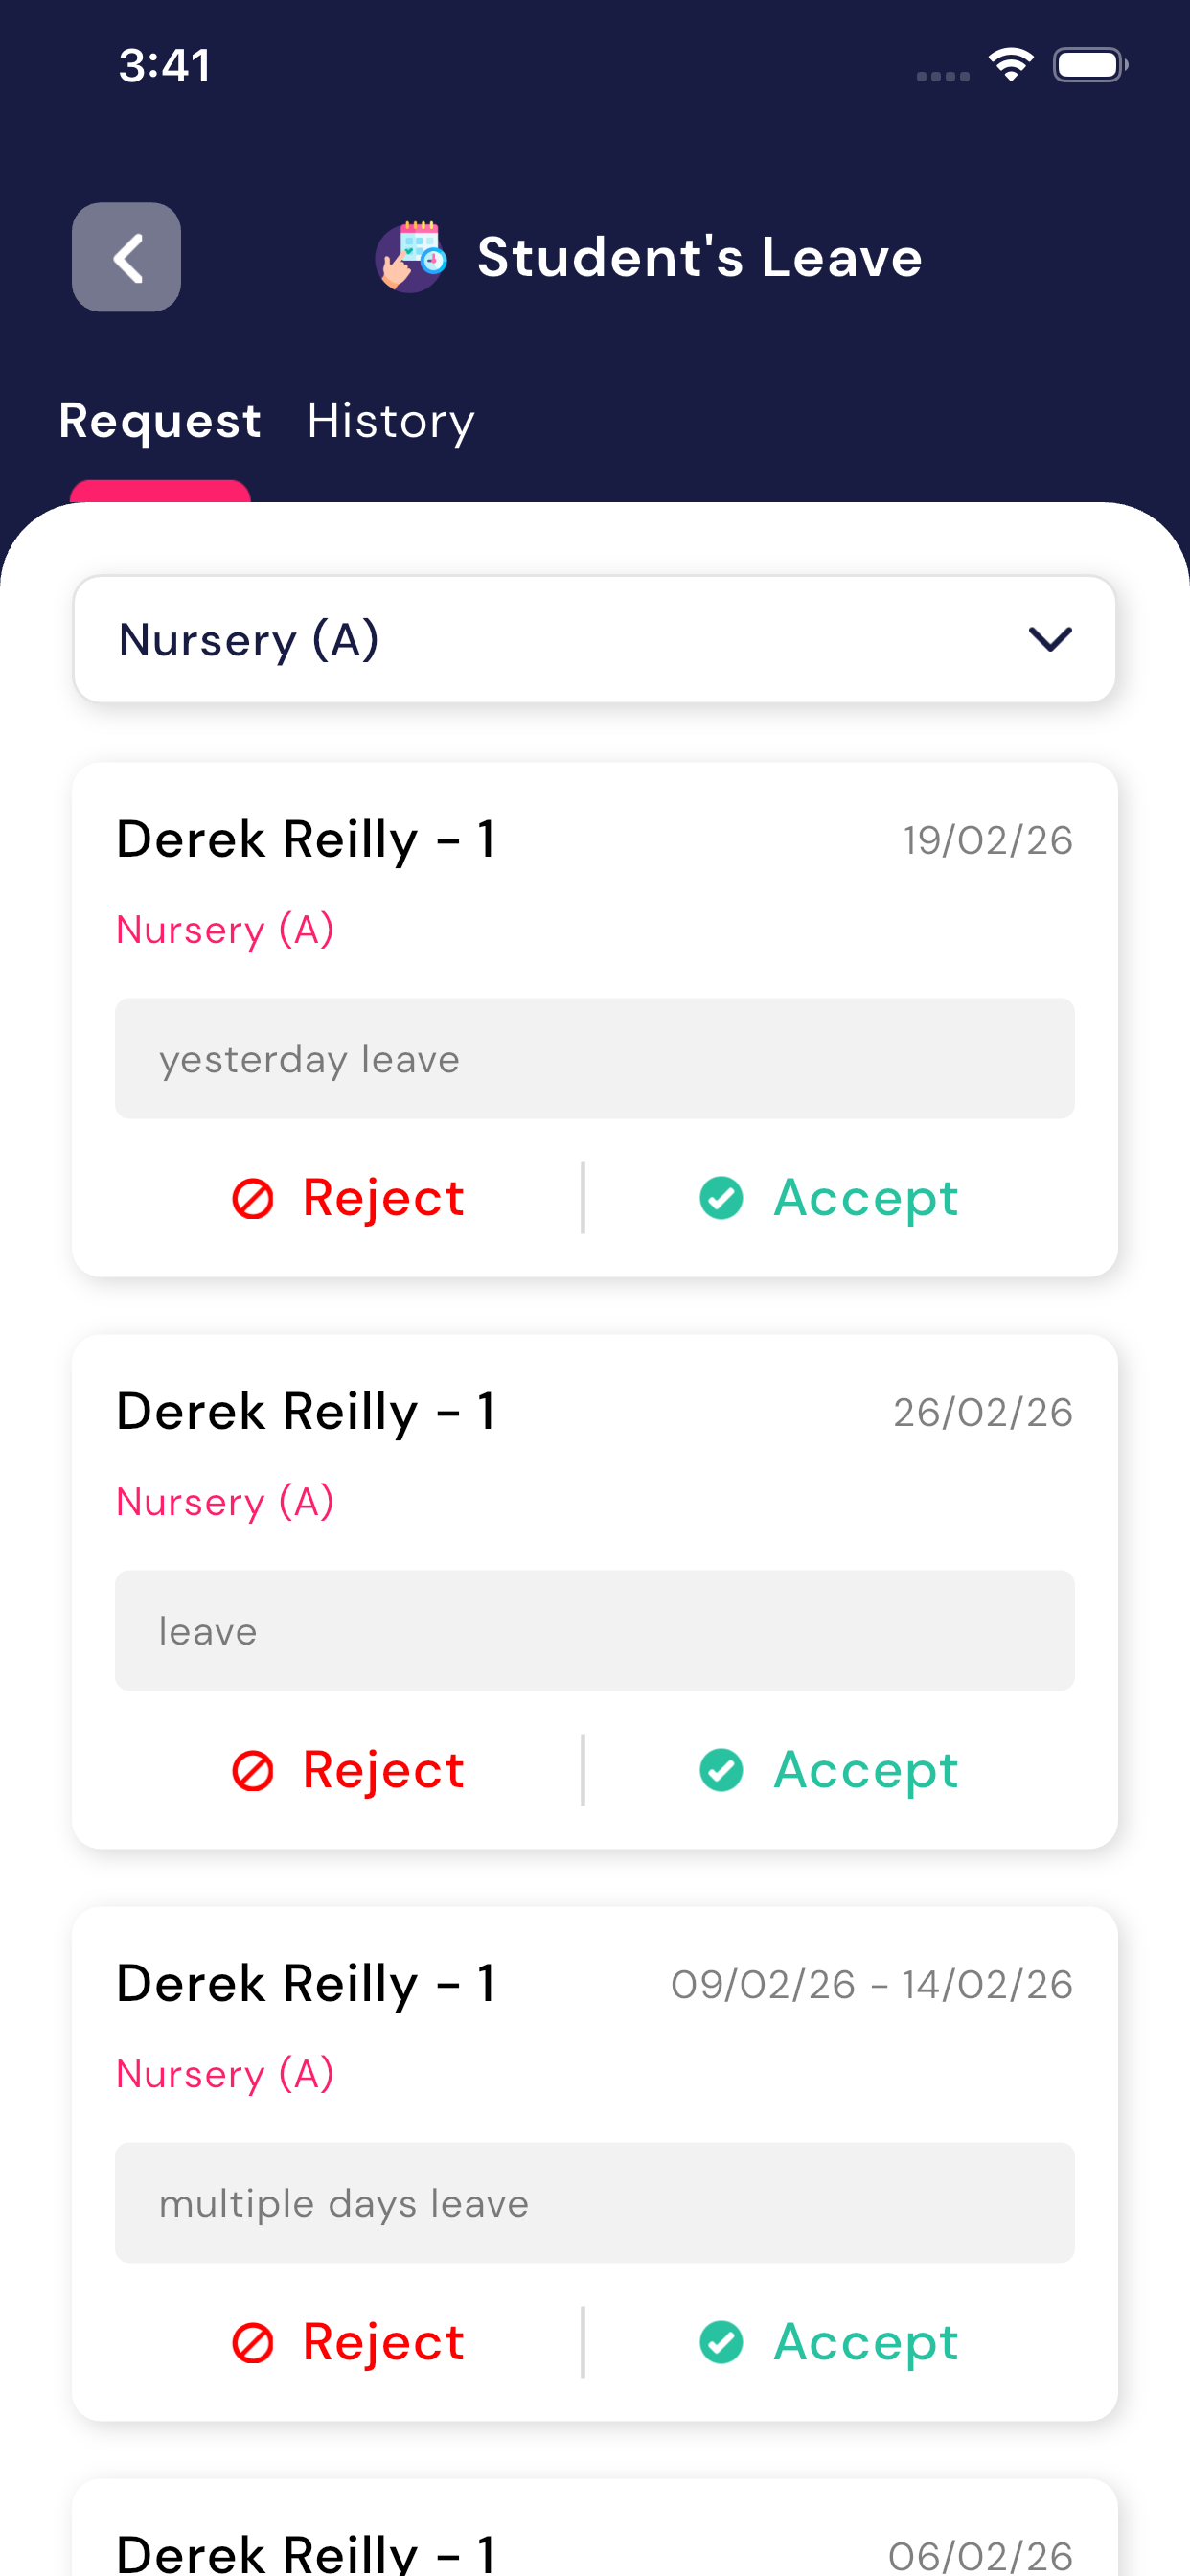
5.5.1 Student Leave – Request List Screen
When the teacher opens Student’s Leave, theRequest tab is shown by default.
On this screen, the teacher can see:
- Class selection dropdown (example: Nursery (A))
- List of students who have requested leave
- Leave reason entered by the student
- Leave date (single day or multiple days)
- Two action buttons: Accept andReject
Each leave card displays:
- Student Name & Roll Number
- Class Name
- Leave Date(s)
- Leave Reason
5.5.2 Approve or Reject Leave
For every leave request, the teacher has two options:
- Accept ✅
If the leave is valid, tap on Accept. The leave status will change to Approved.
- Reject ❌
If the leave is not valid, tap on Reject. The leave status will change to Rejected.
Once action is taken, the request is removed from theRequest list and moved to History.
5.5.3 Types of Leave Supported
The system supports different types of student leave:
- Single Day Leave (example: 19/02/26)
- Multiple Days Leave (example: 09/02/26 – 14/02/26)
All leave types follow the same approval process.
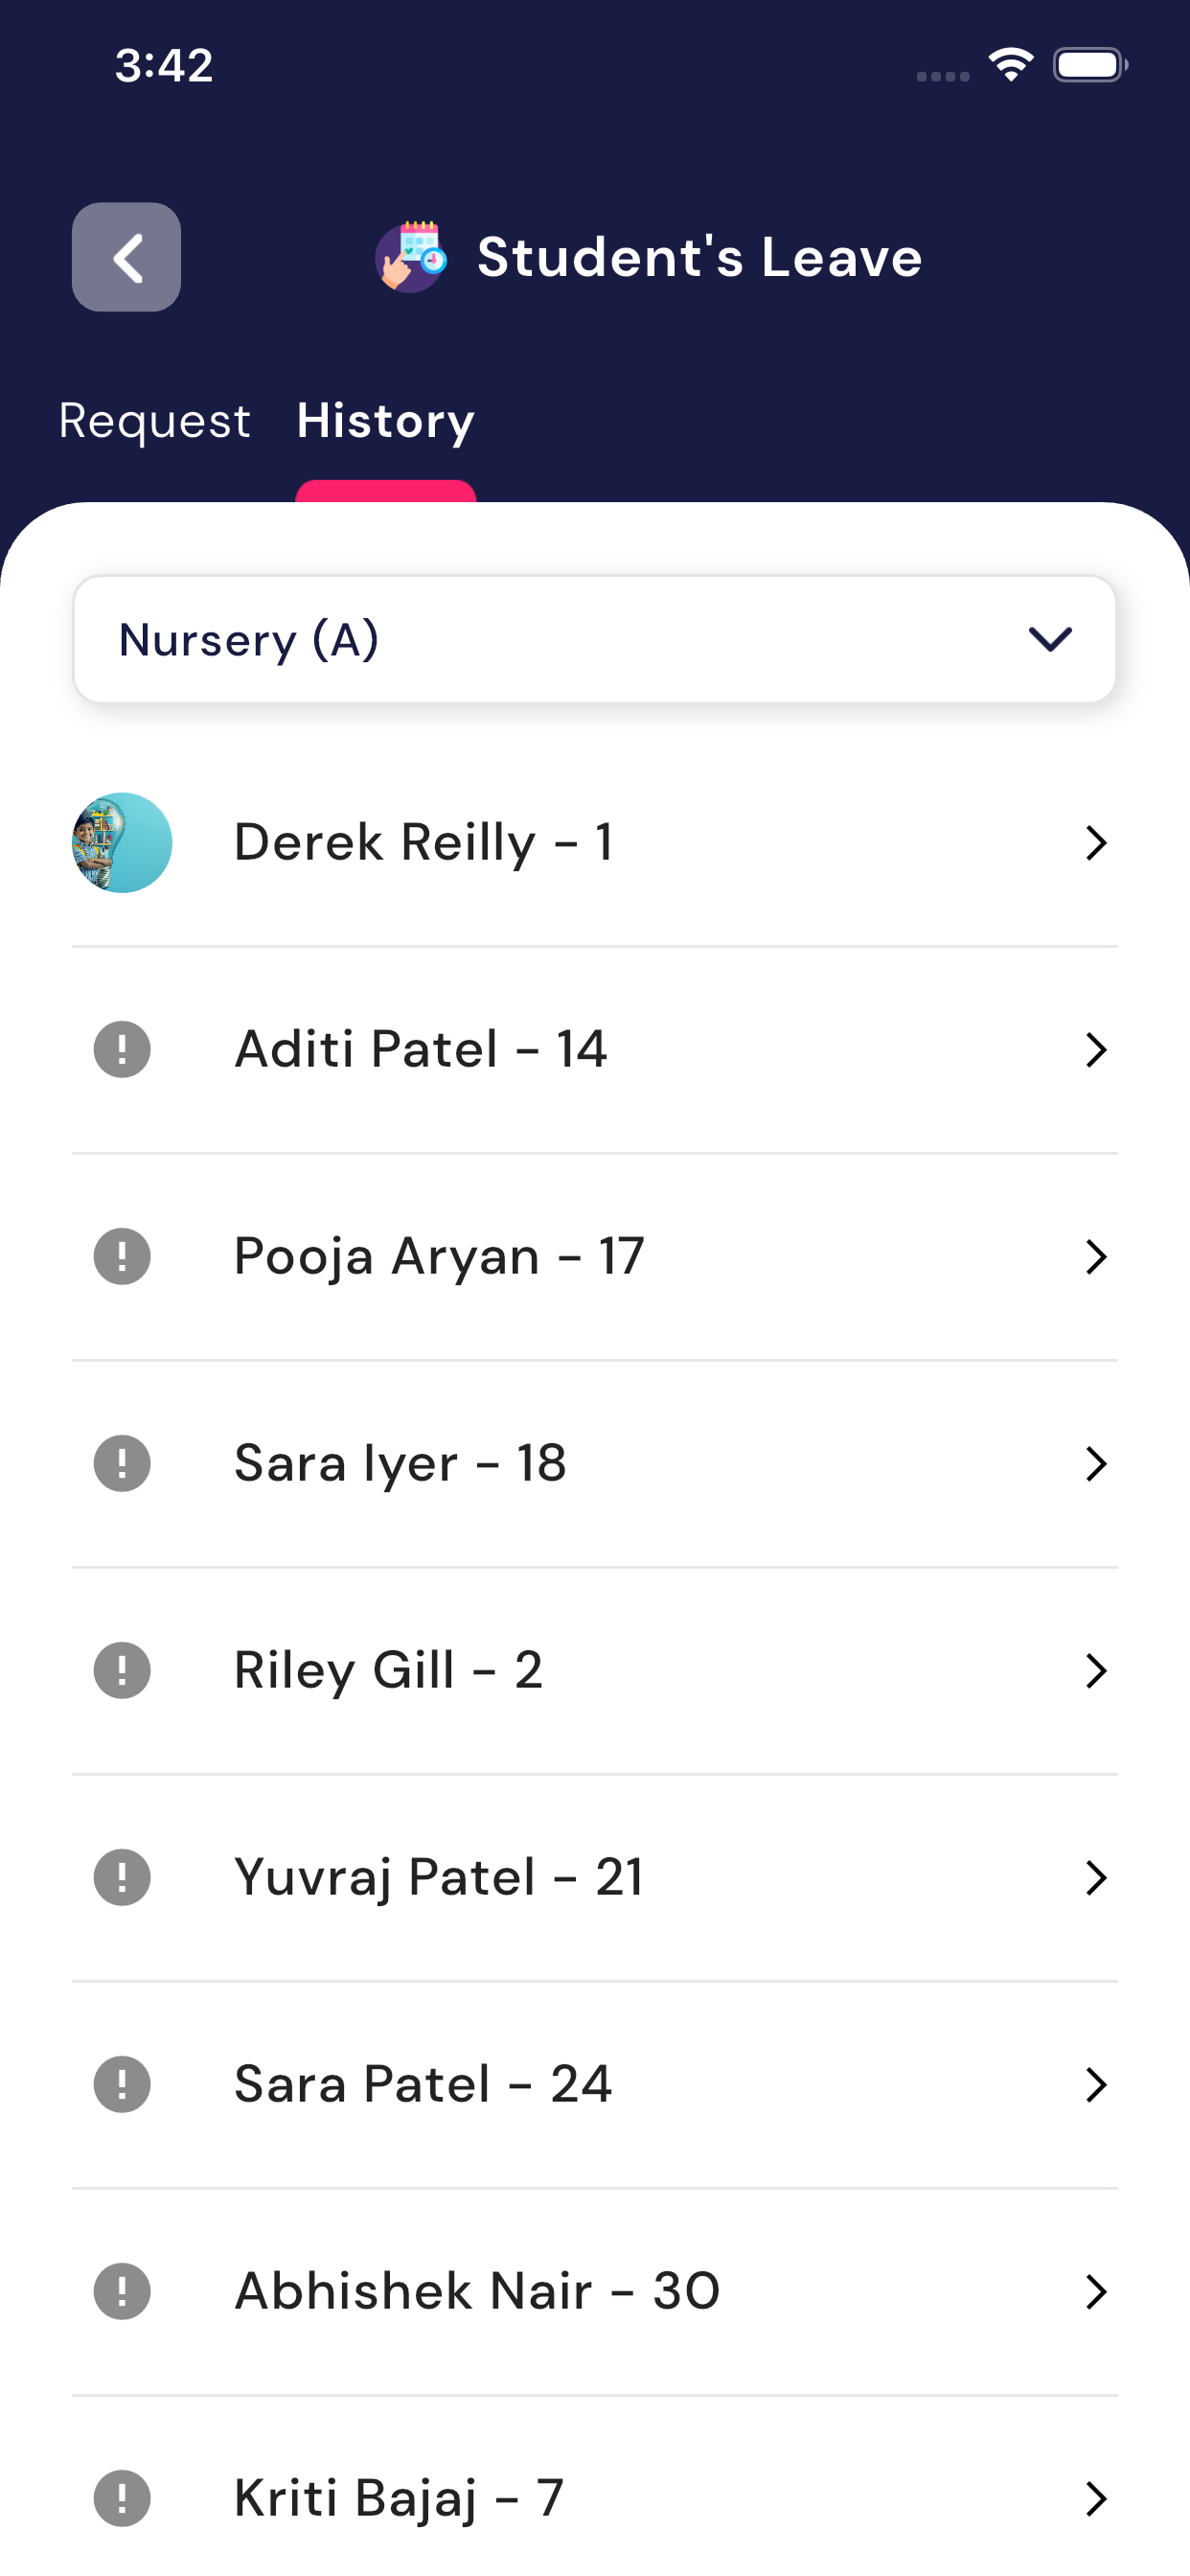
5.5.4 Leave History Screen
Teachers can switch to the History tab to view past leave records.
On the History screen, the teacher can see:
- Total Approved leaves
- Total Pending leaves
- Total Rejected leaves
- Month-wise filter (example: February-2026)
Each record shows:
- Student Name & Roll Number
- Leave Date(s)
- Leave Reason
- Current Leave Status (Pending / Approved / Rejected)
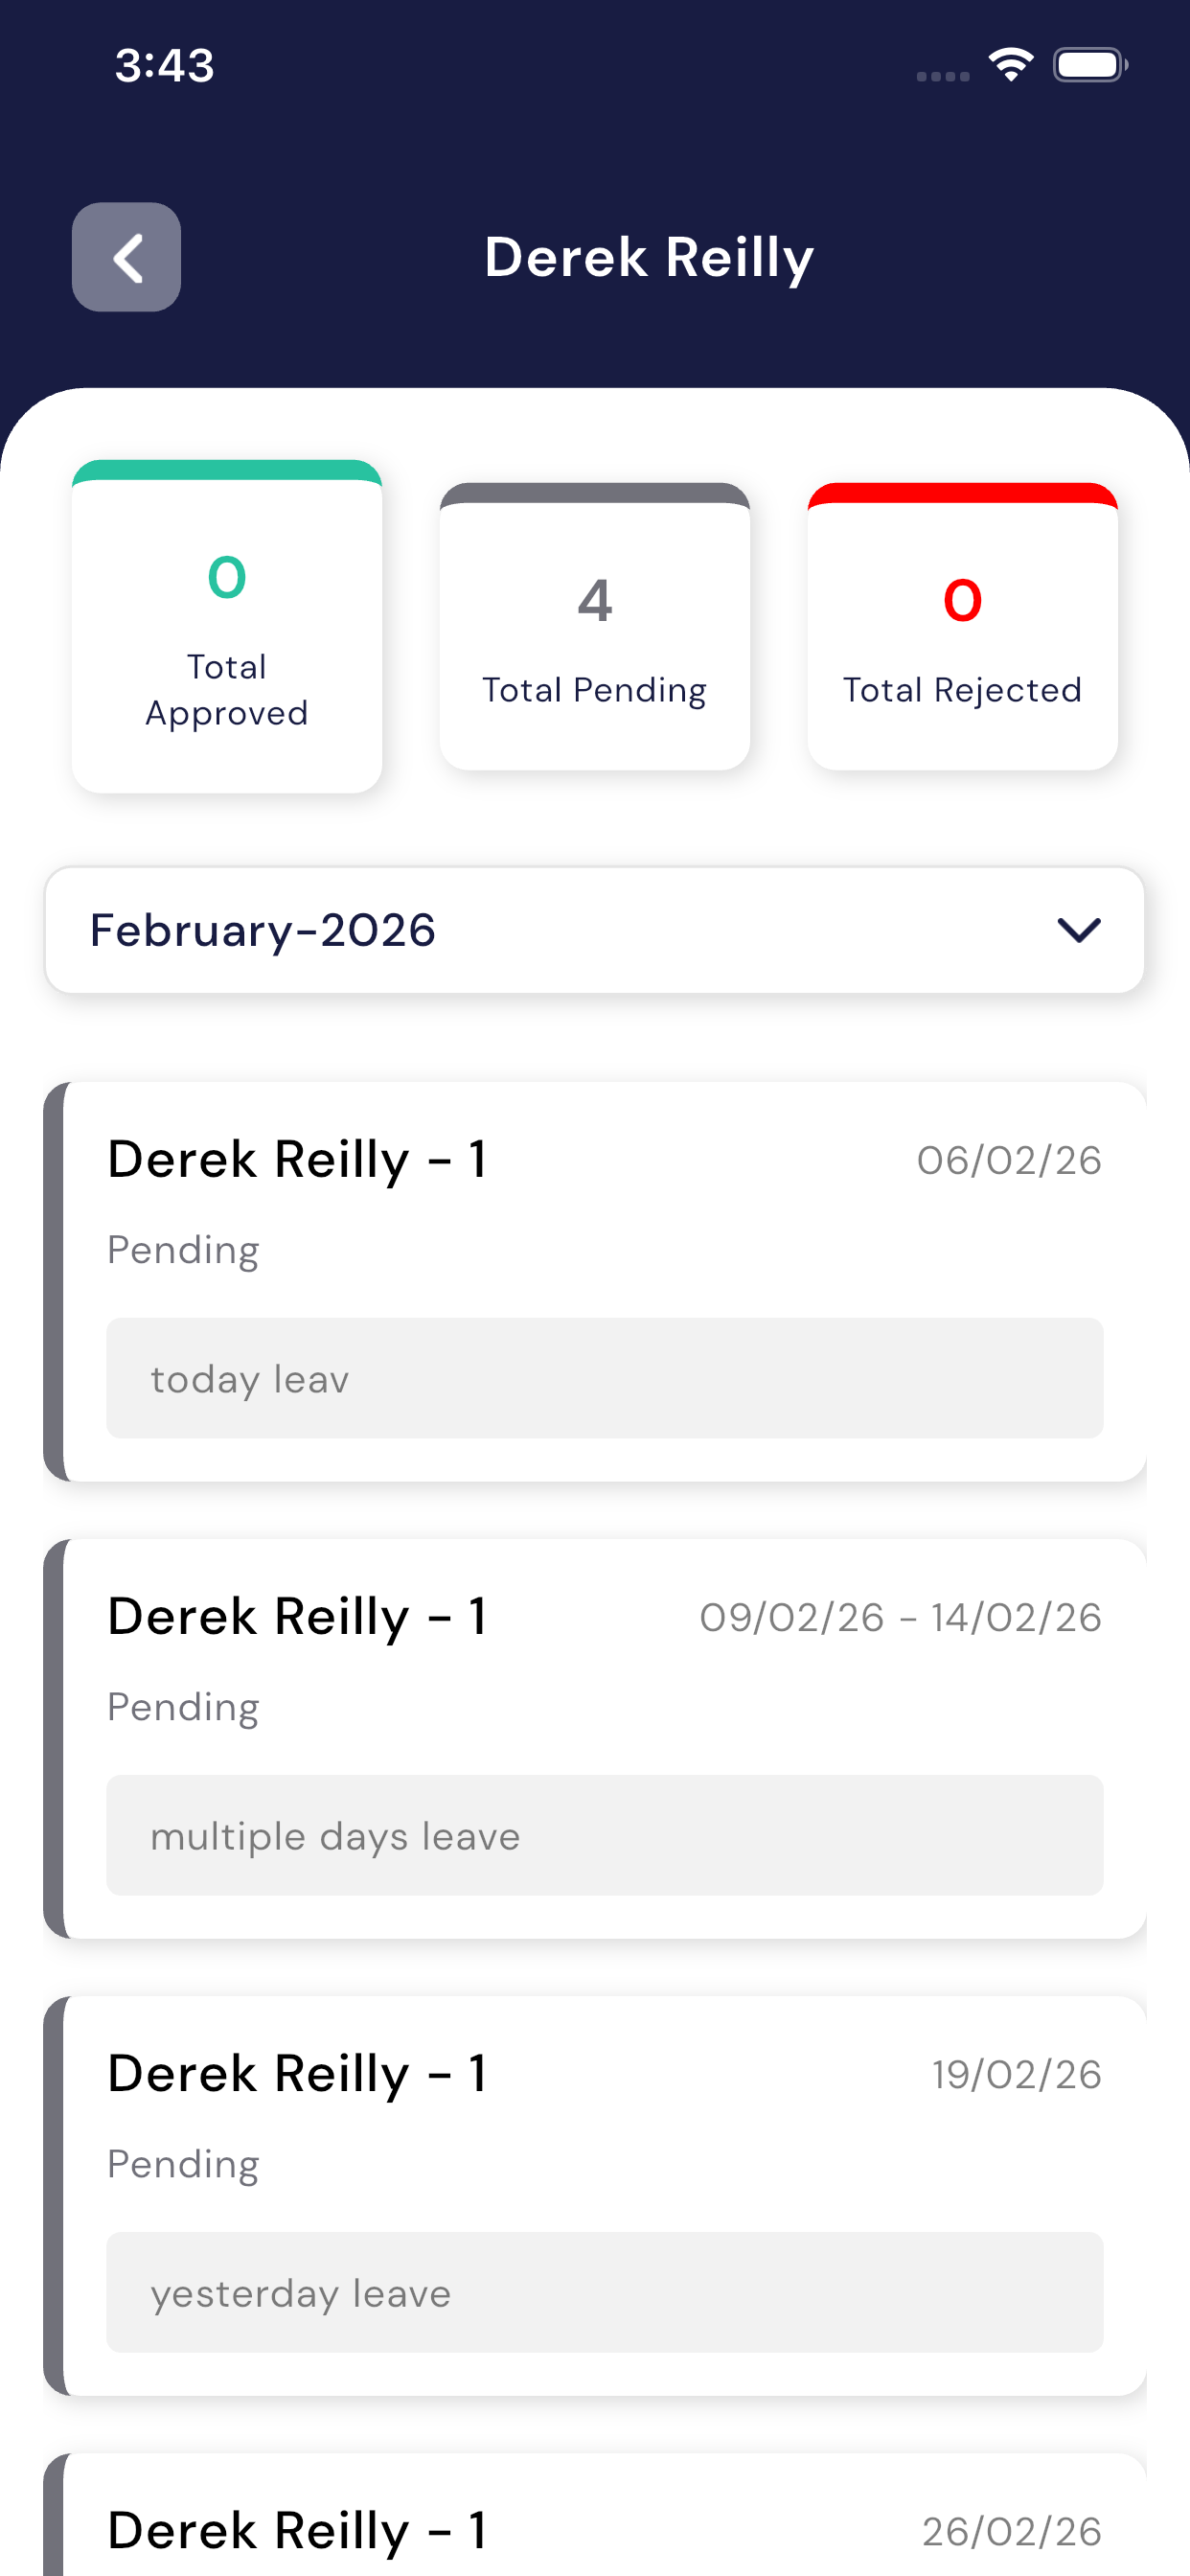
5.5.5 Student-wise Leave Summary
When a teacher opens a specific student’s leave history:
- A summary is displayed at the top
- Total Approved
- Total Pending
- Total Rejected
- Below the summary, all leave requests of that student are shown month-wise
This helps teachers easily track attendance patterns for each student.
Key Points for Teachers
- Students must always send a leave request first
- Teachers must approve or reject each request
- Leave history is automatically maintained
- Both single-day and multiple-day leaves are supported
- Approved leaves reflect in student attendance records
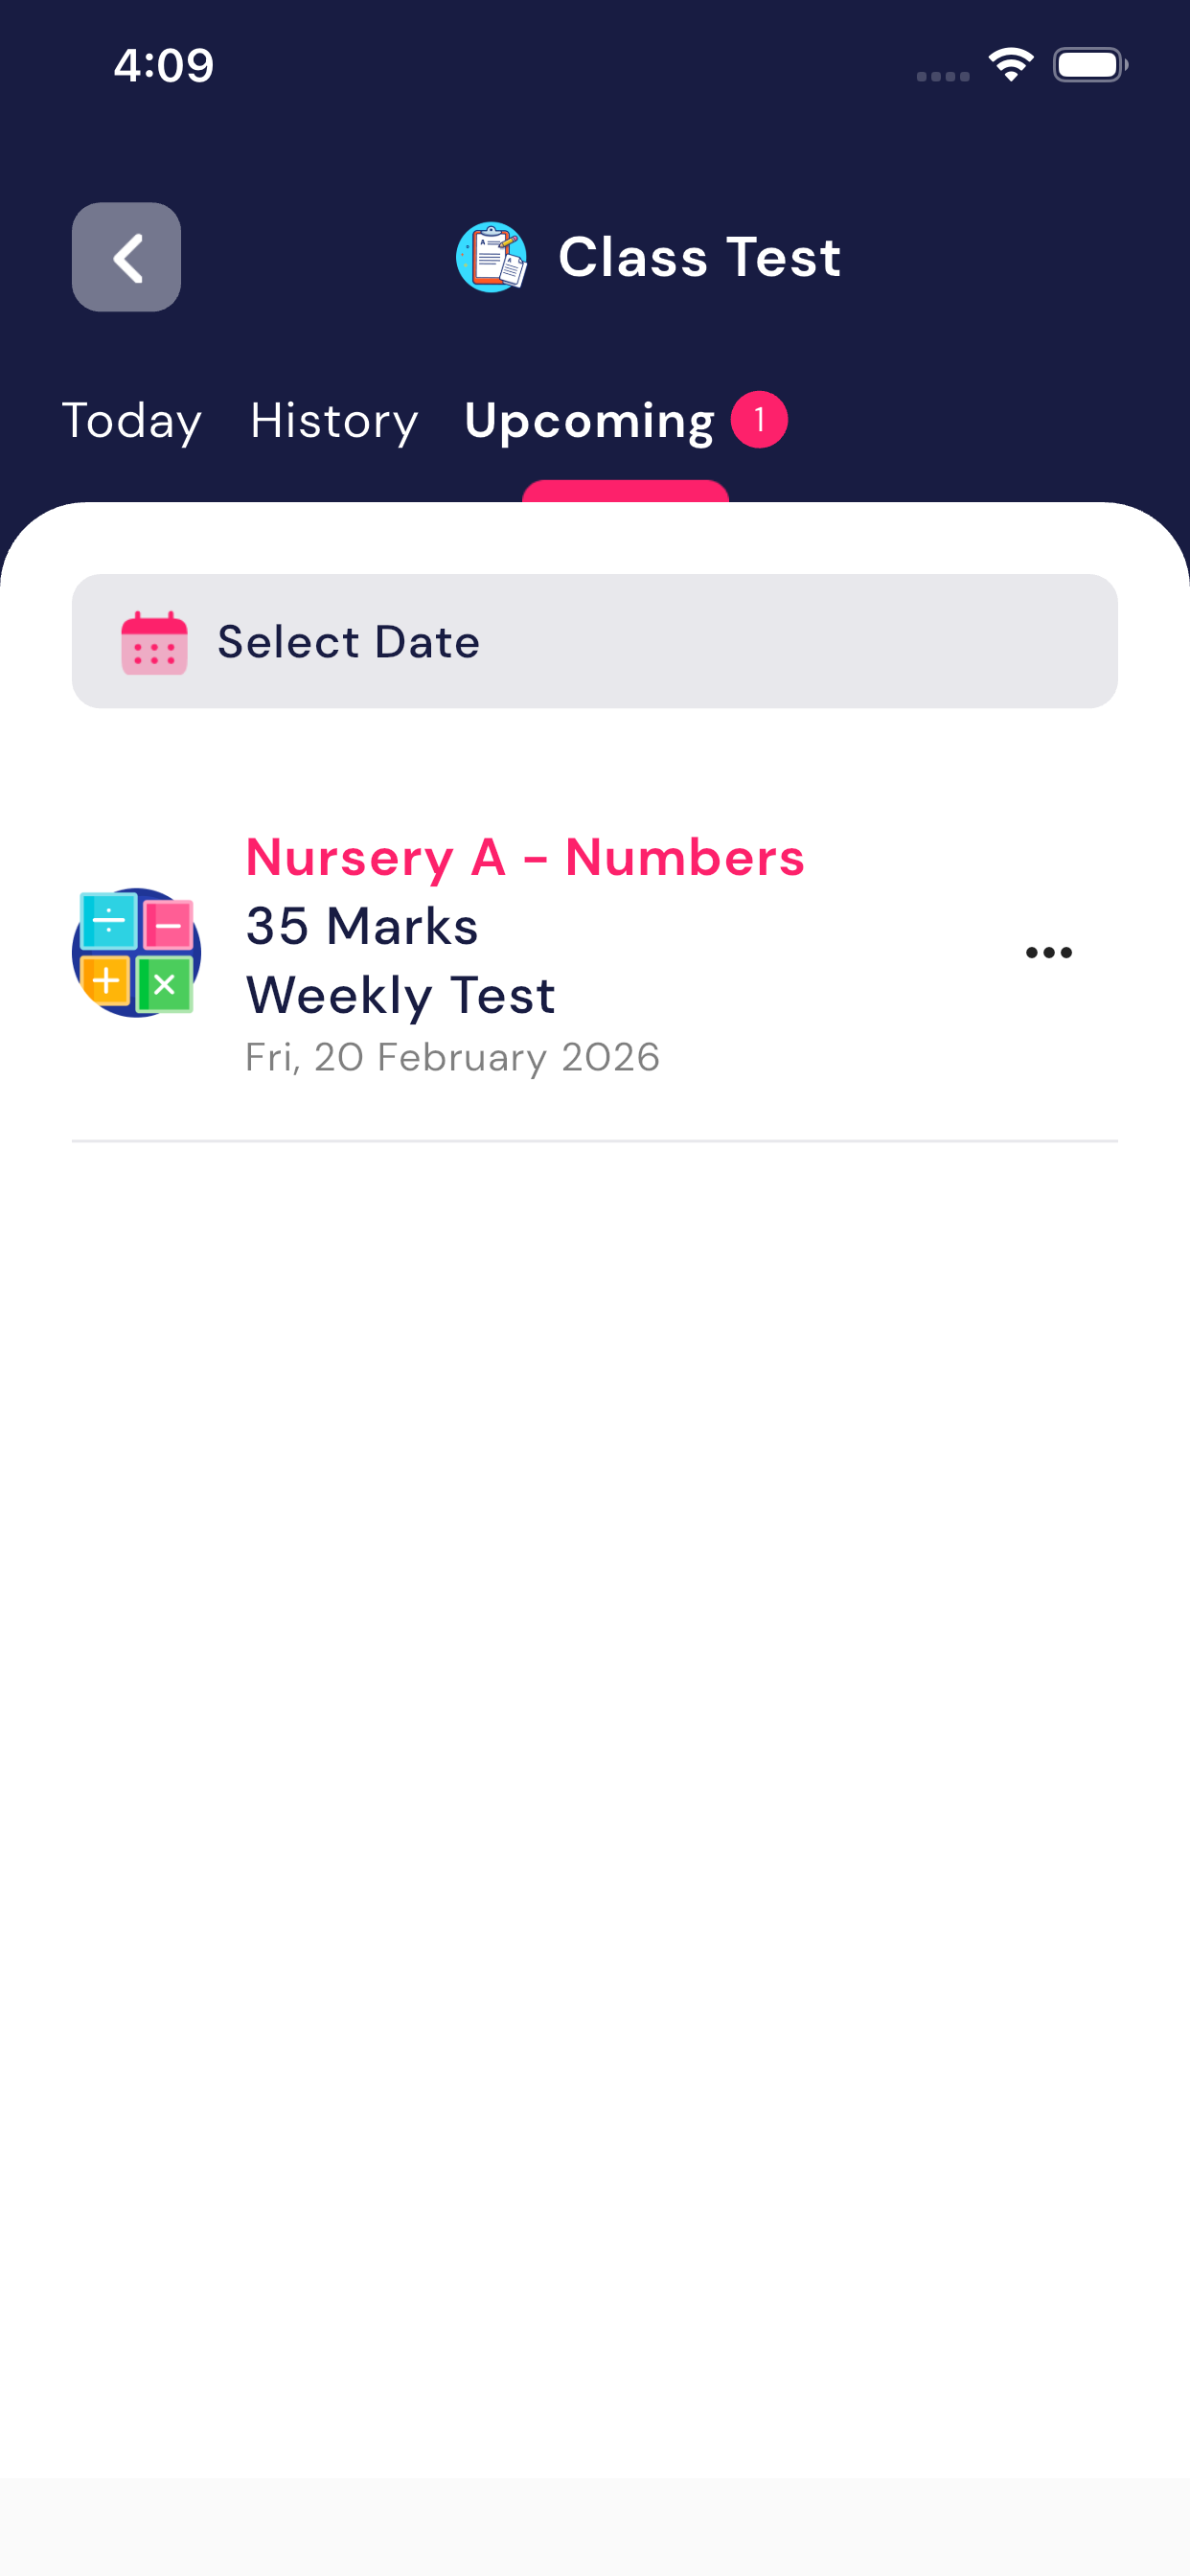
5.6 Class Test
Teachers can manage class tests.
Purpose of the Module
This module helps teachers to:
- Create class-wise class tests
- Make tests visible to students and parents
- Enter and update marks after the test
- Show marks and test details to students
- View tests underToday, History, and Upcoming tabs
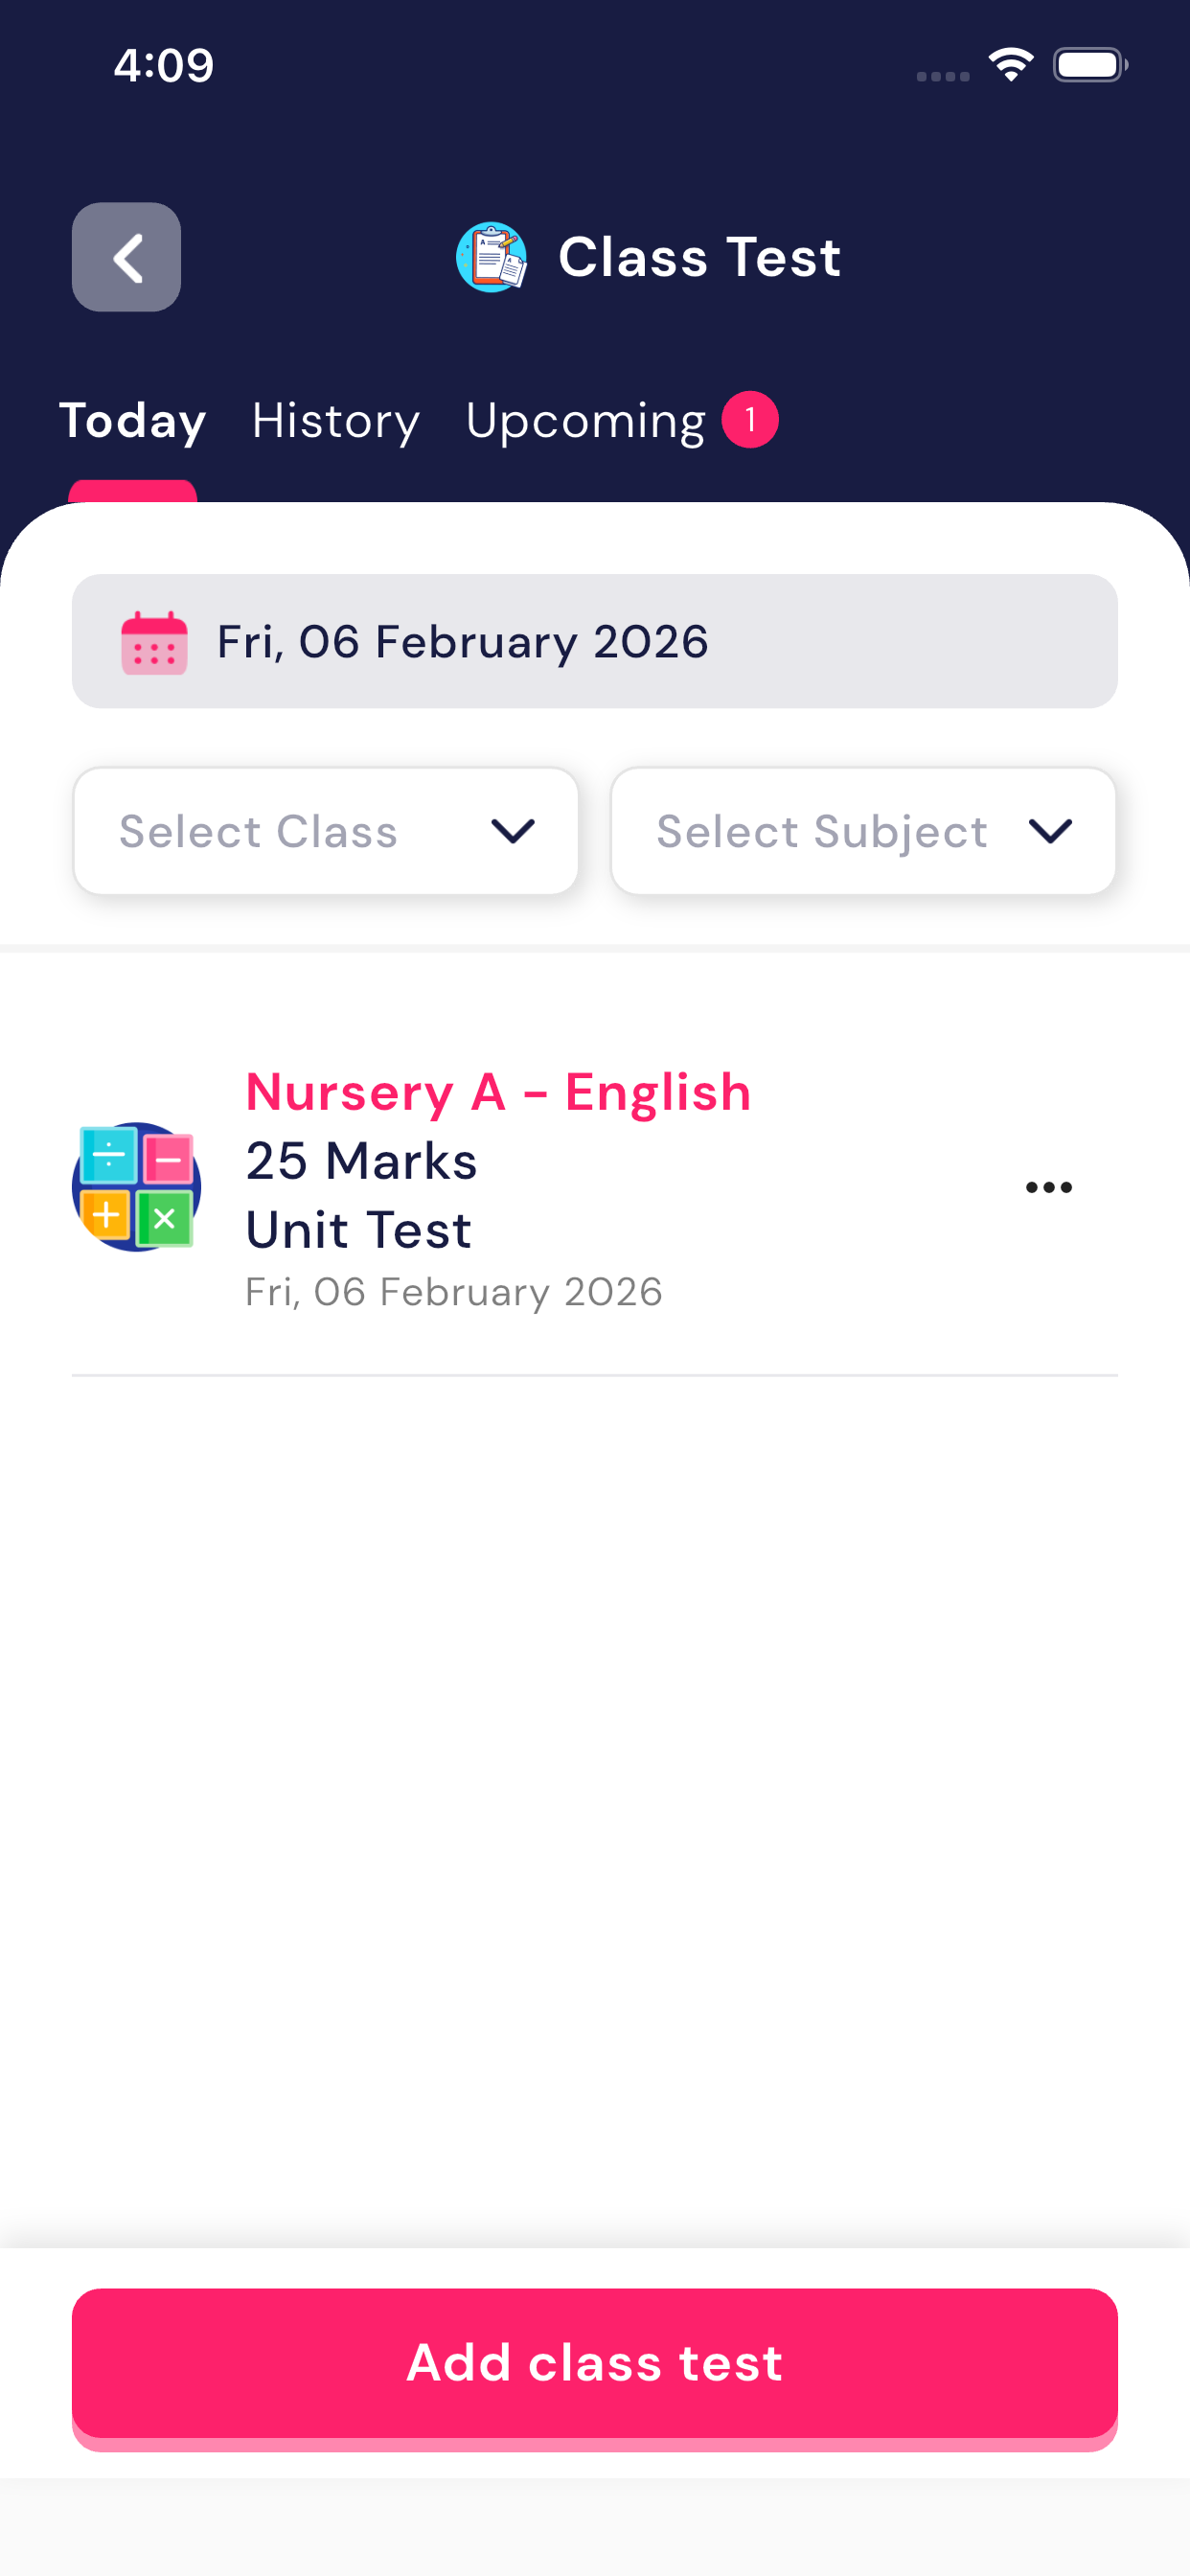
Class Test Screen Overview
The Class Test screen contains three tabs at the top:
- Today
- Shows class tests scheduled for today
- History
- Shows class tests that have already beencompleted
- Upcoming
- Shows future class tests scheduled for upcoming dates
How to Create a New Class Test
Teachers can create a new class test by following the steps below:
- Tap on the Add Class Test button
- Select the test date
- Select the class (e.g., Nursery A)
- Select the subject (e.g., English, Numbers)
- Choose the Test Type (Unit Test / Weekly Test)
- Enter the Total Marks
- (Optional) Add a Description
- Tap on Save / Add Class Test
After creating the test:
- The test will be visible to students and parents
- Based on the selected date, the test will appear under theToday or Upcoming tab
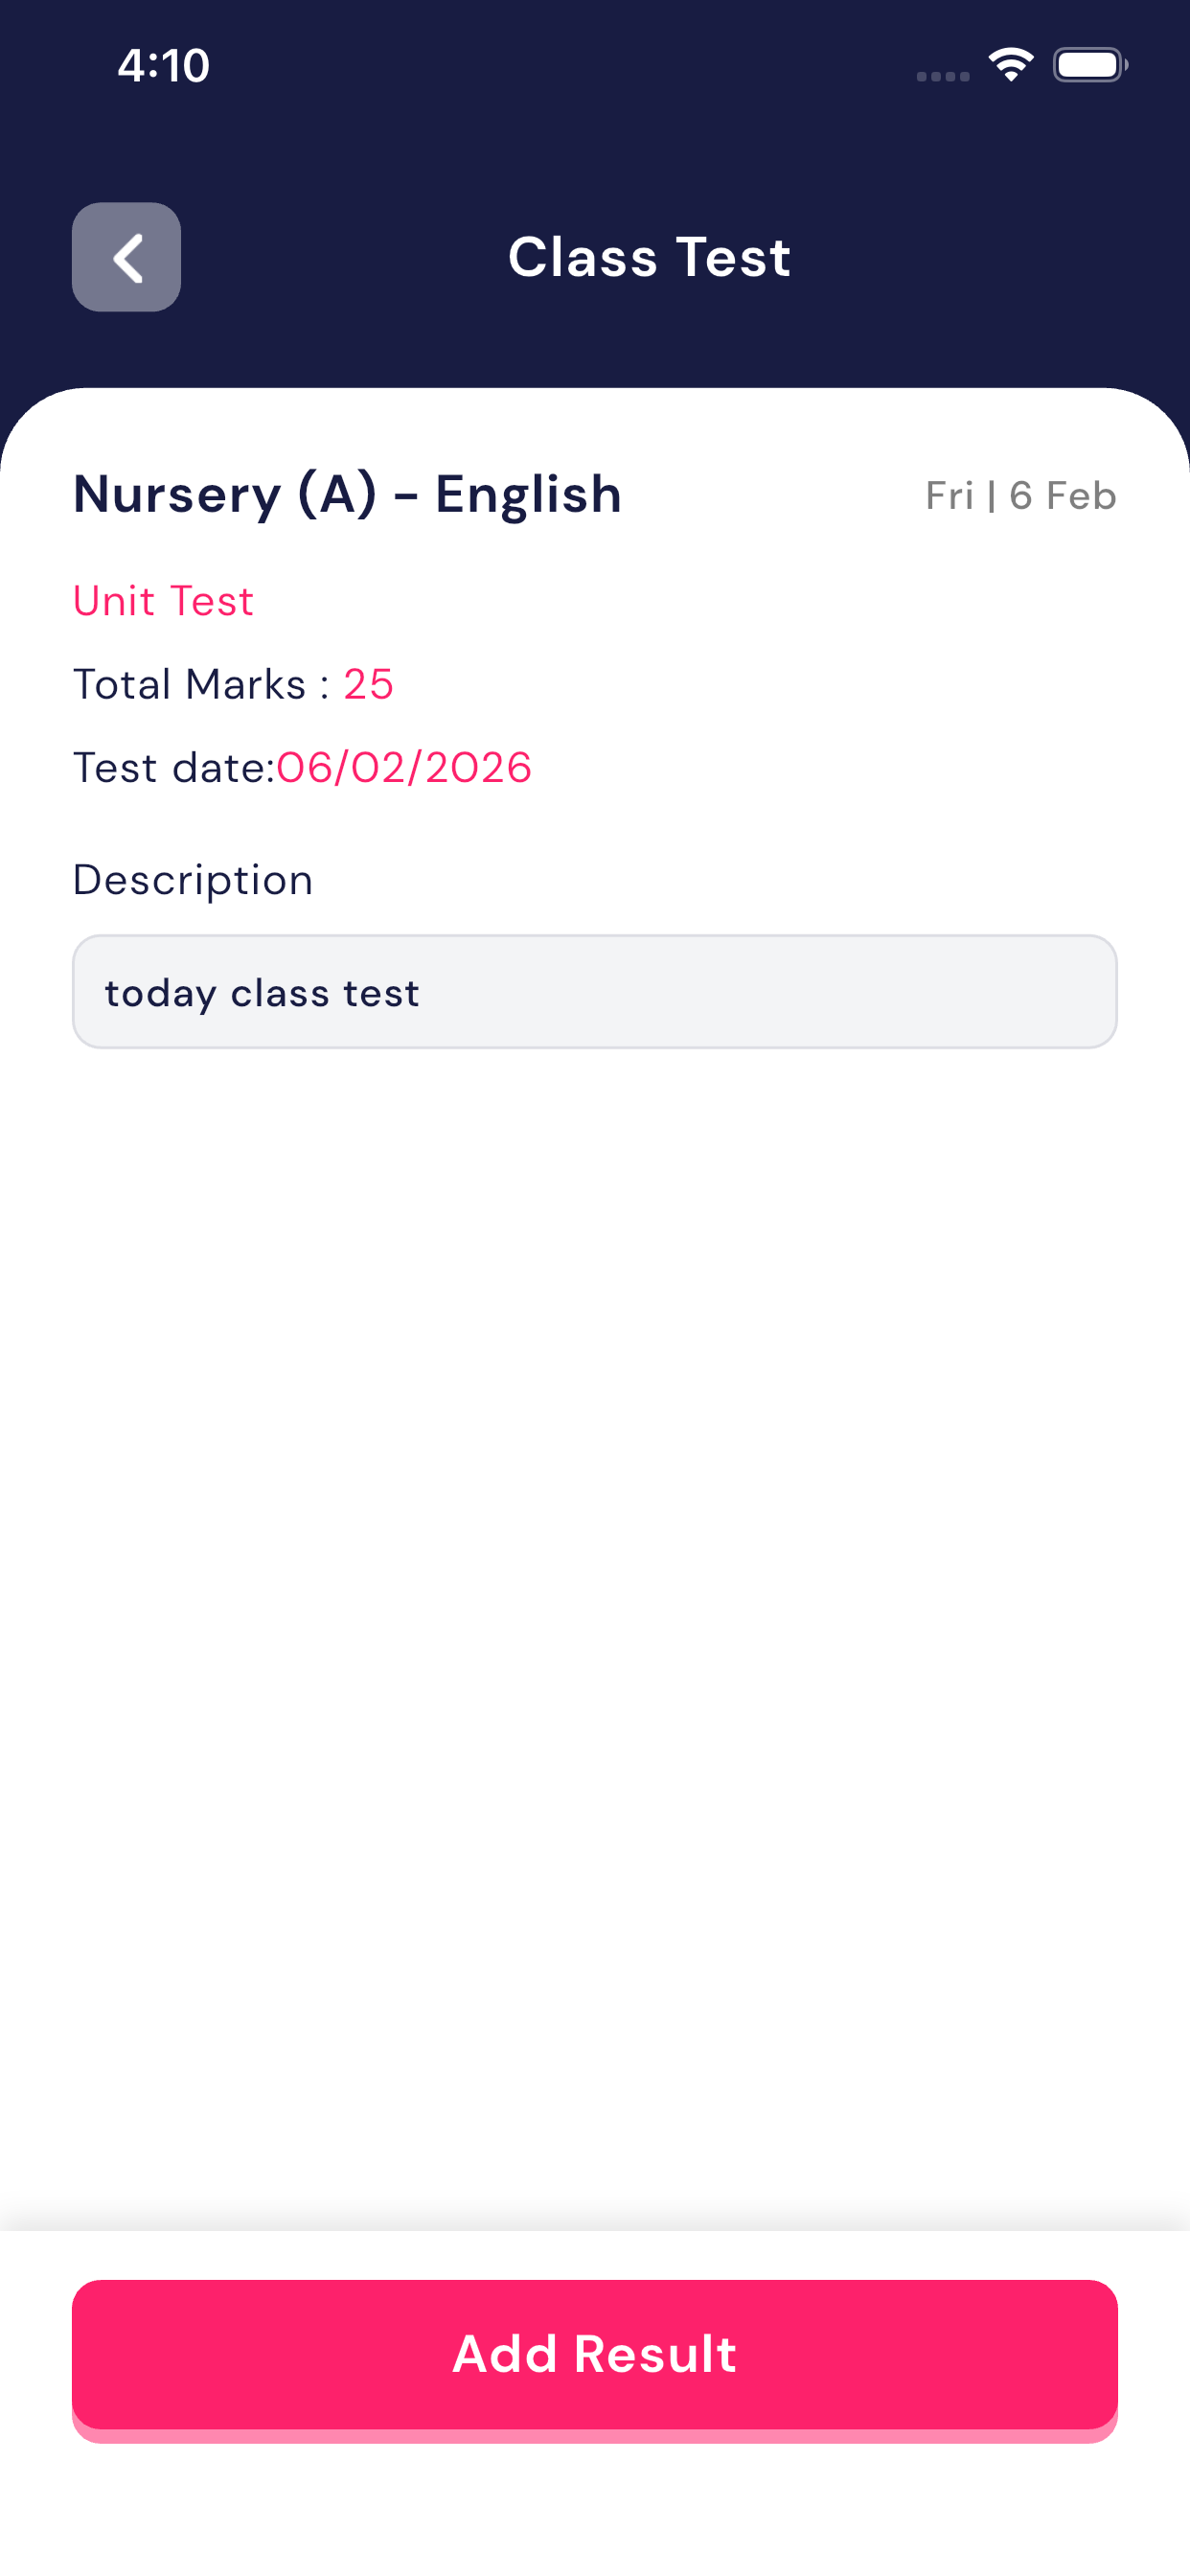
Viewing a Class Test
Teachers can tap on any class test to view its details, including:
- Class and Subject
- Test Type
- Total Marks
- Test Date
- Description
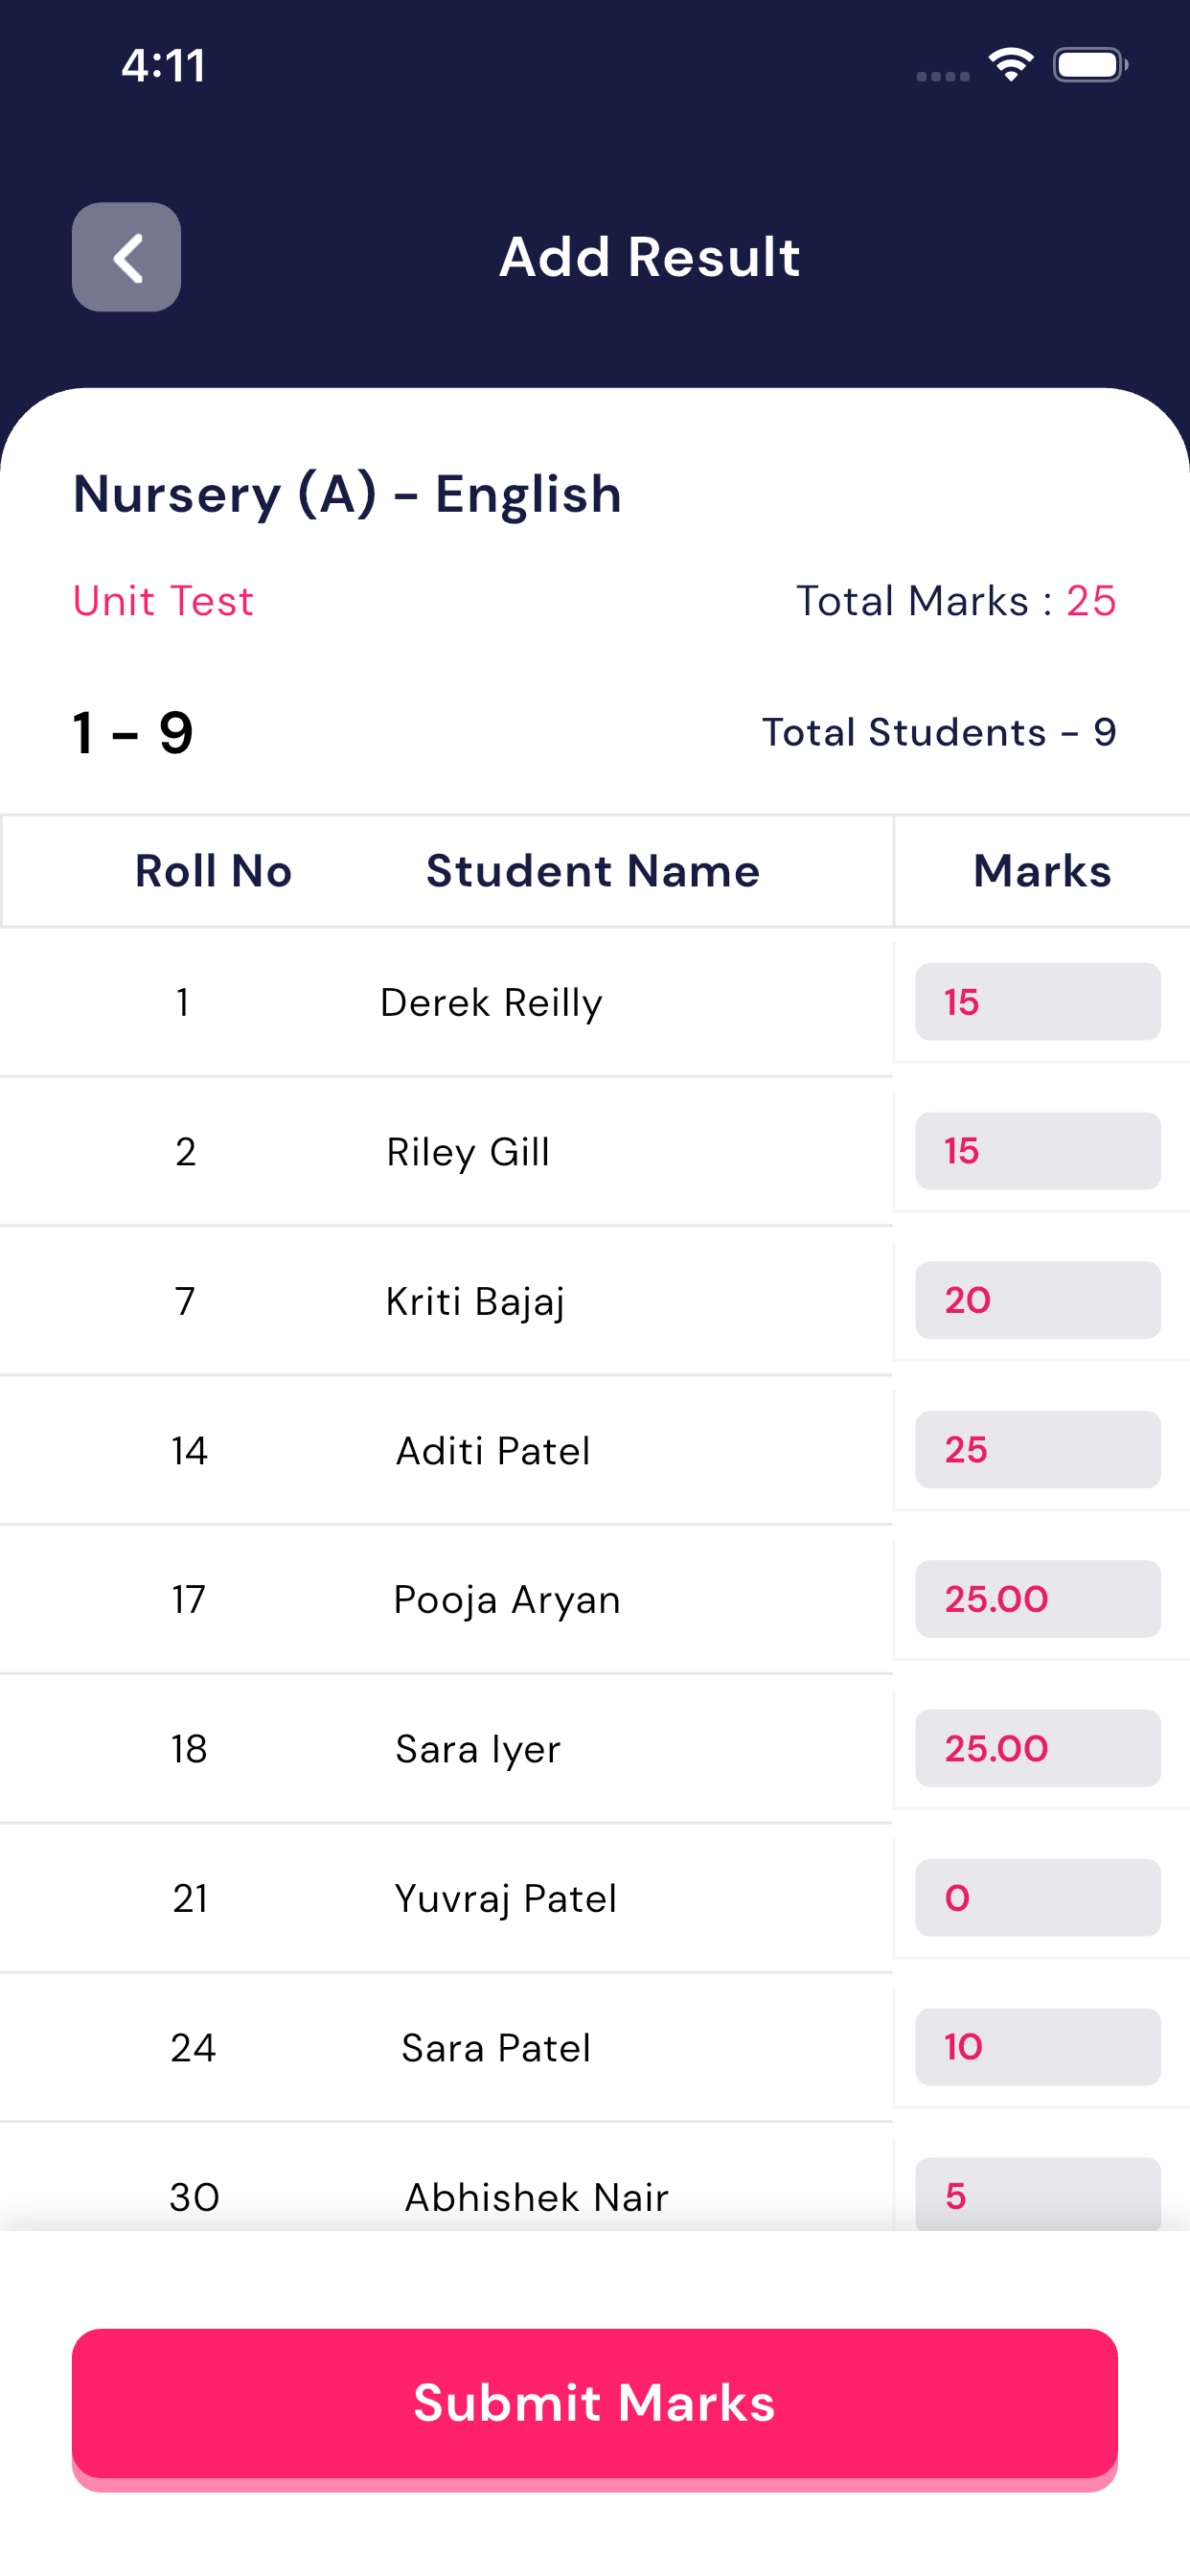
Adding / Updating Marks
After the test is completed, teachers can add or update marks by following these steps:
- Open the required Class Test
- Tap on the Add Result button
- A student list with Roll Number and Name will be displayed
- Enter marks for each student
- After entering all marks, tap on Submit Marks
✔ After marks are submitted:
- Students can view their marks
- Parents can also see the results
Important Points
- Entered marks must not exceed the Total Marks
- Tabs update automatically based on the test date
- Future tests appear under the Upcoming tab
- Completed tests move to the History tab
Summary
The Class Test module gives teachers full control over assessments by allowing them to:
- Create and manage class tests
- Inform students and parents
- Enter and update marks
- Maintain transparency in student results
This module makes the school assessment processsimple, organized, and efficient.
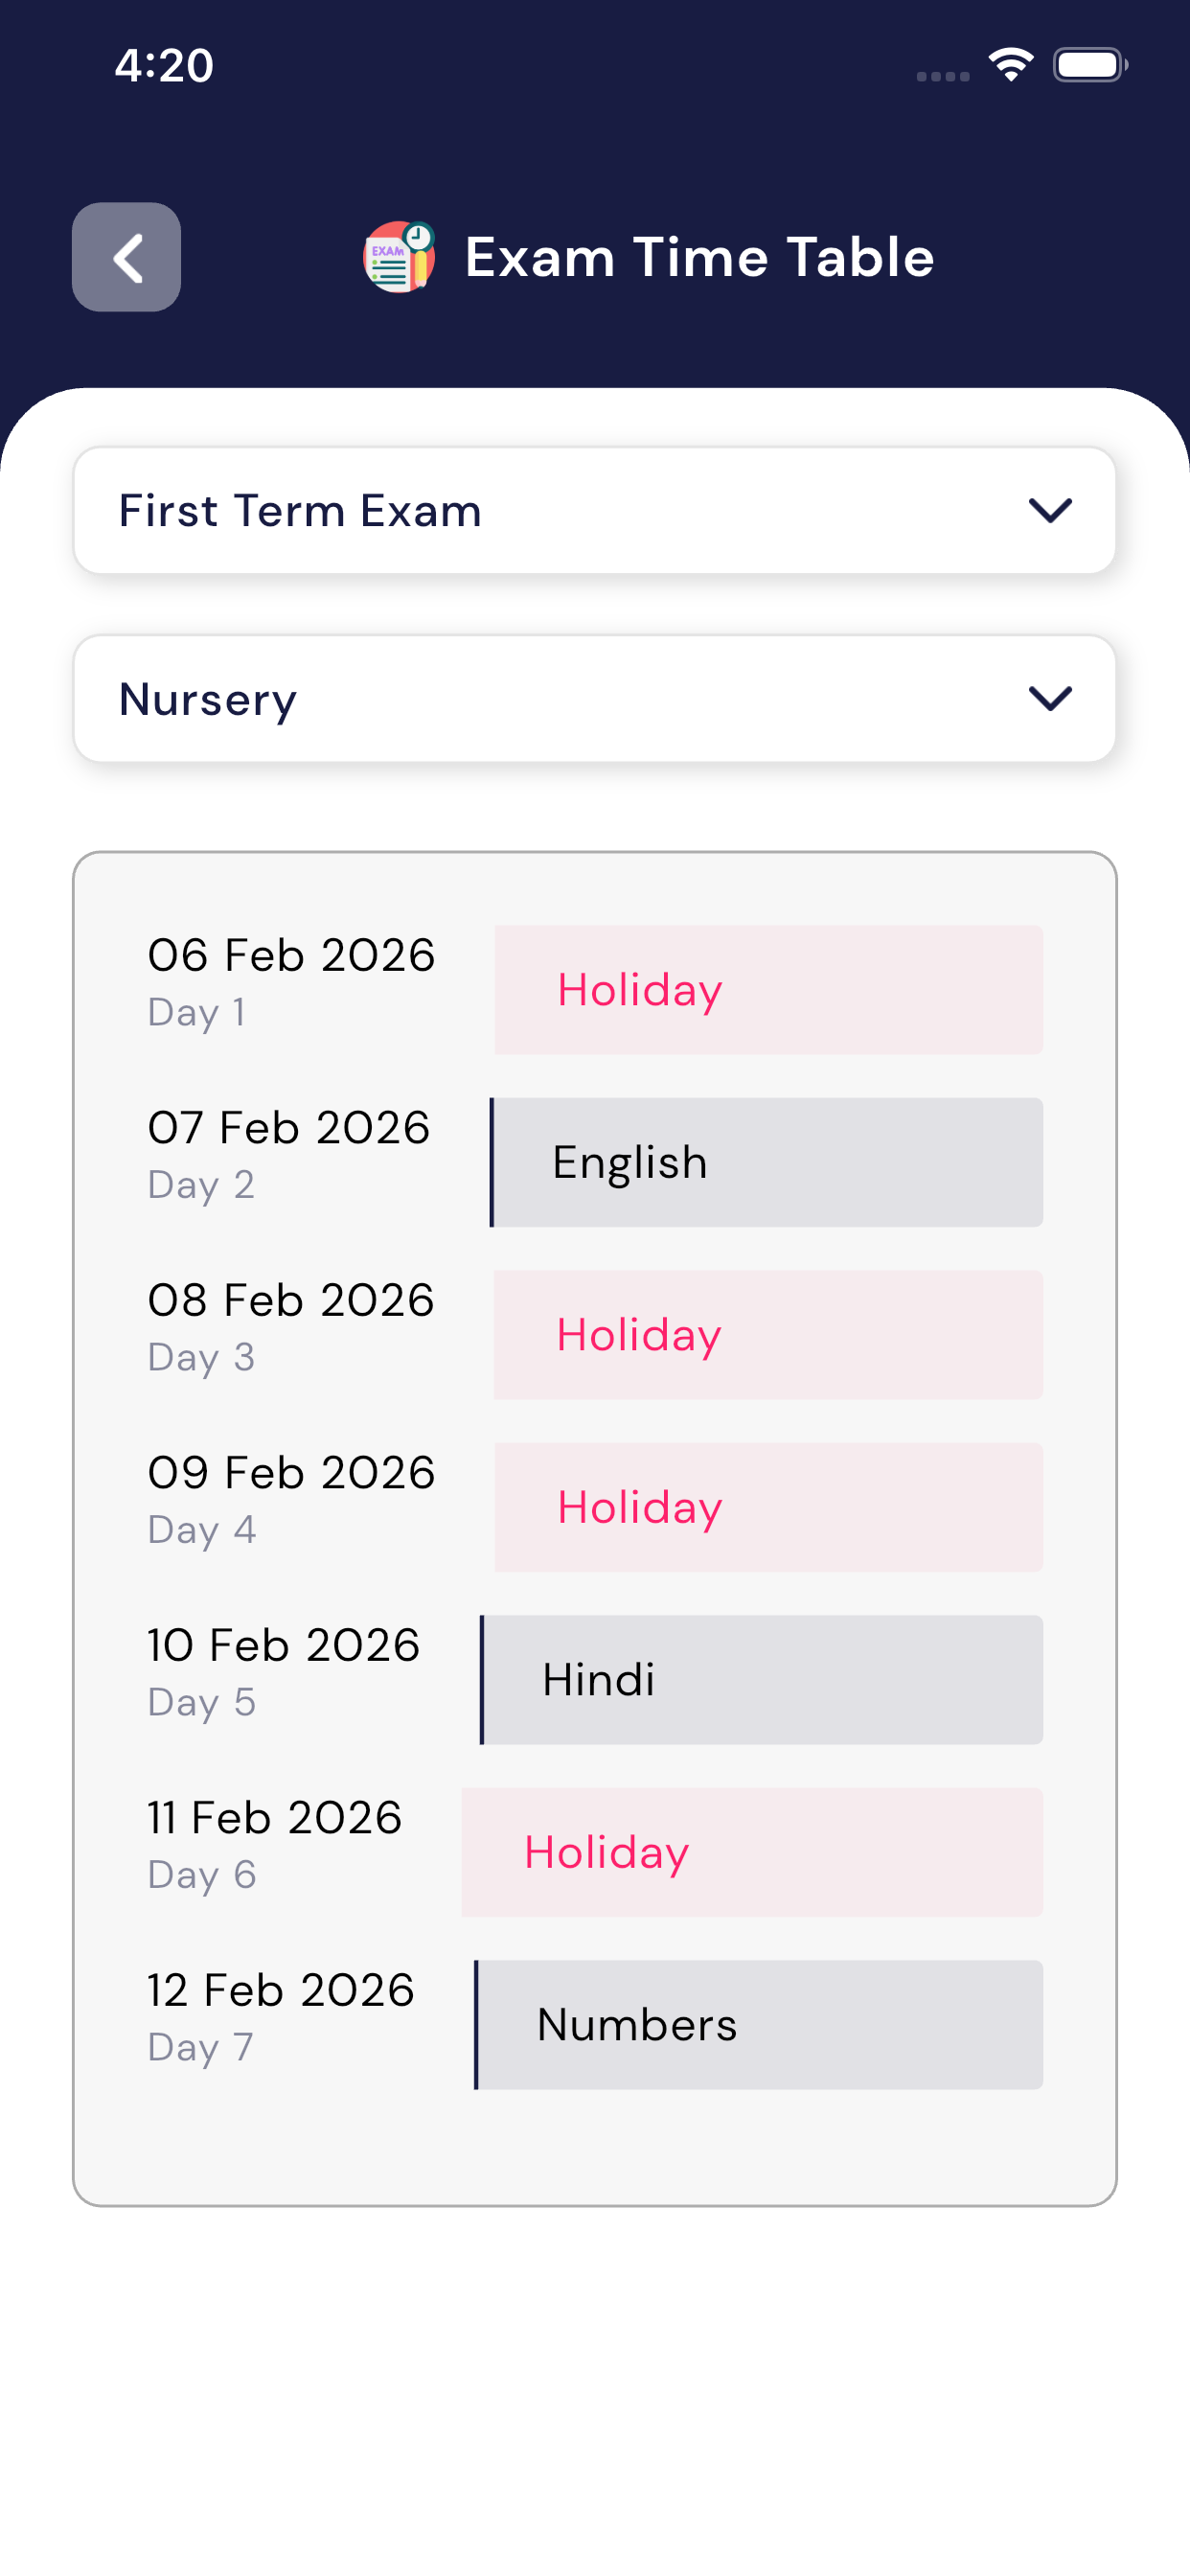
5.7 Exam Time Table
The Exam Time Table module is used to view the exam schedule for a selected exam and class. This screen isonly for viewing the exam timetable.
Purpose of Exam Time Table Module
Using this module, the teacher can:
- View which exam timetable is created (example: First Term Exam)
- View exam schedule class-wise
- Check exam dates and subjects
- Identify exam days and holidays
This timetable is also visible tostudents and parents.
Exam Time Table Screen Overview
On the Exam Time Table screen, the following options are available:
- Exam Selection
- Teacher can select the exam name
Example: First Term Exam
- Teacher can select the exam name
- Class Selection
- Teacher can select the class
Example: Nursery
- Teacher can select the class
After selecting the exam and class, the timetable will be displayed below.
Understanding the Time Table List
For each day, the following details are shown:
- Exam Date
- Day Number (Day 1, Day 2, etc.)
- Subject Name (if exam is scheduled)
- Holiday (if no exam on that day)
Example:
- If “English” is shown → Exam is scheduled for that subject
- If “Holiday” is shown → No exam on that day
How Teacher Uses This Module
- Open Exam Time Table
- Select the Exam Name
- Select the Class
- View the complete exam schedule day-wise
No editing or sharing is required from this screen.
Important Notes
- This module is view-only
- Teachers cannot edit the timetable here
- Exam schedule is shown date-wise
- Holidays are clearly marked as Holiday
Summary
The Exam Time Table module helps teachers to:
- Quickly check exam schedules
- Know which subject exam is on which date
- Identify exam days and holidays easily
This module keeps exam planningclear, simple, and organized.
5.8 Result
The Exam Time Table screen helps the teacher seewhich exam is going on and for which class.
Who can add marks
- Only the subject teacher can add or update marks for that subject.
- Other teachers cannot edit marks for subjects they do not teach.
How to add results
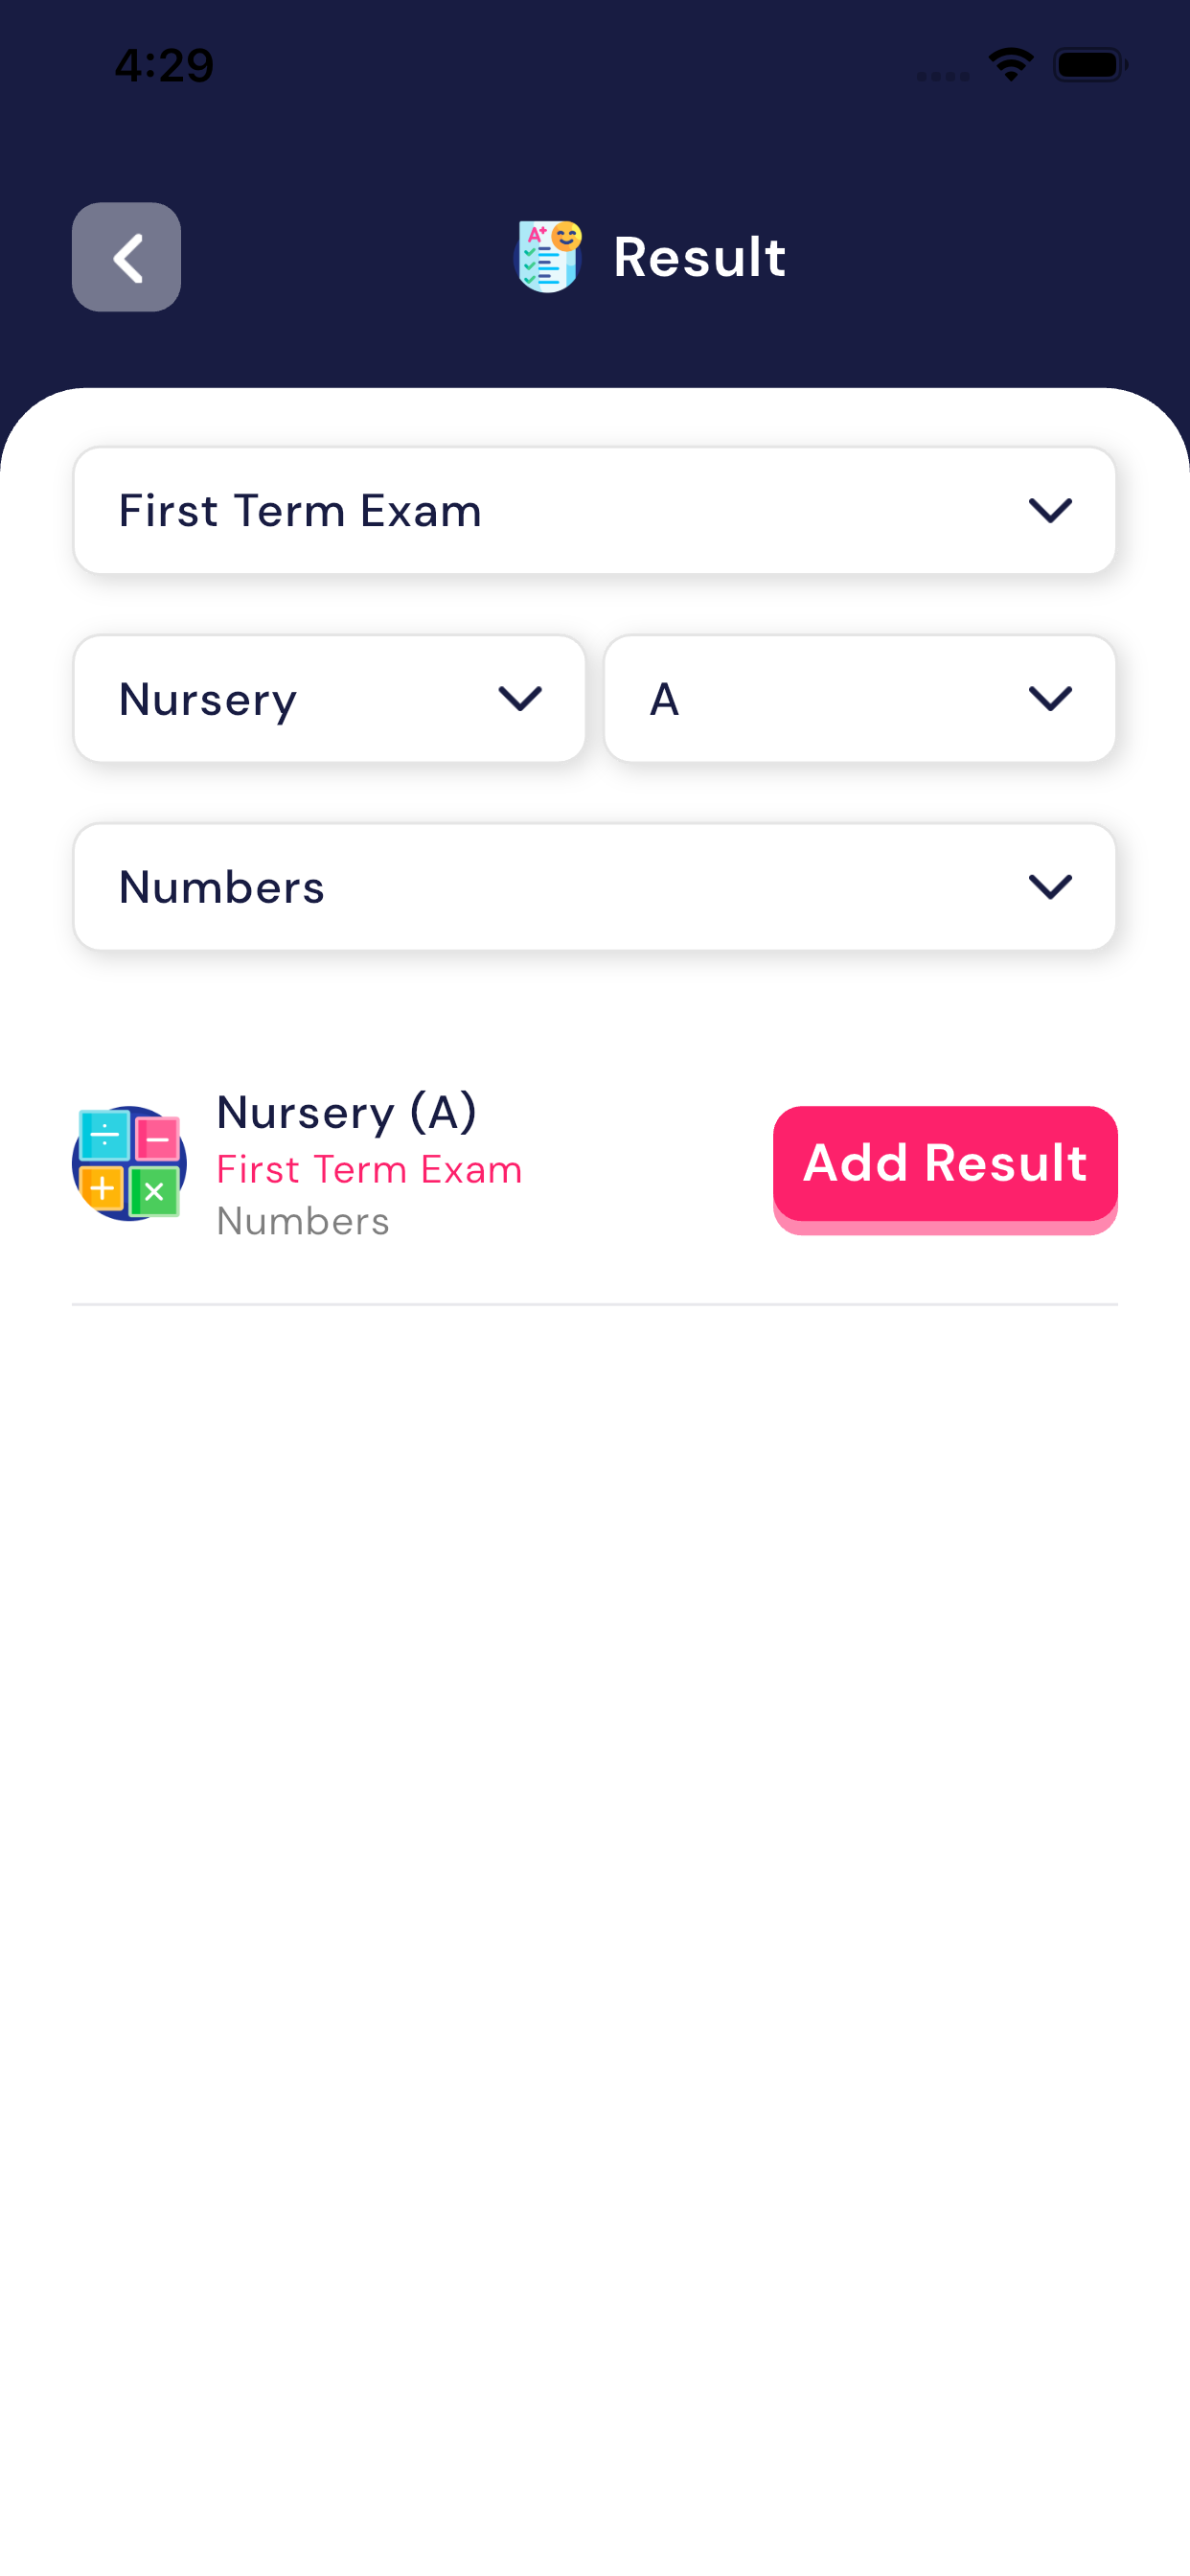
- Select Exam
- Choose the exam (for example: First Term Exam).
- Select Class and Section
- Choose the class (example: Nursery) and section (example: A).
- Select Subject
- Select the subject you teach (example: Numbers).
- Click on “Add Result”
- The student list for that class will open.
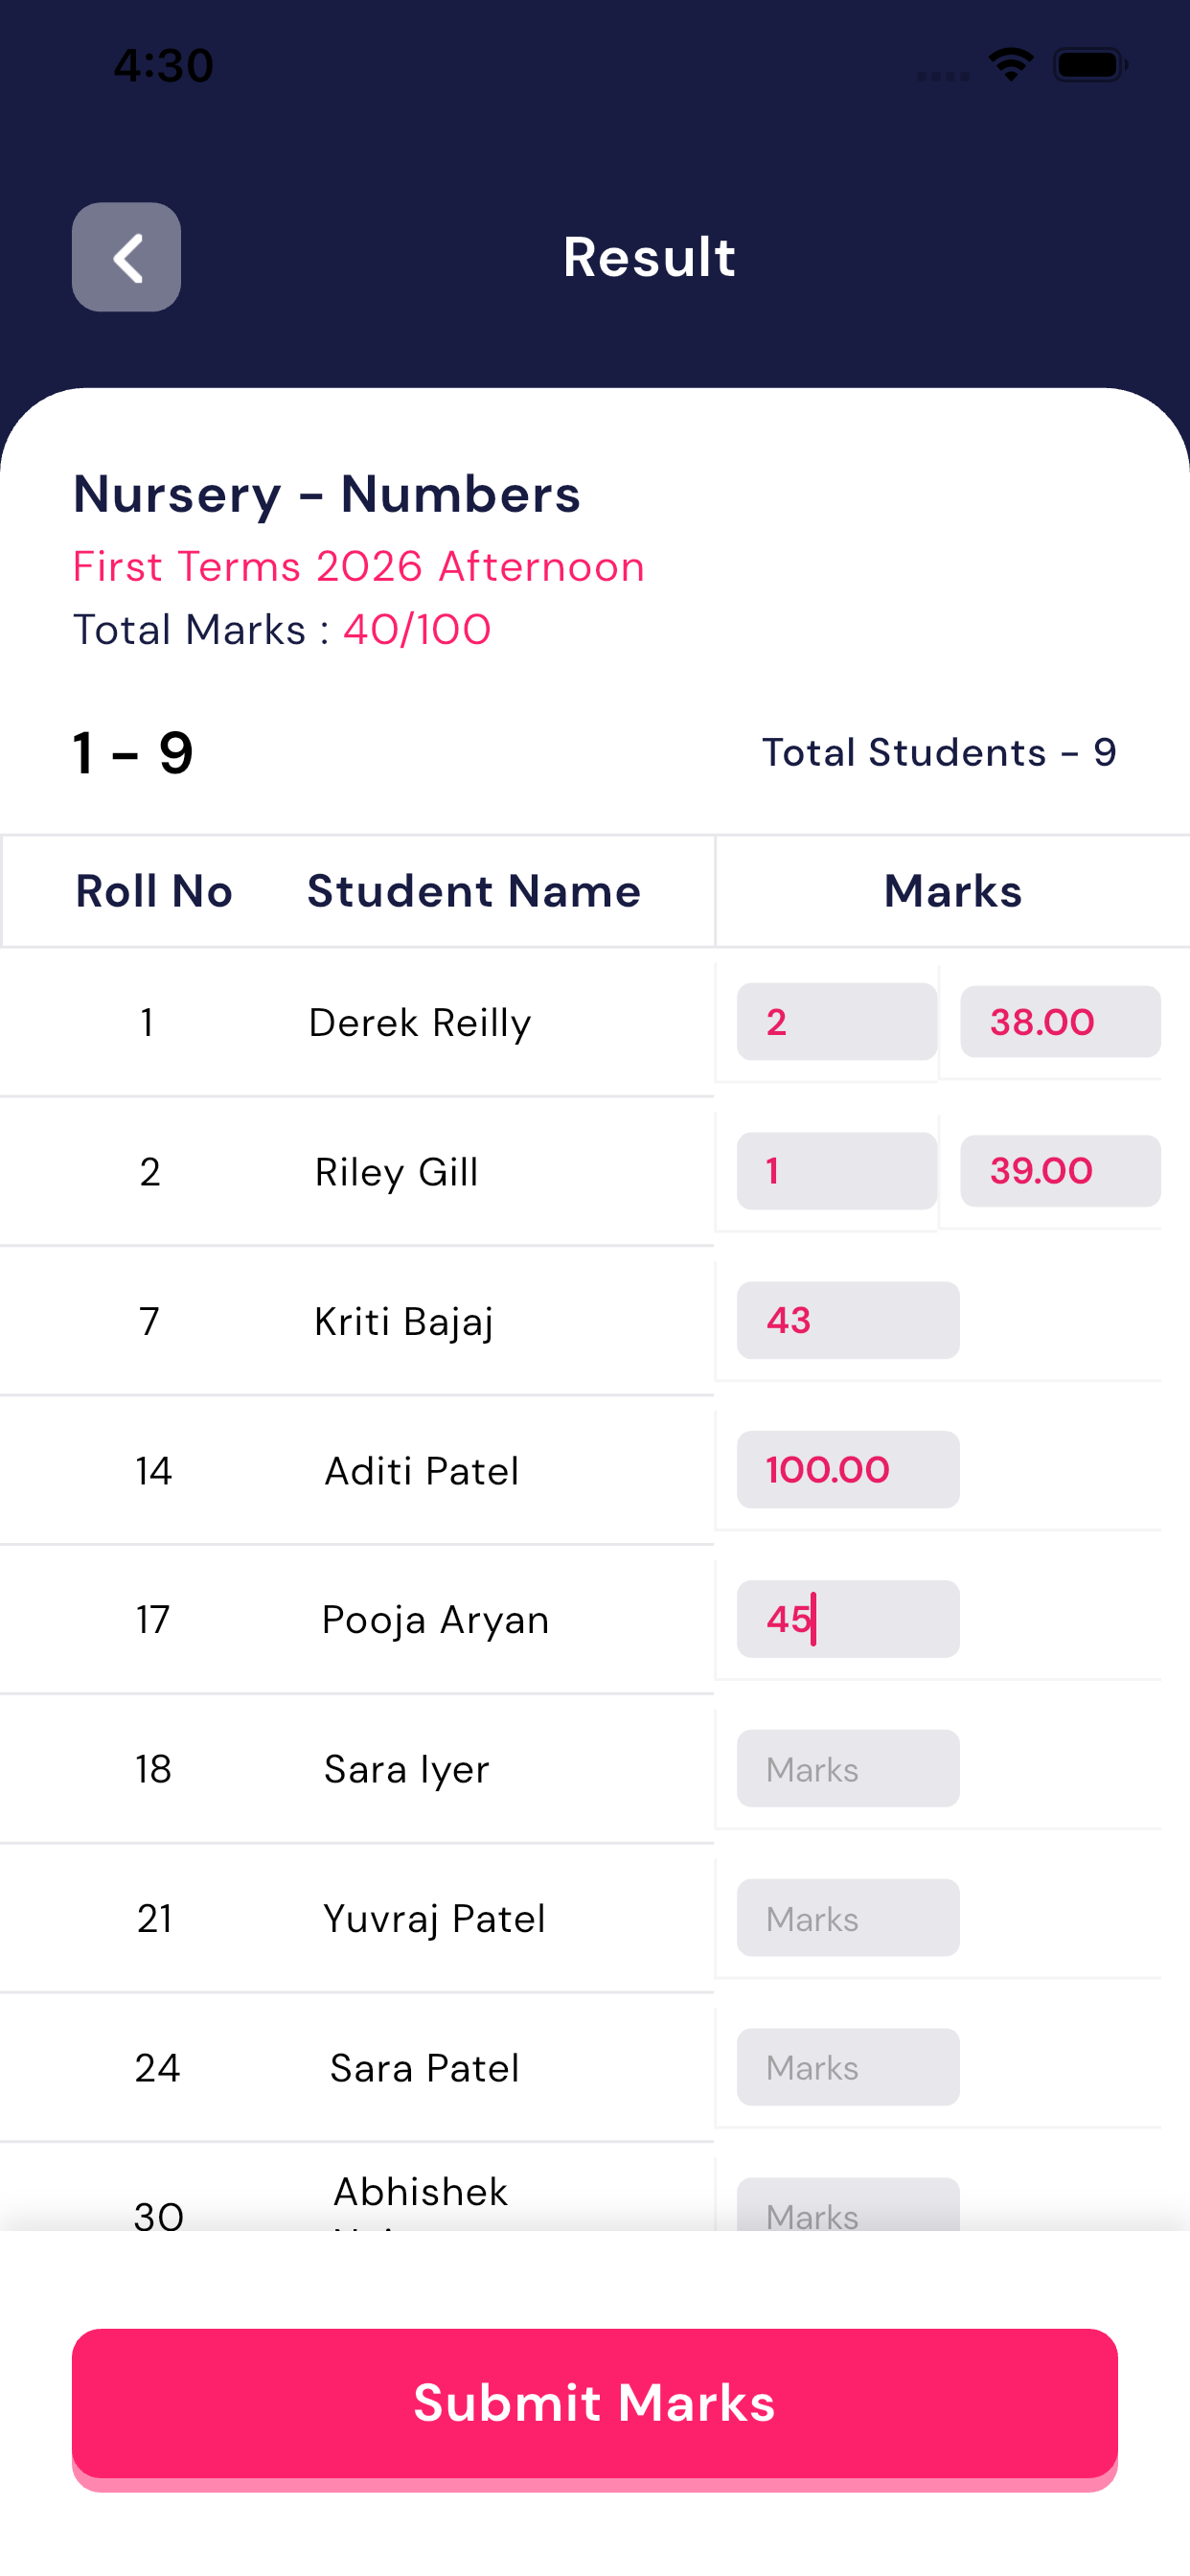
- Enter Marks
- Enter marks for each student in the marks box.
- Total marks are shown on the top (example: 40/100).
- Grace Marks
- Teacher can also add grace marks if required.
- Submit Marks
- After entering all marks, clickSubmit Marks to save.
Important Rules
- Marks can be updatedonly after the exam date is completed.
- Marks cannot be updated before the exam date.
- Only authorized subject teachers can submit marks.
- Once submitted, marks will be saved for all students.
Benefits for Teachers
- Easy and clear student list.
- No confusion about exam, class, or subject.
- Secure system – only the correct teacher can update marks.
- Grace marks option available.
5.9 Supervision Schedule
The Supervision Schedule screen shows the teacherwhere and when they have exam supervision duty.
Purpose of this screen
- To inform the teacherwhich exam room they must go to
- To show date, time, class, and subject for supervision duty
- This screen is only for viewing, no editing is required
What the teacher can see
On this screen, the teacher will see the following details:
- Supervisor Name
- Shows the teacher’s name assigned for supervision.
- Exam Name
- Shows the exam for which supervision is assigned
(Example: First Terms 2026 Afternoon).
- Shows the exam for which supervision is assigned
- Date & Day
- Shows the exam date and day number.
- Status
- Status shows Assigned, which means supervision duty is confirmed.
- Room Number
- Shows the room where the teacher must go for supervision.
- Class
- Shows the class whose exam is being conducted
(Example: Nursery).
- Shows the class whose exam is being conducted
- Subject
- Shows the subject of the exam
(Example: English, Hindi, Numbers).
- Shows the subject of the exam
- Time
- Shows the start time and end time of supervision duty.
Important Points for Teachers
- Teacher only needs tocheck and follow the schedule.
- Teacher must reach the assigned room on time.
- Supervision details may be different on different dates.
- Teacher cannot change room, time, or class from this screen.
- This screen helps avoidconfusion during exam time.
Benefits
- Clear exam supervision details in one place.
- Saves time and avoids manual instructions.
- Teacher always knows where to go and when.

5.10 Teacher Scheduler
The Teacher Scheduler module helps teachers plan and manage their teaching schedule.
Teachers can add what they will teach on a particular date and also see what they have already taught in the past.
Purpose of Teacher Scheduler
Using this module, a teacher can:
- Plan future teaching schedules
- Add details of which subject and class will be taught
- Write topic/title and description (what will be taught)
- View today’s schedule
- Check past (history) teaching details
- See upcoming schedules easily
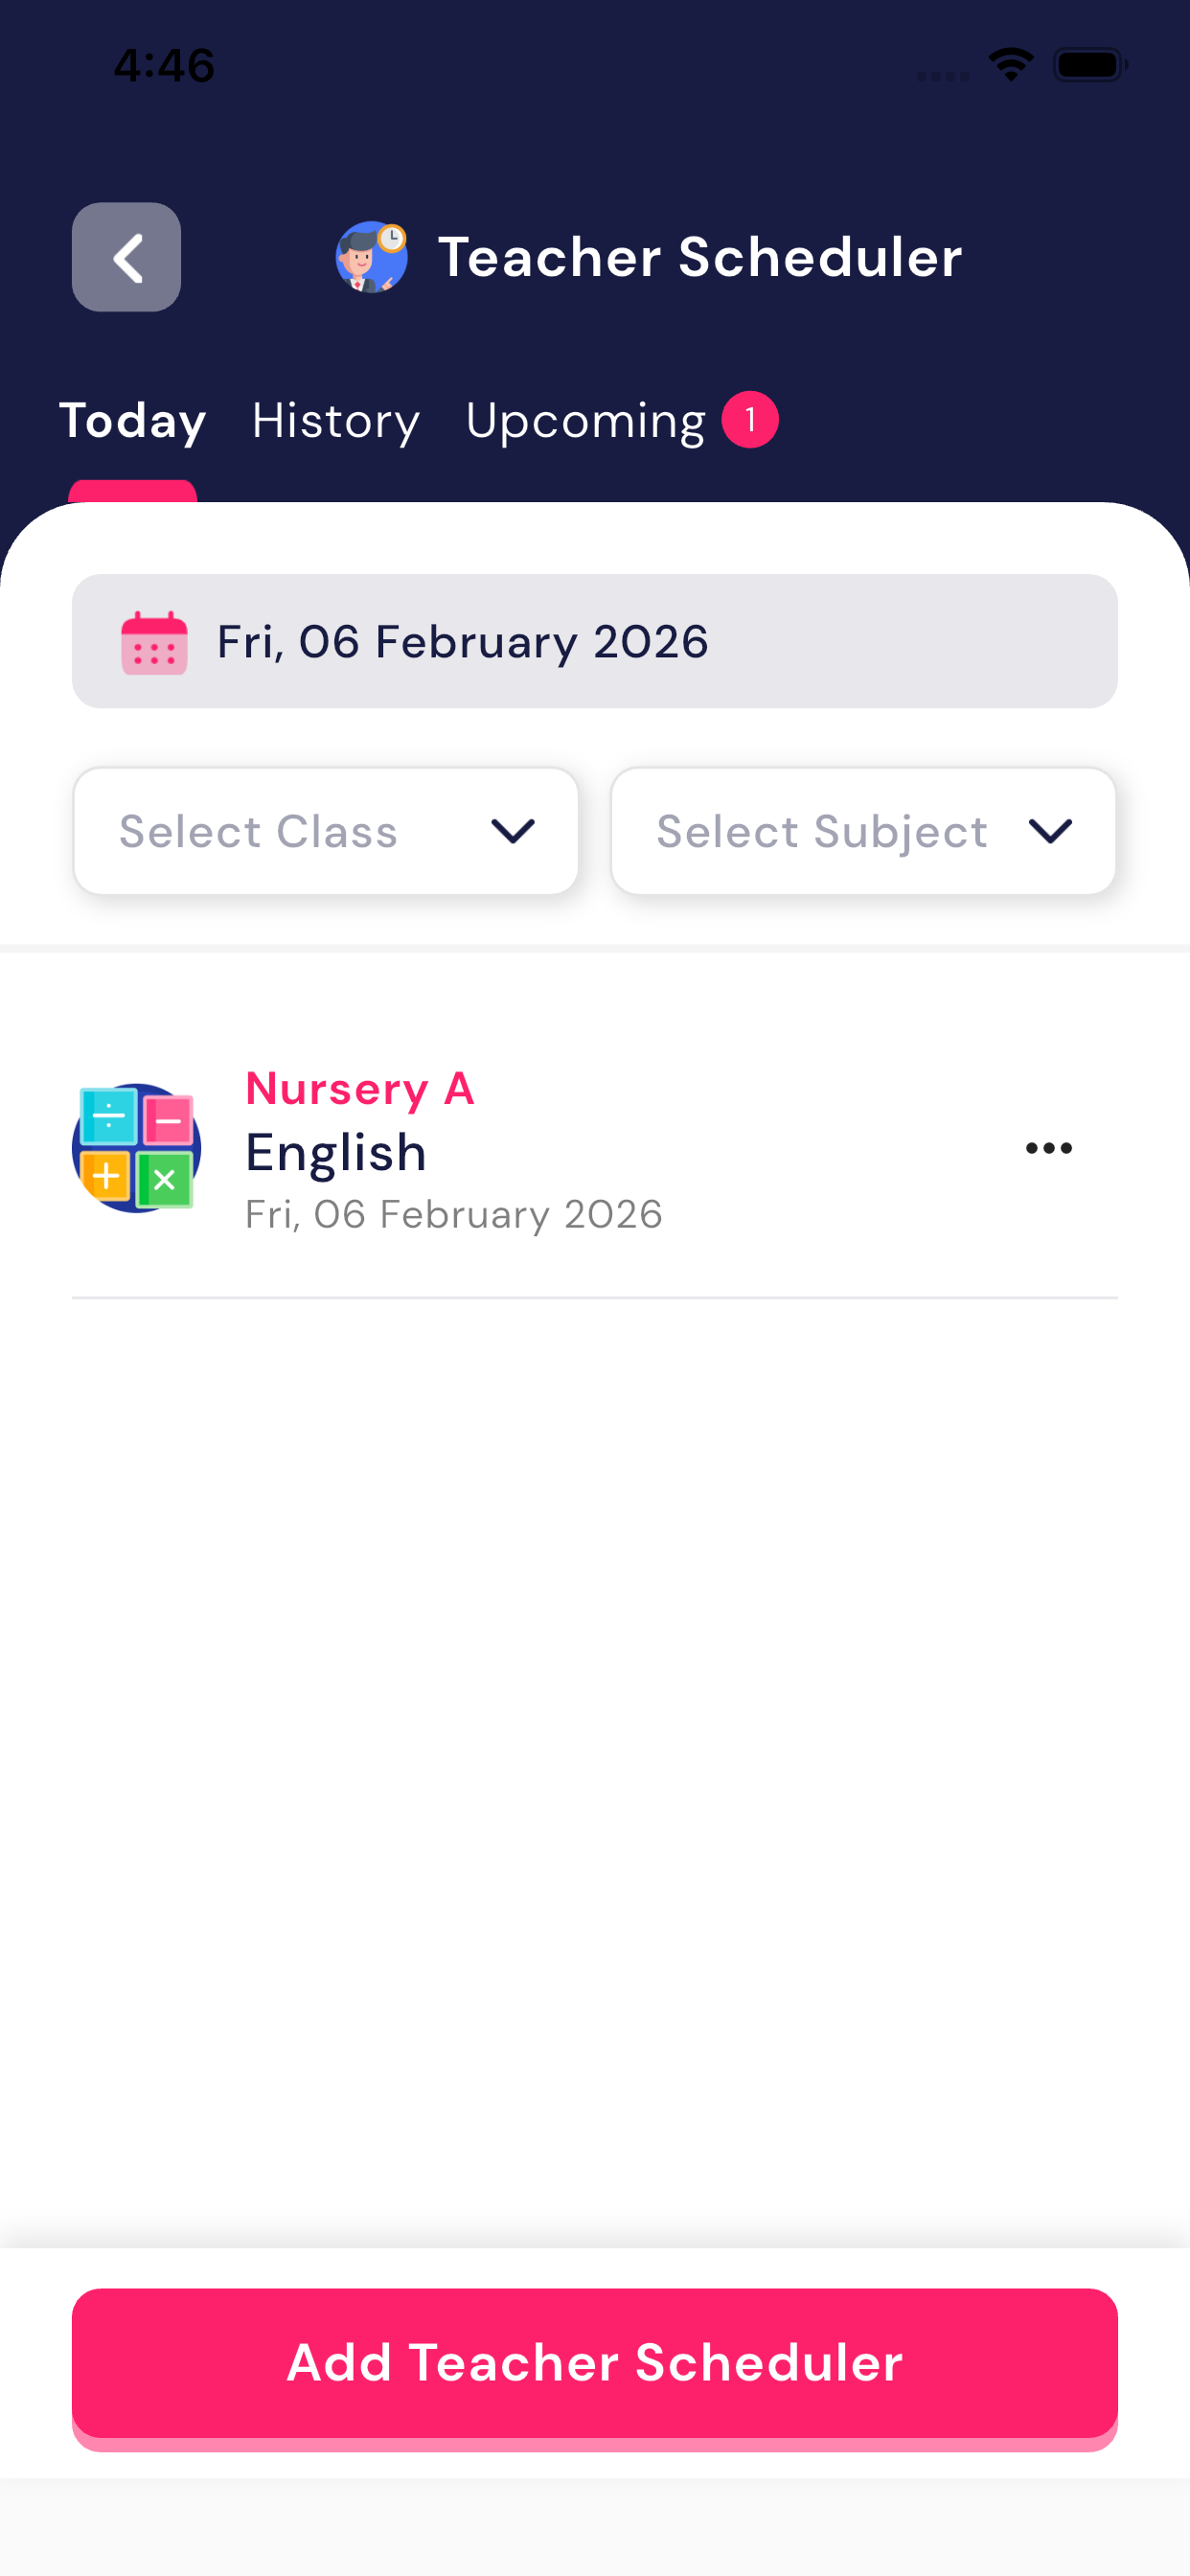
Teacher Scheduler Tabs
There are three tabs available at the top:
- Today
- Shows today’s teaching schedule.
- History
- Shows what the teacher has already taught on previous dates.
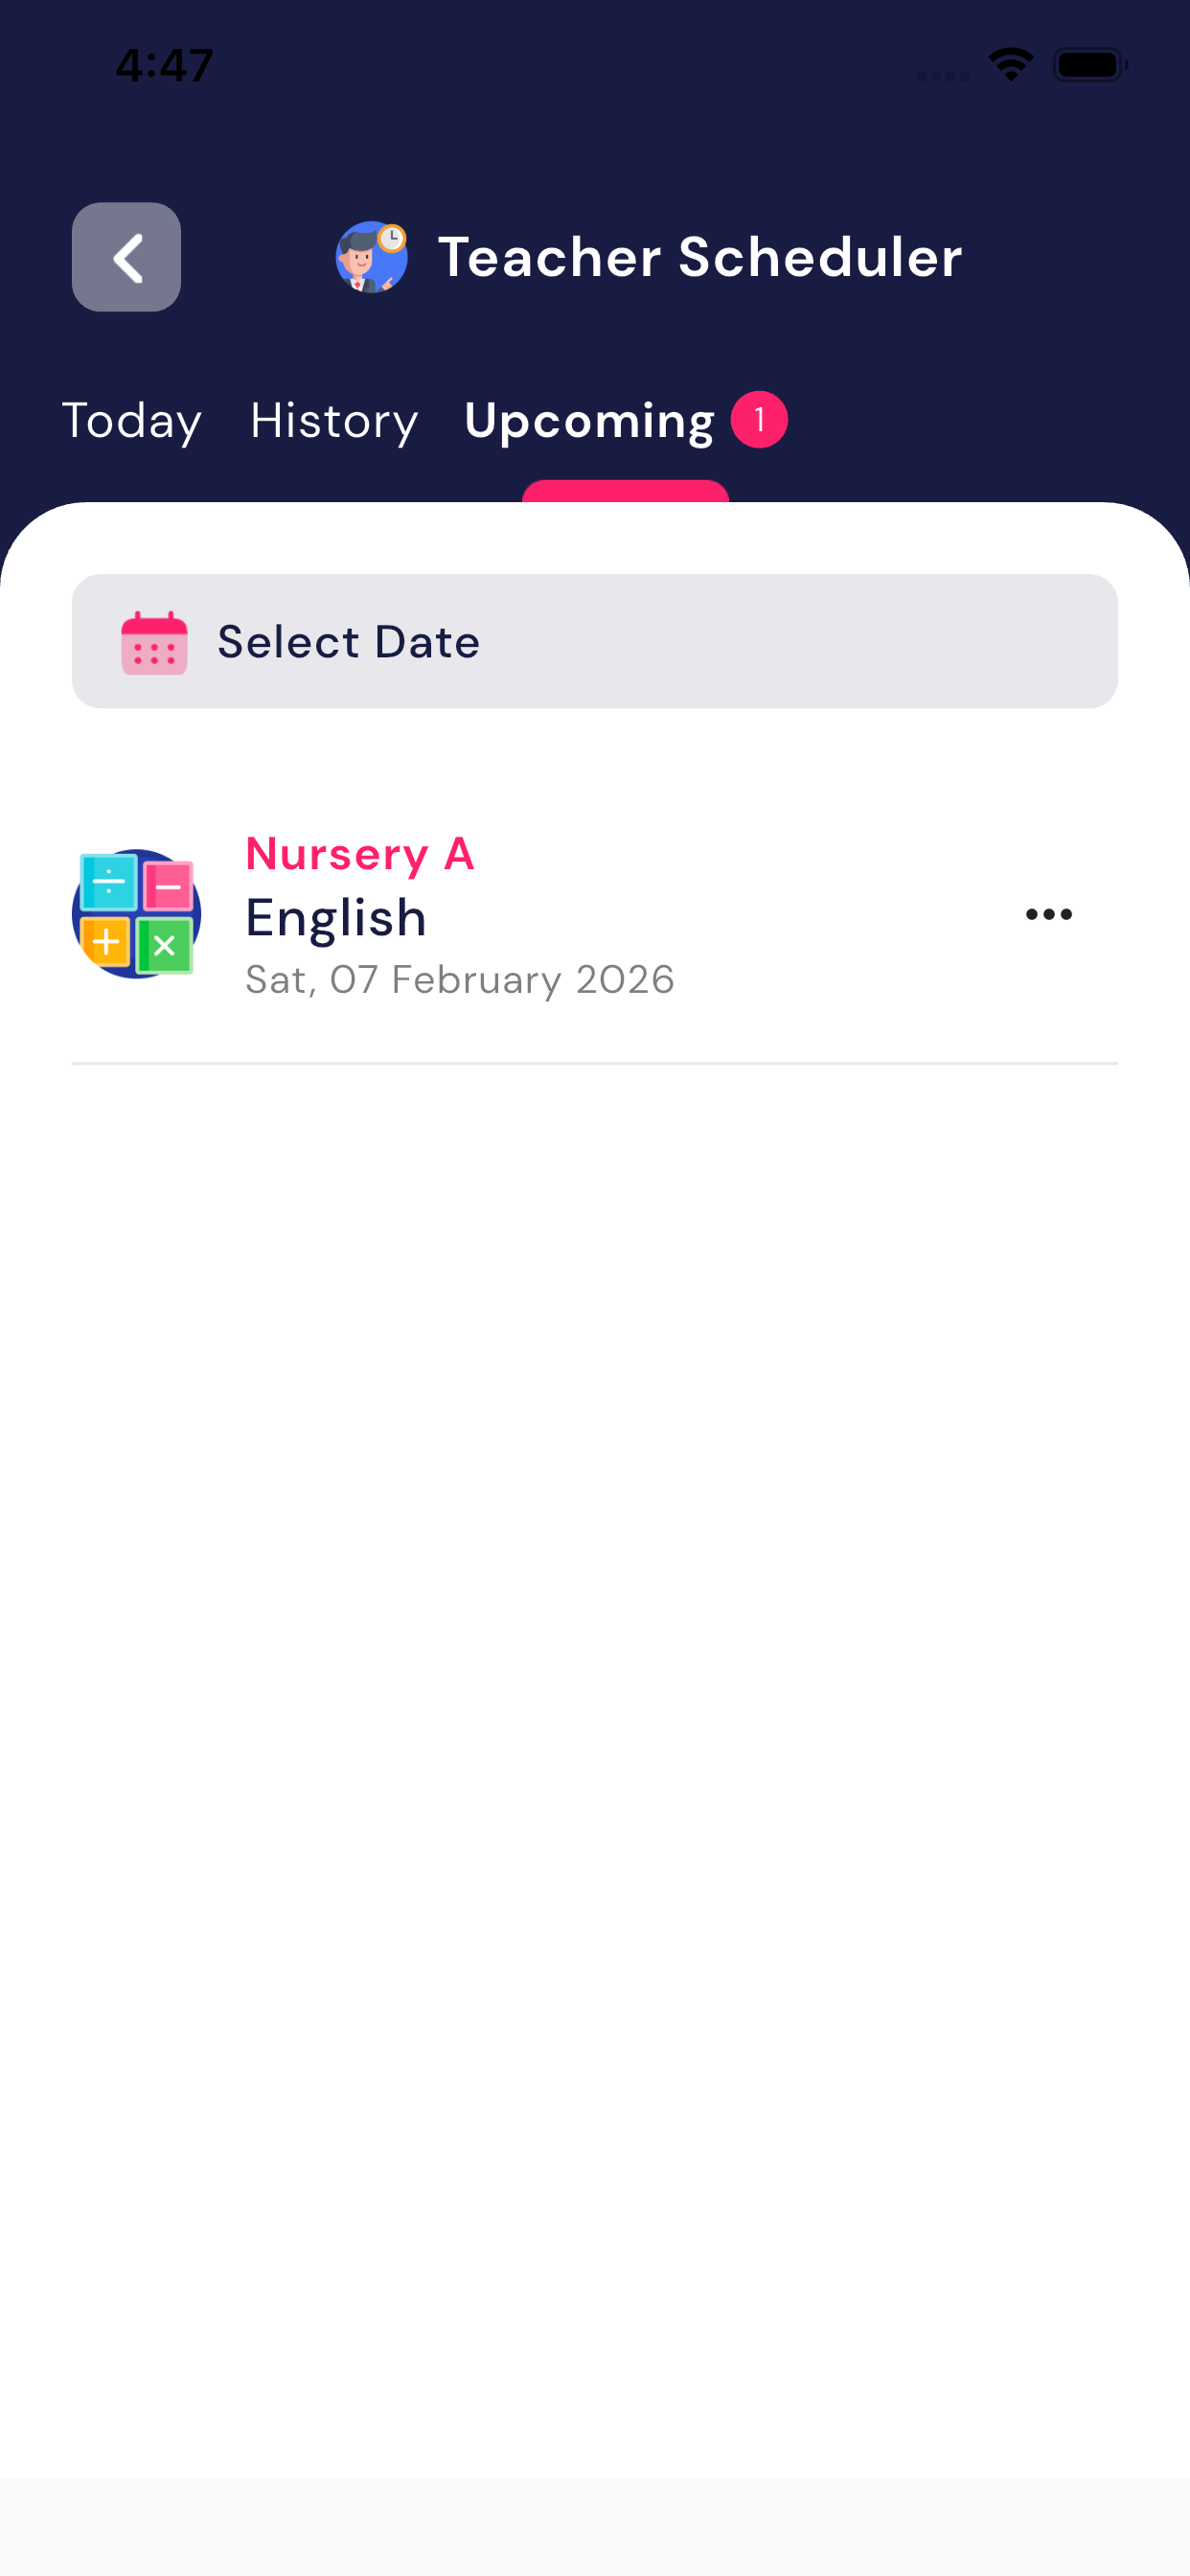
- Upcoming
- Shows future teaching plans.
- A number badge shows how many upcoming schedules are added.
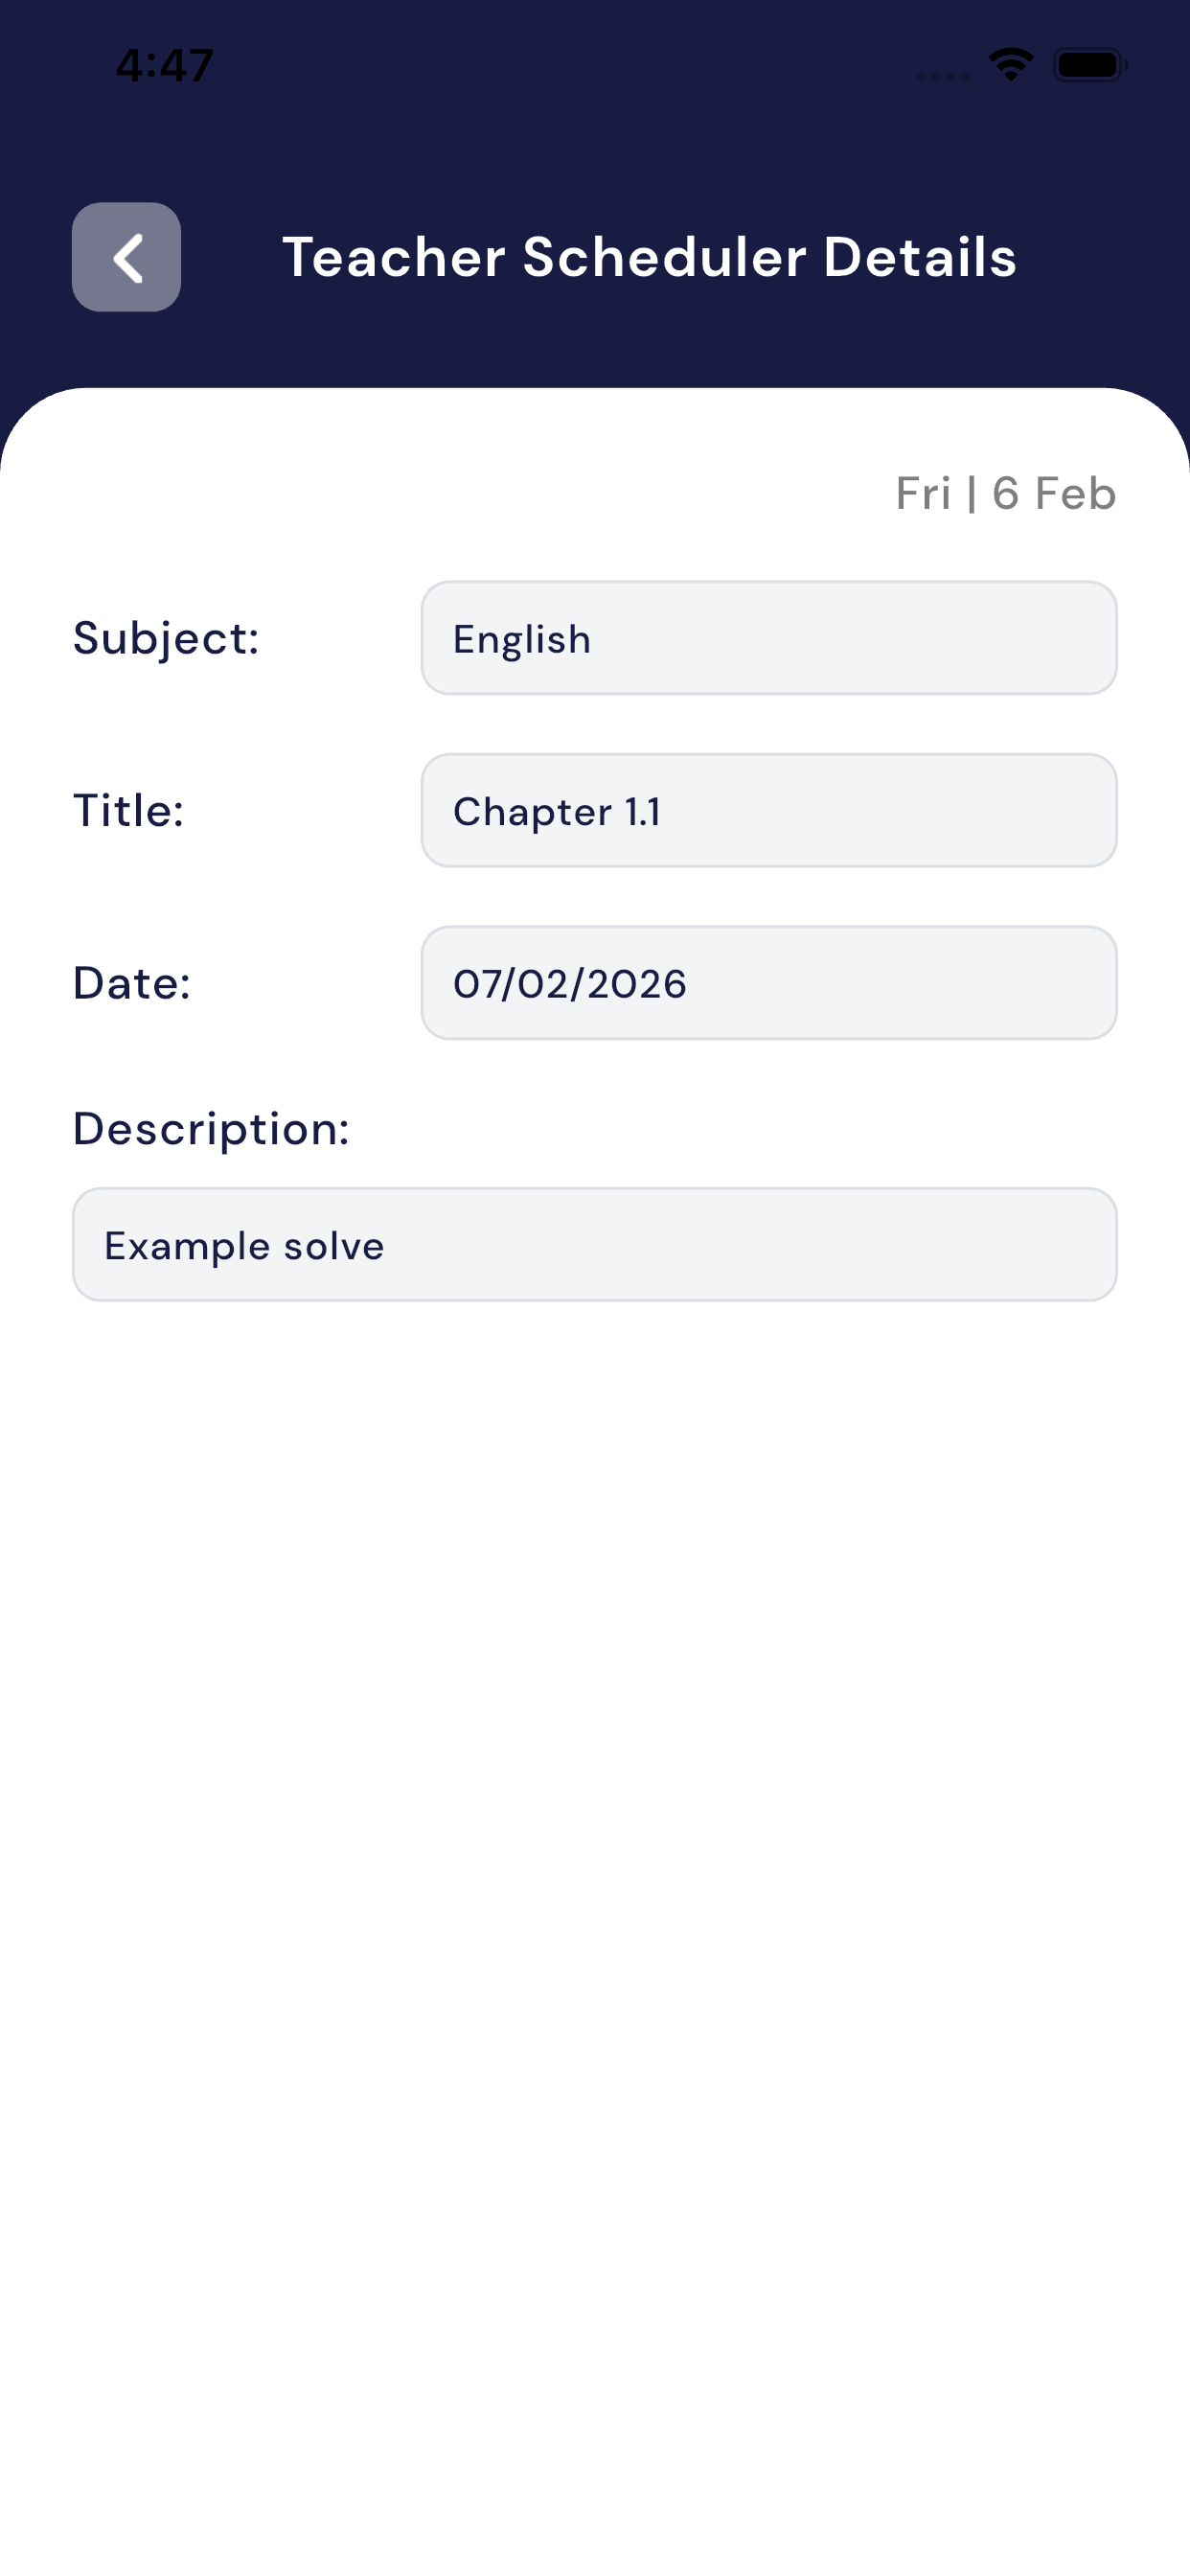
View Teacher Schedule
On the main screen, the teacher can see:
- Class name (example: Nursery A)
- Subject (example: English)
- Date
- Tap on any schedule to see full details like:
- Subject
- Title (topic name)
- Date
- Description (what will be taught)
Add New Teacher Scheduler
Teacher can add a new schedule by following these steps:
- Tap on Add Teacher Scheduler
- Select Class
- Select Subject
- Enter Title
- Example: Chapter 1, Alphabets, Numbers Practice
- Enter Description
- Example: Alphabet reading, revision, writing practice
- Select Due Date
- Tap on Publish
✔ After publishing:
- The schedule will appear in the Upcoming tab
- On the selected date, it will move to theToday tab
- After the date passes, it will be shown inHistory
Important Points
- Teacher can add schedulesonly for their own teaching
- Past schedules are read-only (cannot be edited)
- Future schedules help teachersplan lessons in advance
- This module is for teacher’s personal planning, not exams or tests
Summary
The Teacher Scheduler module helps teachers:
- Plan daily and future teaching work
- Stay organized and prepared
- Track what was taught earlier
- Manage teaching schedule in an easy way
This makes lesson planningsimple, clear, and well organized for teachers.
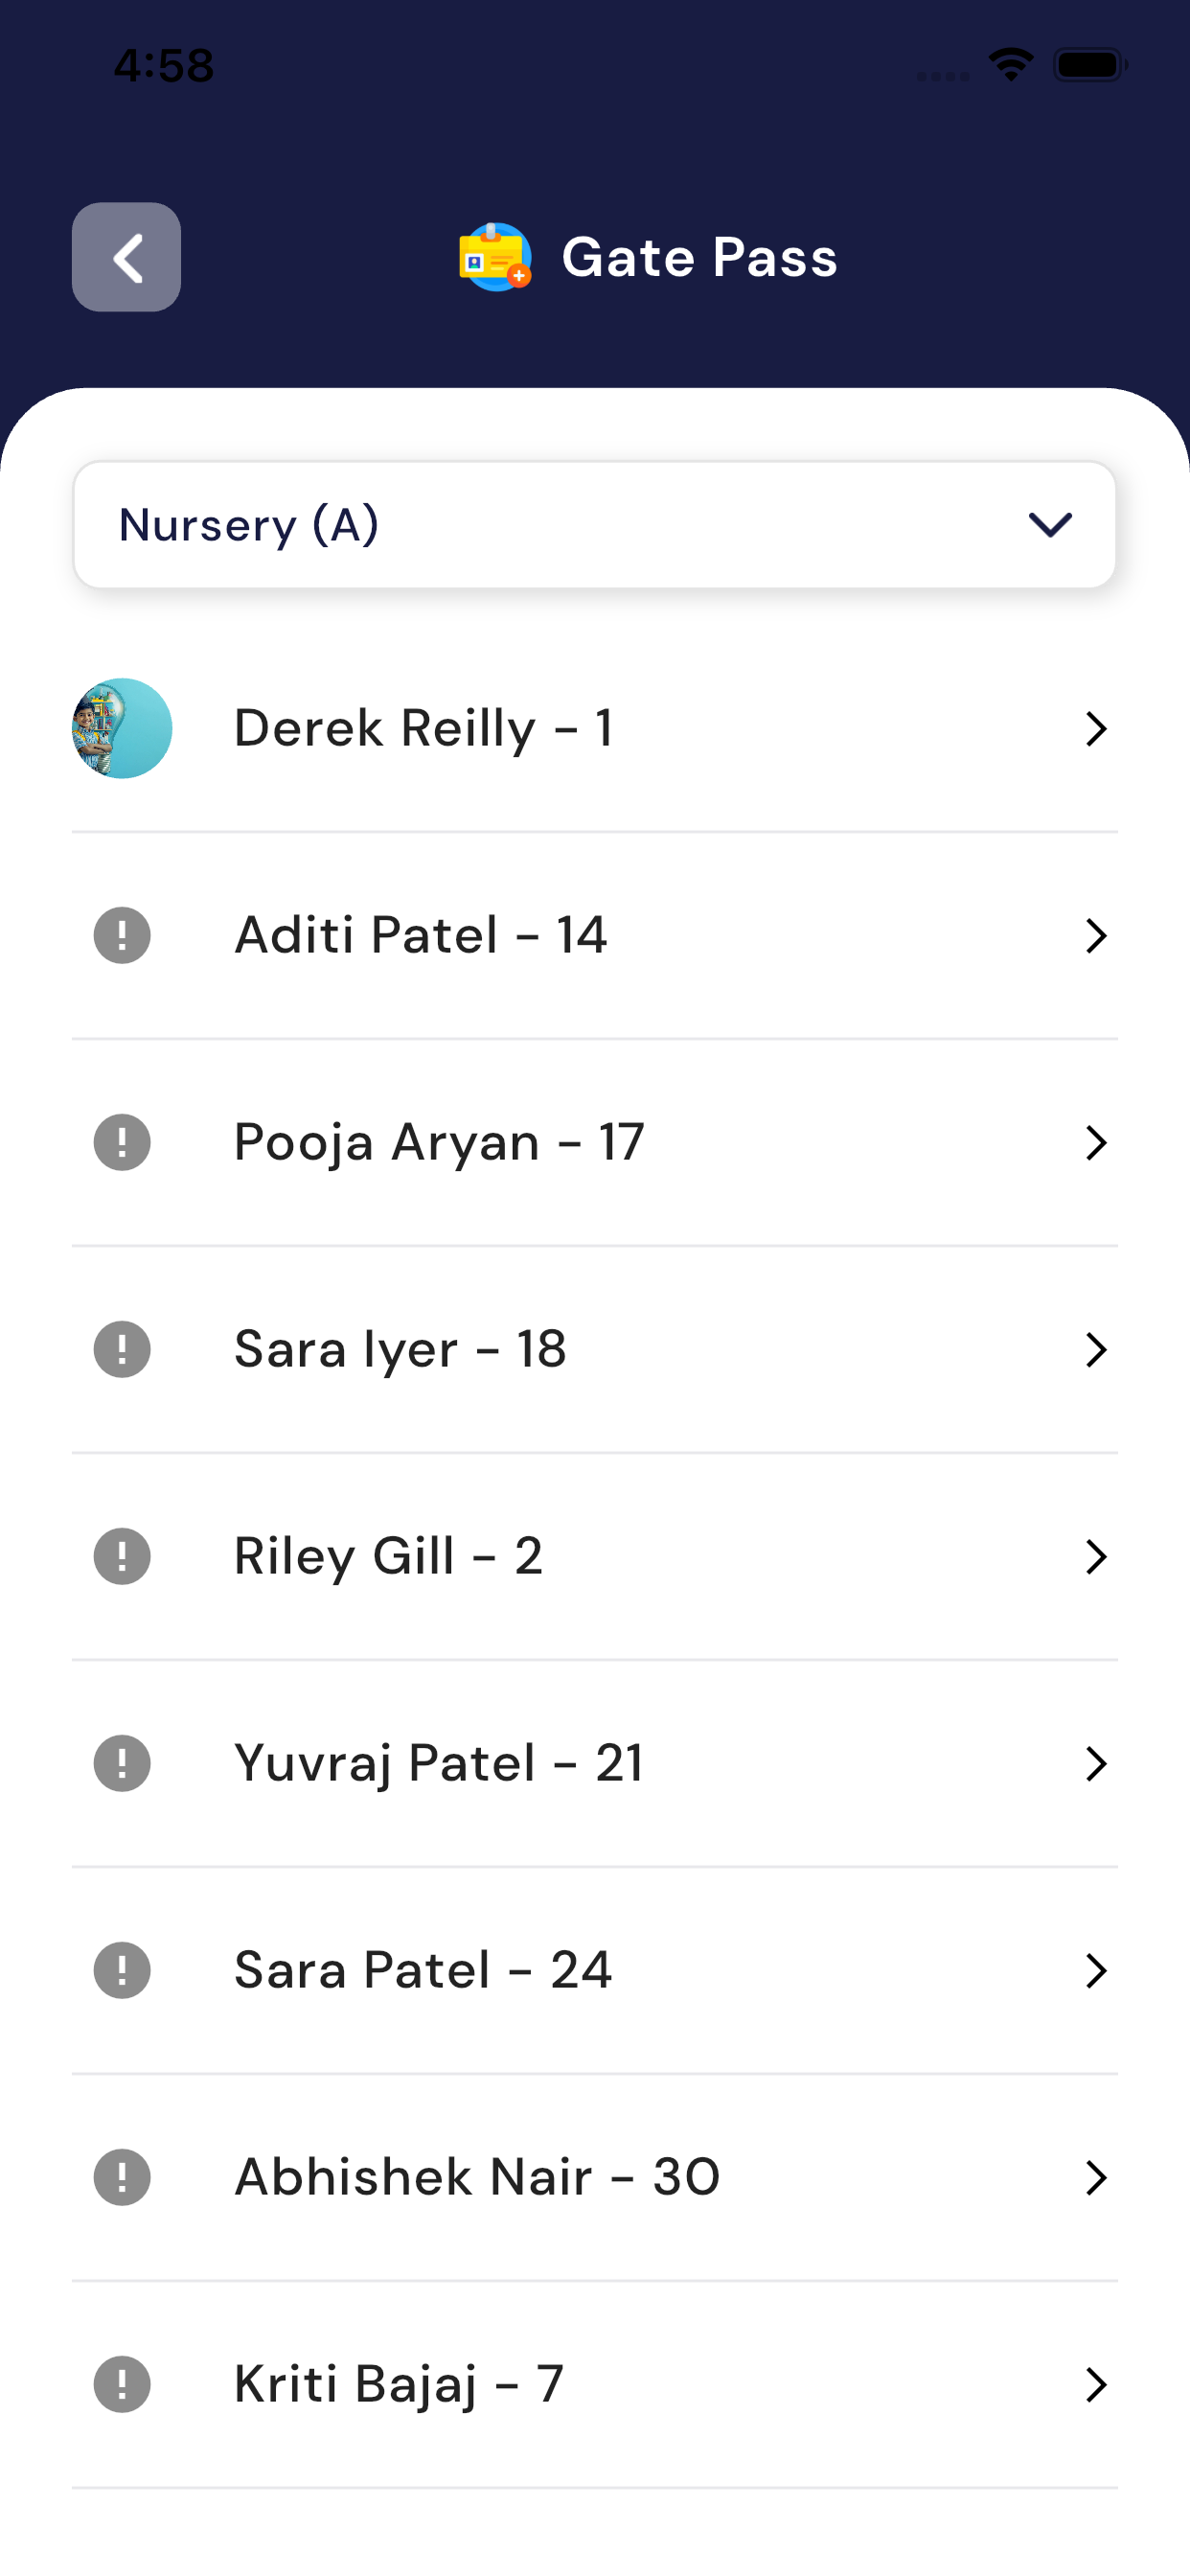
5.11 Gate Pass
The Gate Pass module helps teachers verify whether a student is allowed to leave the school during school hours.
This ensures student safety andproper authorization before handing over a child to parents or guardians.
Purpose of Gate Pass Module
Using the Gate Pass module, a teacher can:
- View all gate passes created by admin
- Check if a student has permission to leave
- Verify who is coming to pick up the student
- Know the reason for leaving school
- Ensure students are releasedonly to authorized persons
How Gate Pass Works
- When a parent comes to take a student early,
the admin creates a Gate Pass from the admin panel.
- The Gate Pass is created in the student’s name.
- That Gate Pass is automatically visible to the teacher.
- Before allowing the student to leave, the teacherchecks the Gate Pass details.
- After verification, the teacher allows the student to go with the parent/guardian.
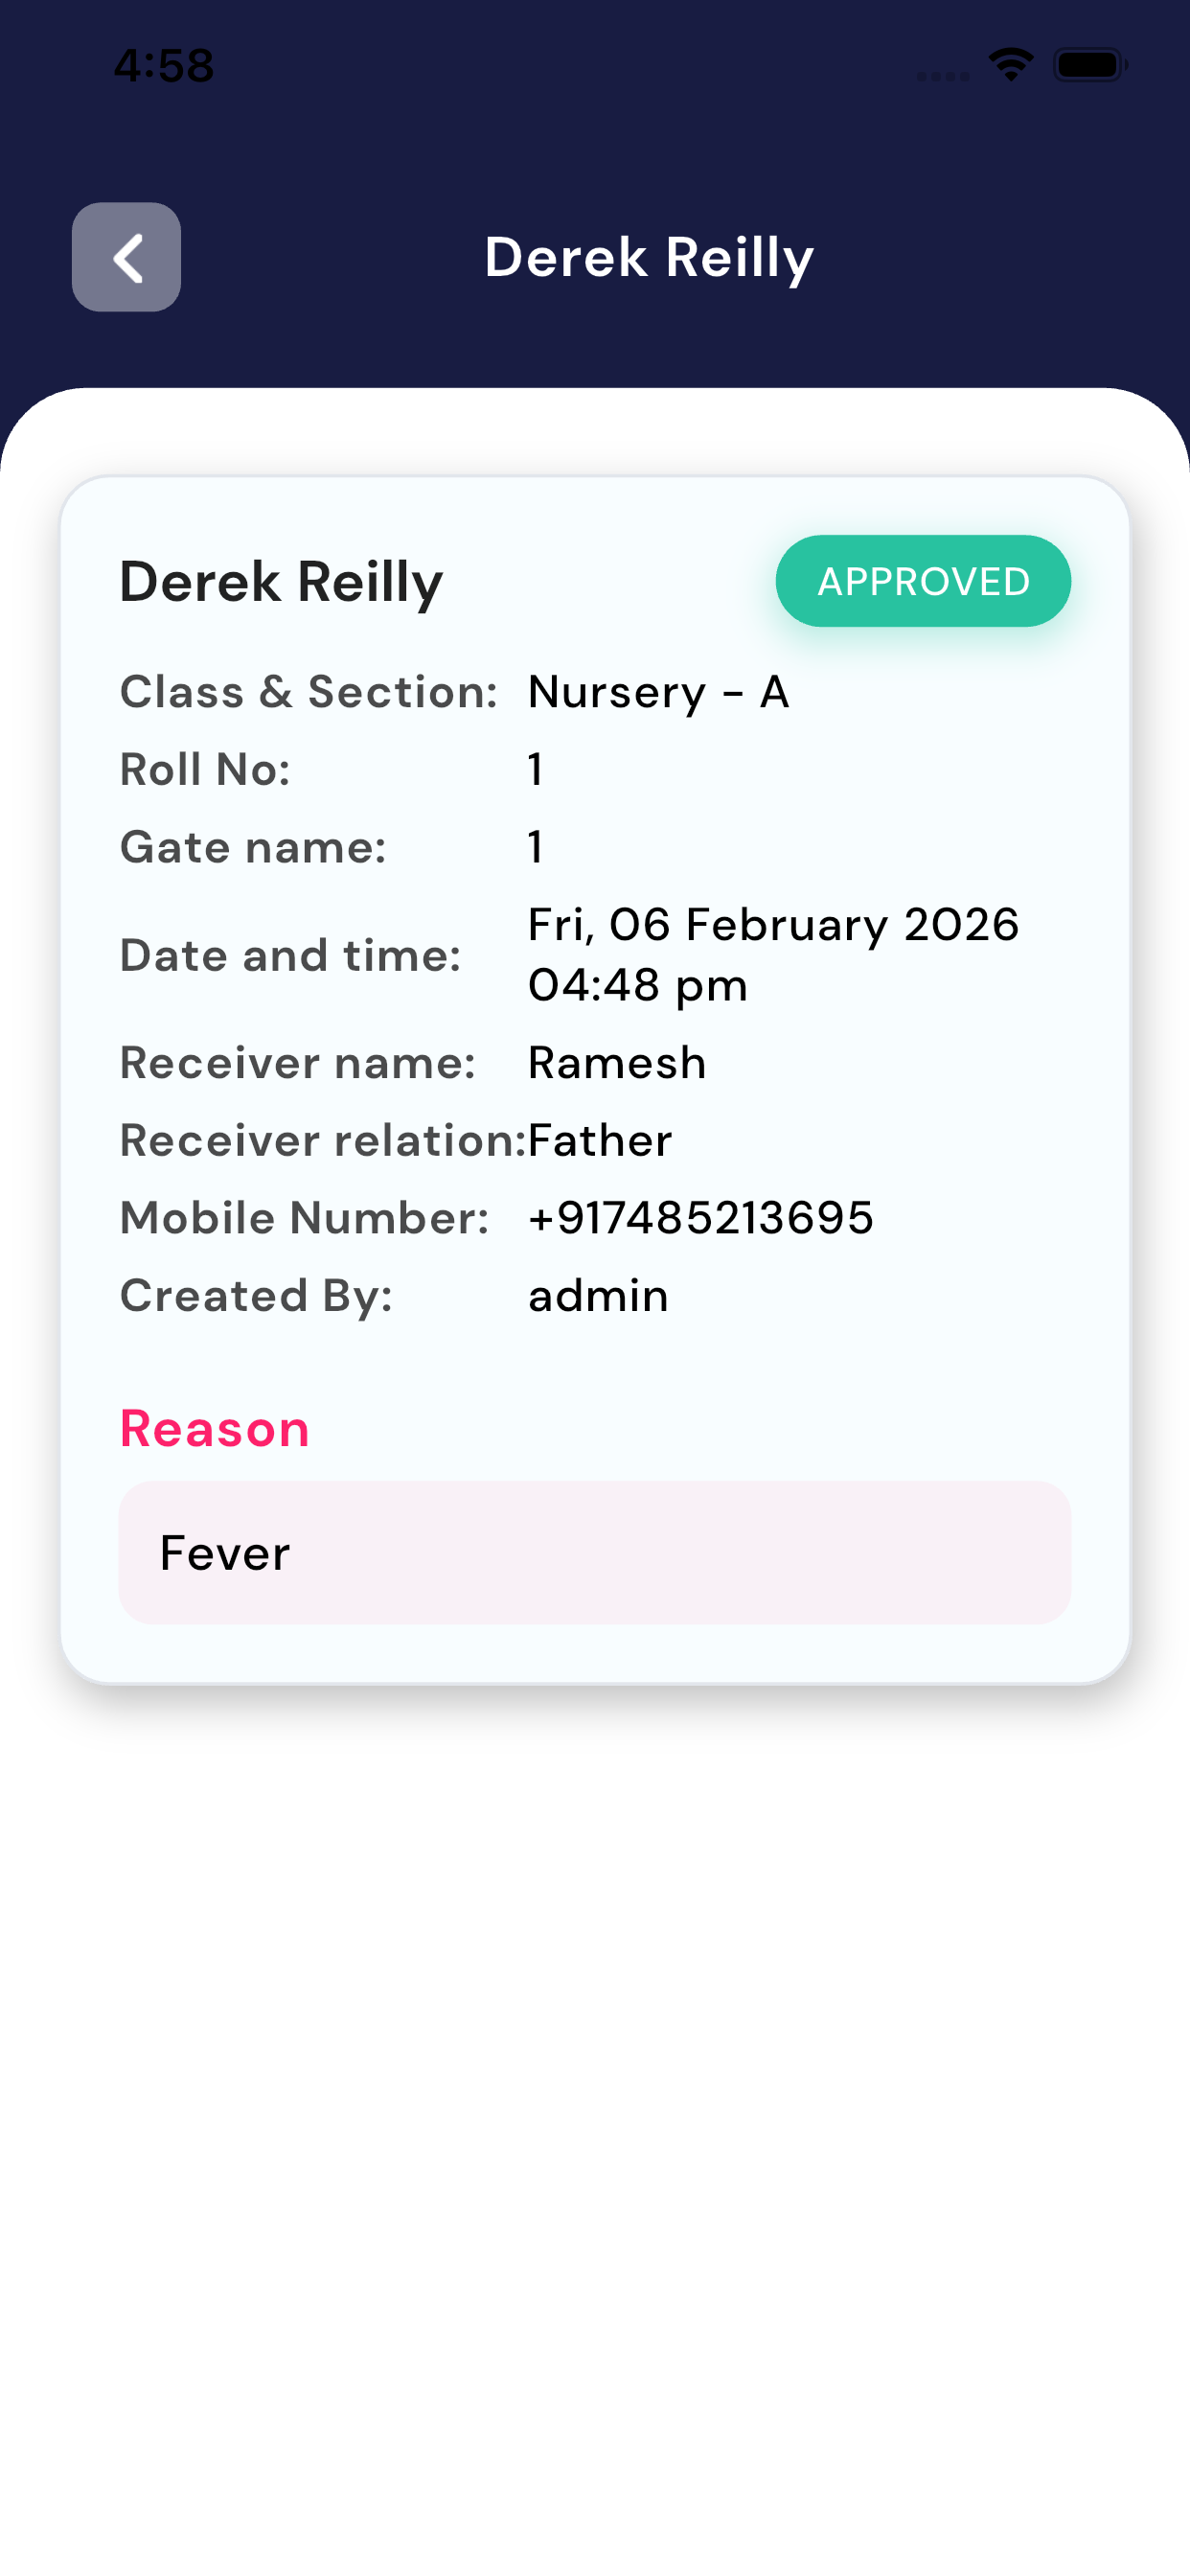
Gate Pass Information Shown to Teacher
For each student gate pass, the teacher can see the following details:
- Student Name
- Class & Section
- Roll Number
- Gate Pass Status
- Approved / Pending
- Date and Time
- Receiver Name
- Person who is coming to take the student
- Receiver Relation
- Father / Mother / Guardian
- Mobile Number
- Reason
- Example: Fever, Personal Work, Emergency
- Created By
- Admin
How Teacher Should Use Gate Pass
- Open the Gate Pass module
- Select the student’s gate pass
- Carefully verify:
- Student name
- Receiver name and relation
- Reason for leaving
- Gate pass status (must be Approved)
- Match the details with the person who has come to pick up the student
- After confirmation, allow the student to leave
Important Points for Teachers
- Teachers cannot create gate passes
- Gate passes are created only by admin
- Student should be allowed to leaveonly if gate pass is approved
- If no gate pass is available,do not allow the student to go
- Always verify the receiver’s identity before handing over the student
Benefits of Gate Pass Module
- Ensures student safety
- Prevents unauthorized pickup
- Keeps a proper record of student movement
- Helps teachers make quick and correct decisions
Summary
The Gate Pass module allows teachers to:
- Check student exit permission
- Know who is picking up the student
- Understand the reason for leaving
- Safely hand over students to authorized persons
This module makes the school exit processsafe, transparent, and well controlled.
5.12 Students List
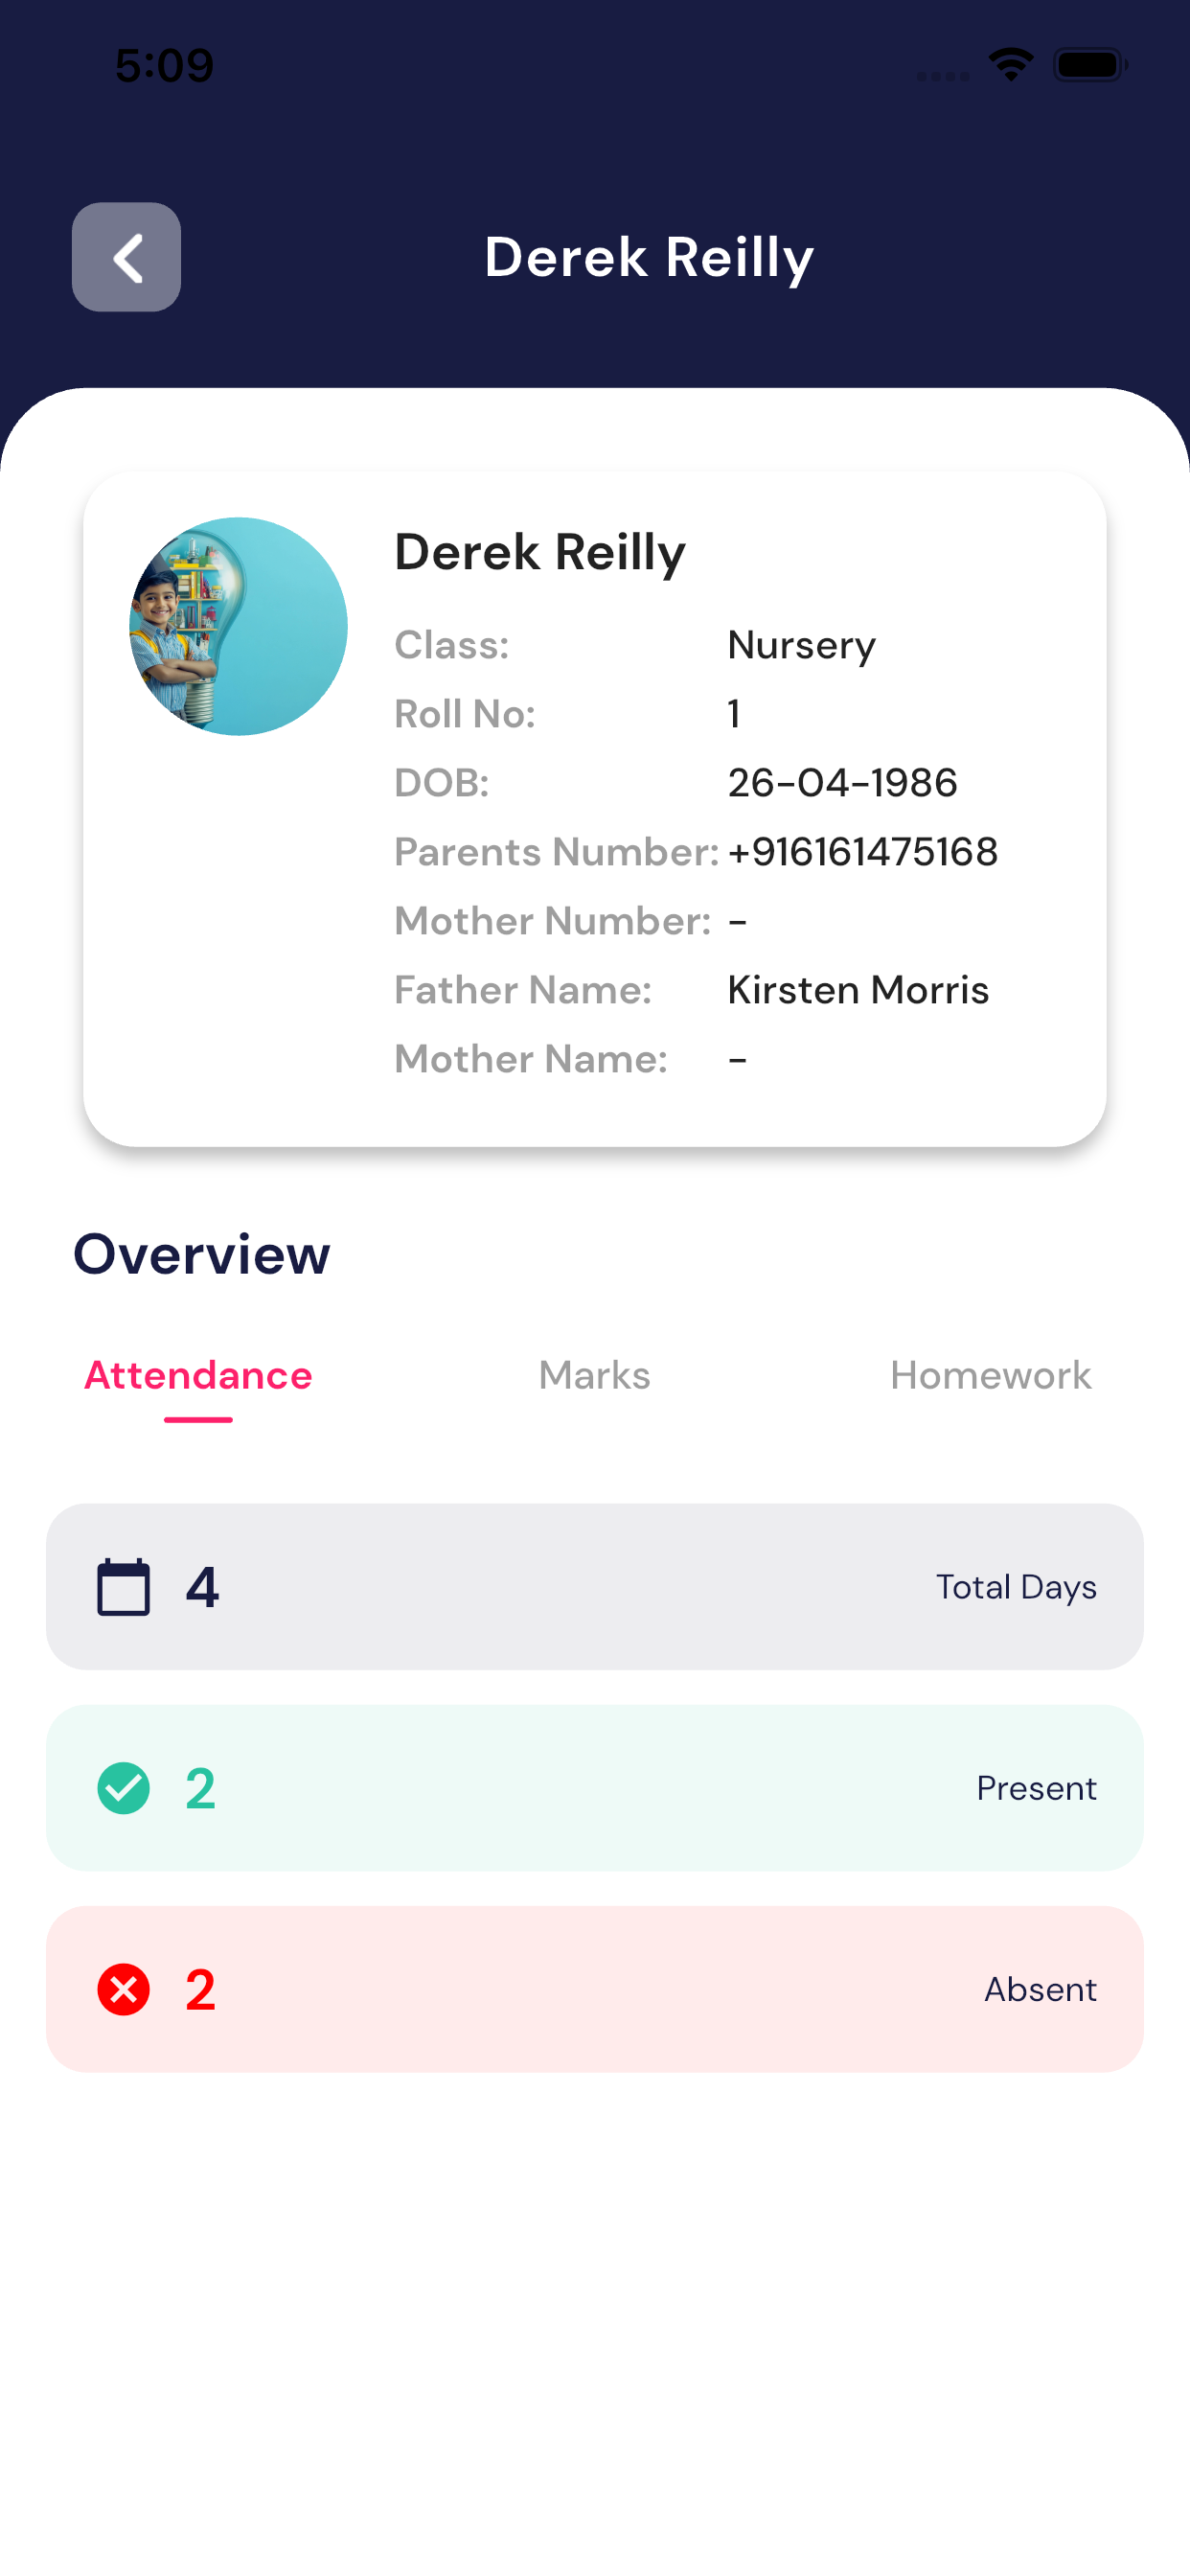
The Students List module helps teachers view all students of their class and check each student’s complete academic overview in one place.
This module is view-only for teachers and is used to quickly understand a student’s attendance, marks, and homework status.
Purpose of Students List Module
Using this module, a teacher can:
- View all students of the assigned class
- Open any student’s complete profile
- Check attendance summary for the academic year
- View exam and test marks
- See marks graph subject-wise
- Check homework status (completed and pending)
Student Profile Details
After selecting a student, the student profile opens with the following sections:
1. Student Basic Information
At the top of the screen, teacher can see:
- Student Name
- Class
- Roll Number
- Date of Birth
- Parent’s Mobile Number
- Father’s / Mother’s Name
This helps the teacher quickly identify the student.
Overview Section
The Overview section has three tabs:
1. Attendance Tab
This tab shows the student’s attendance summary for the academic year:
- Total Days – Total working days
- Present – Number of days student attended school
- Absent – Number of days student was absent
This gives a quick idea of the student’s regularity.
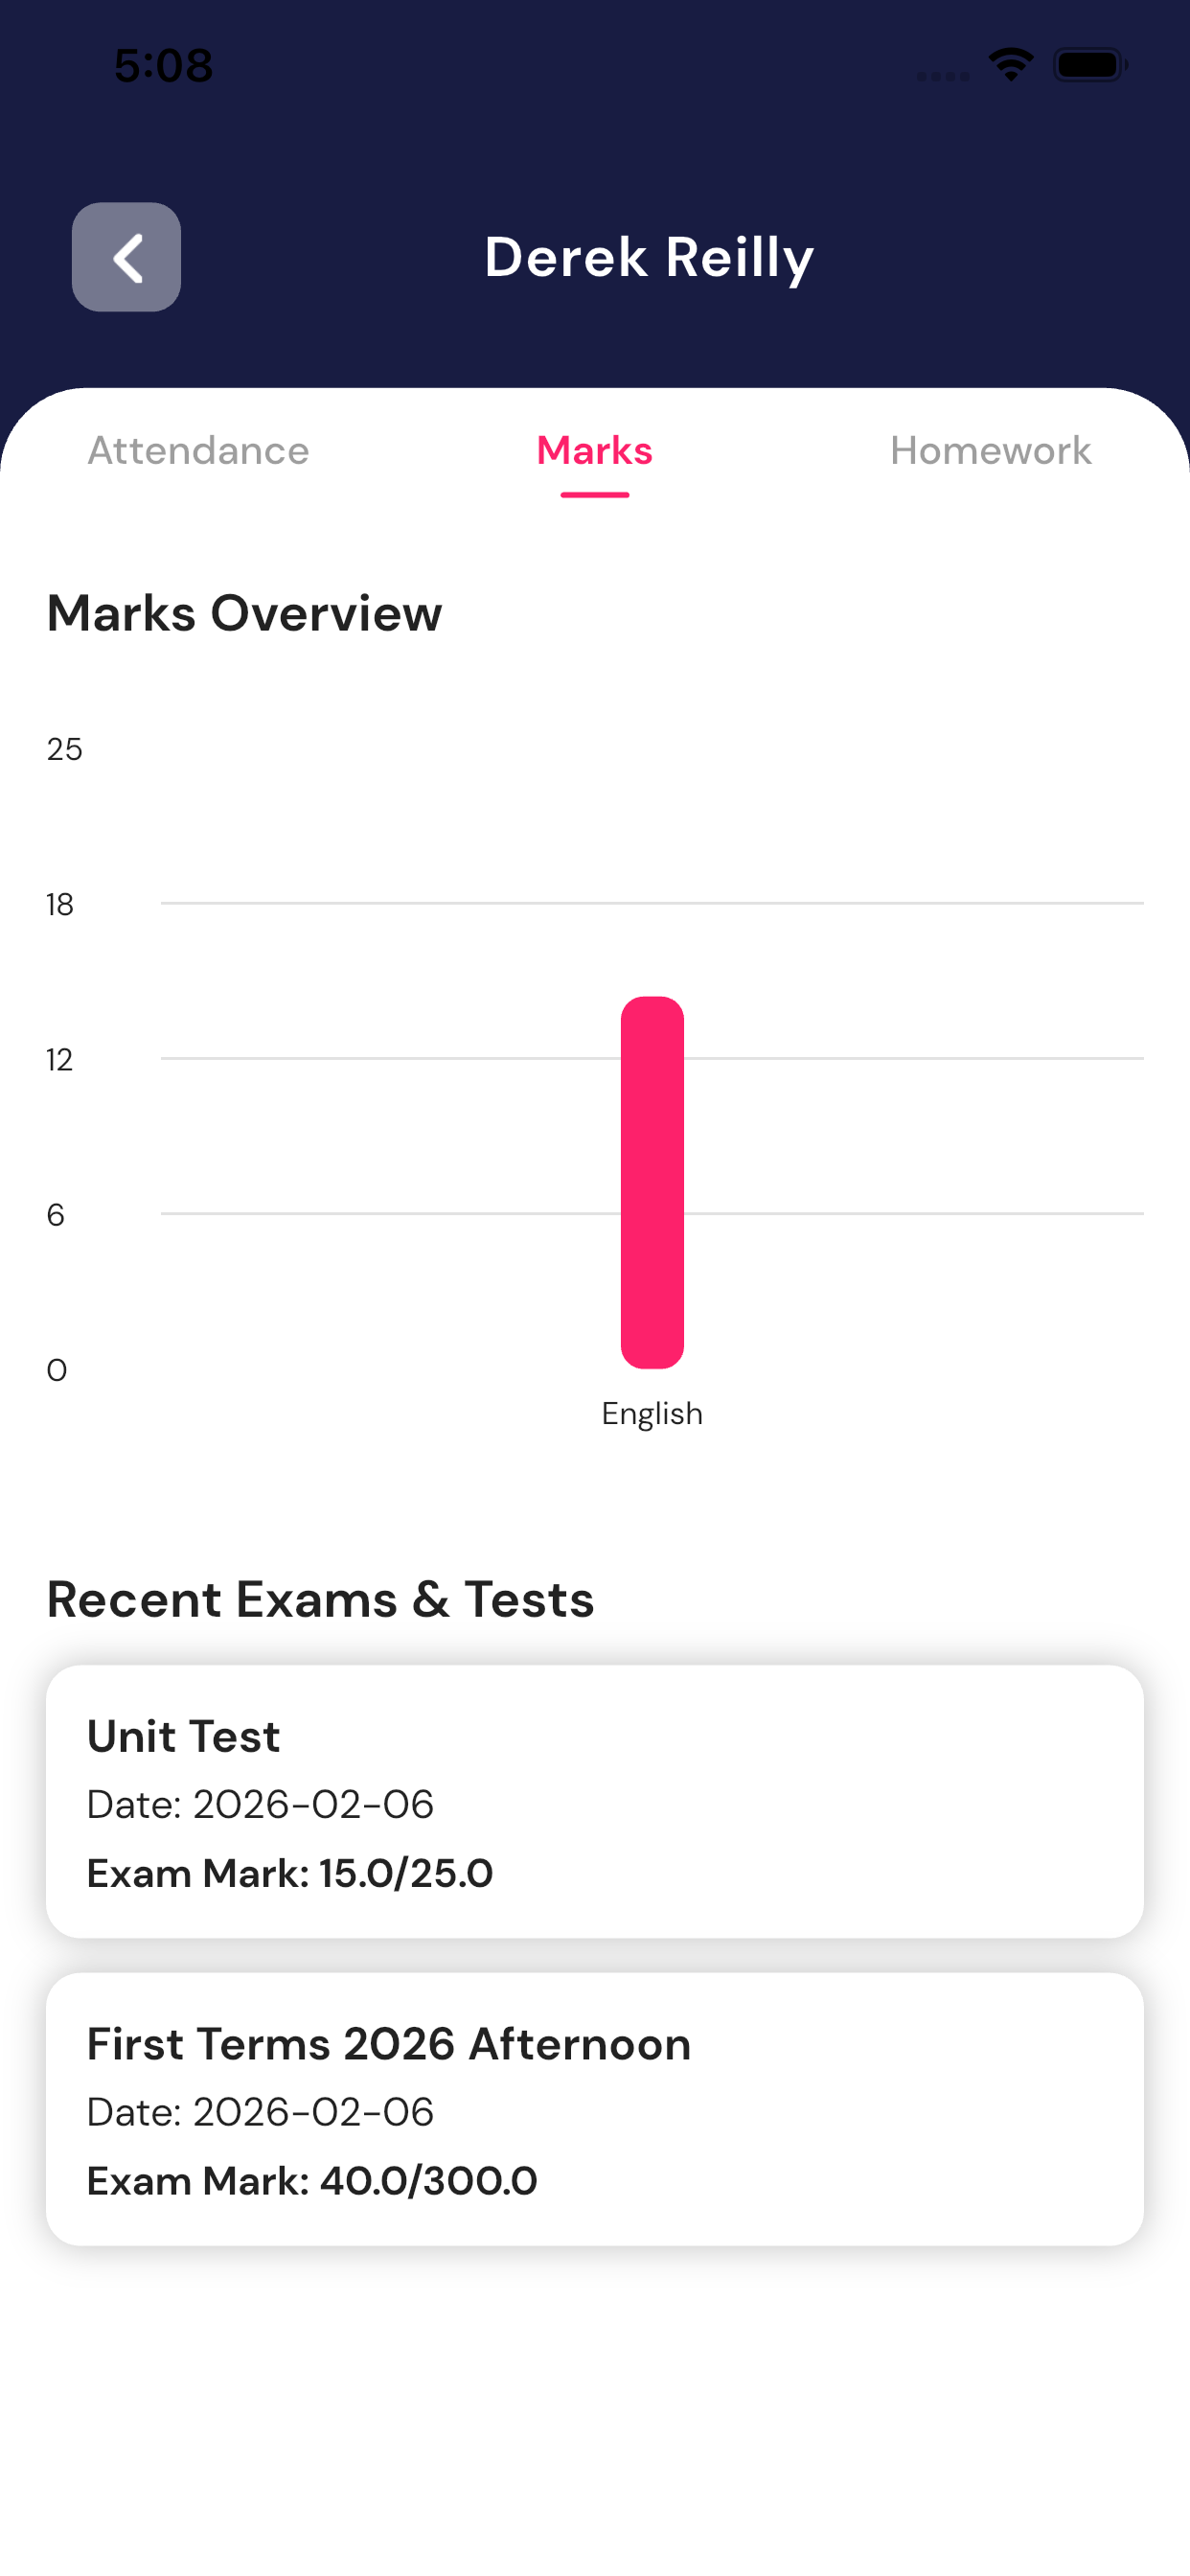
2. Marks Tab
In the Marks tab, teacher can see:
- Marks Overview graph (subject-wise performance)
- Recent Exams & Tests list, including:
- Exam/Test Name
- Exam Date
- Marks Obtained / Total Marks
This helps teachers track the student’s academic performance easily.
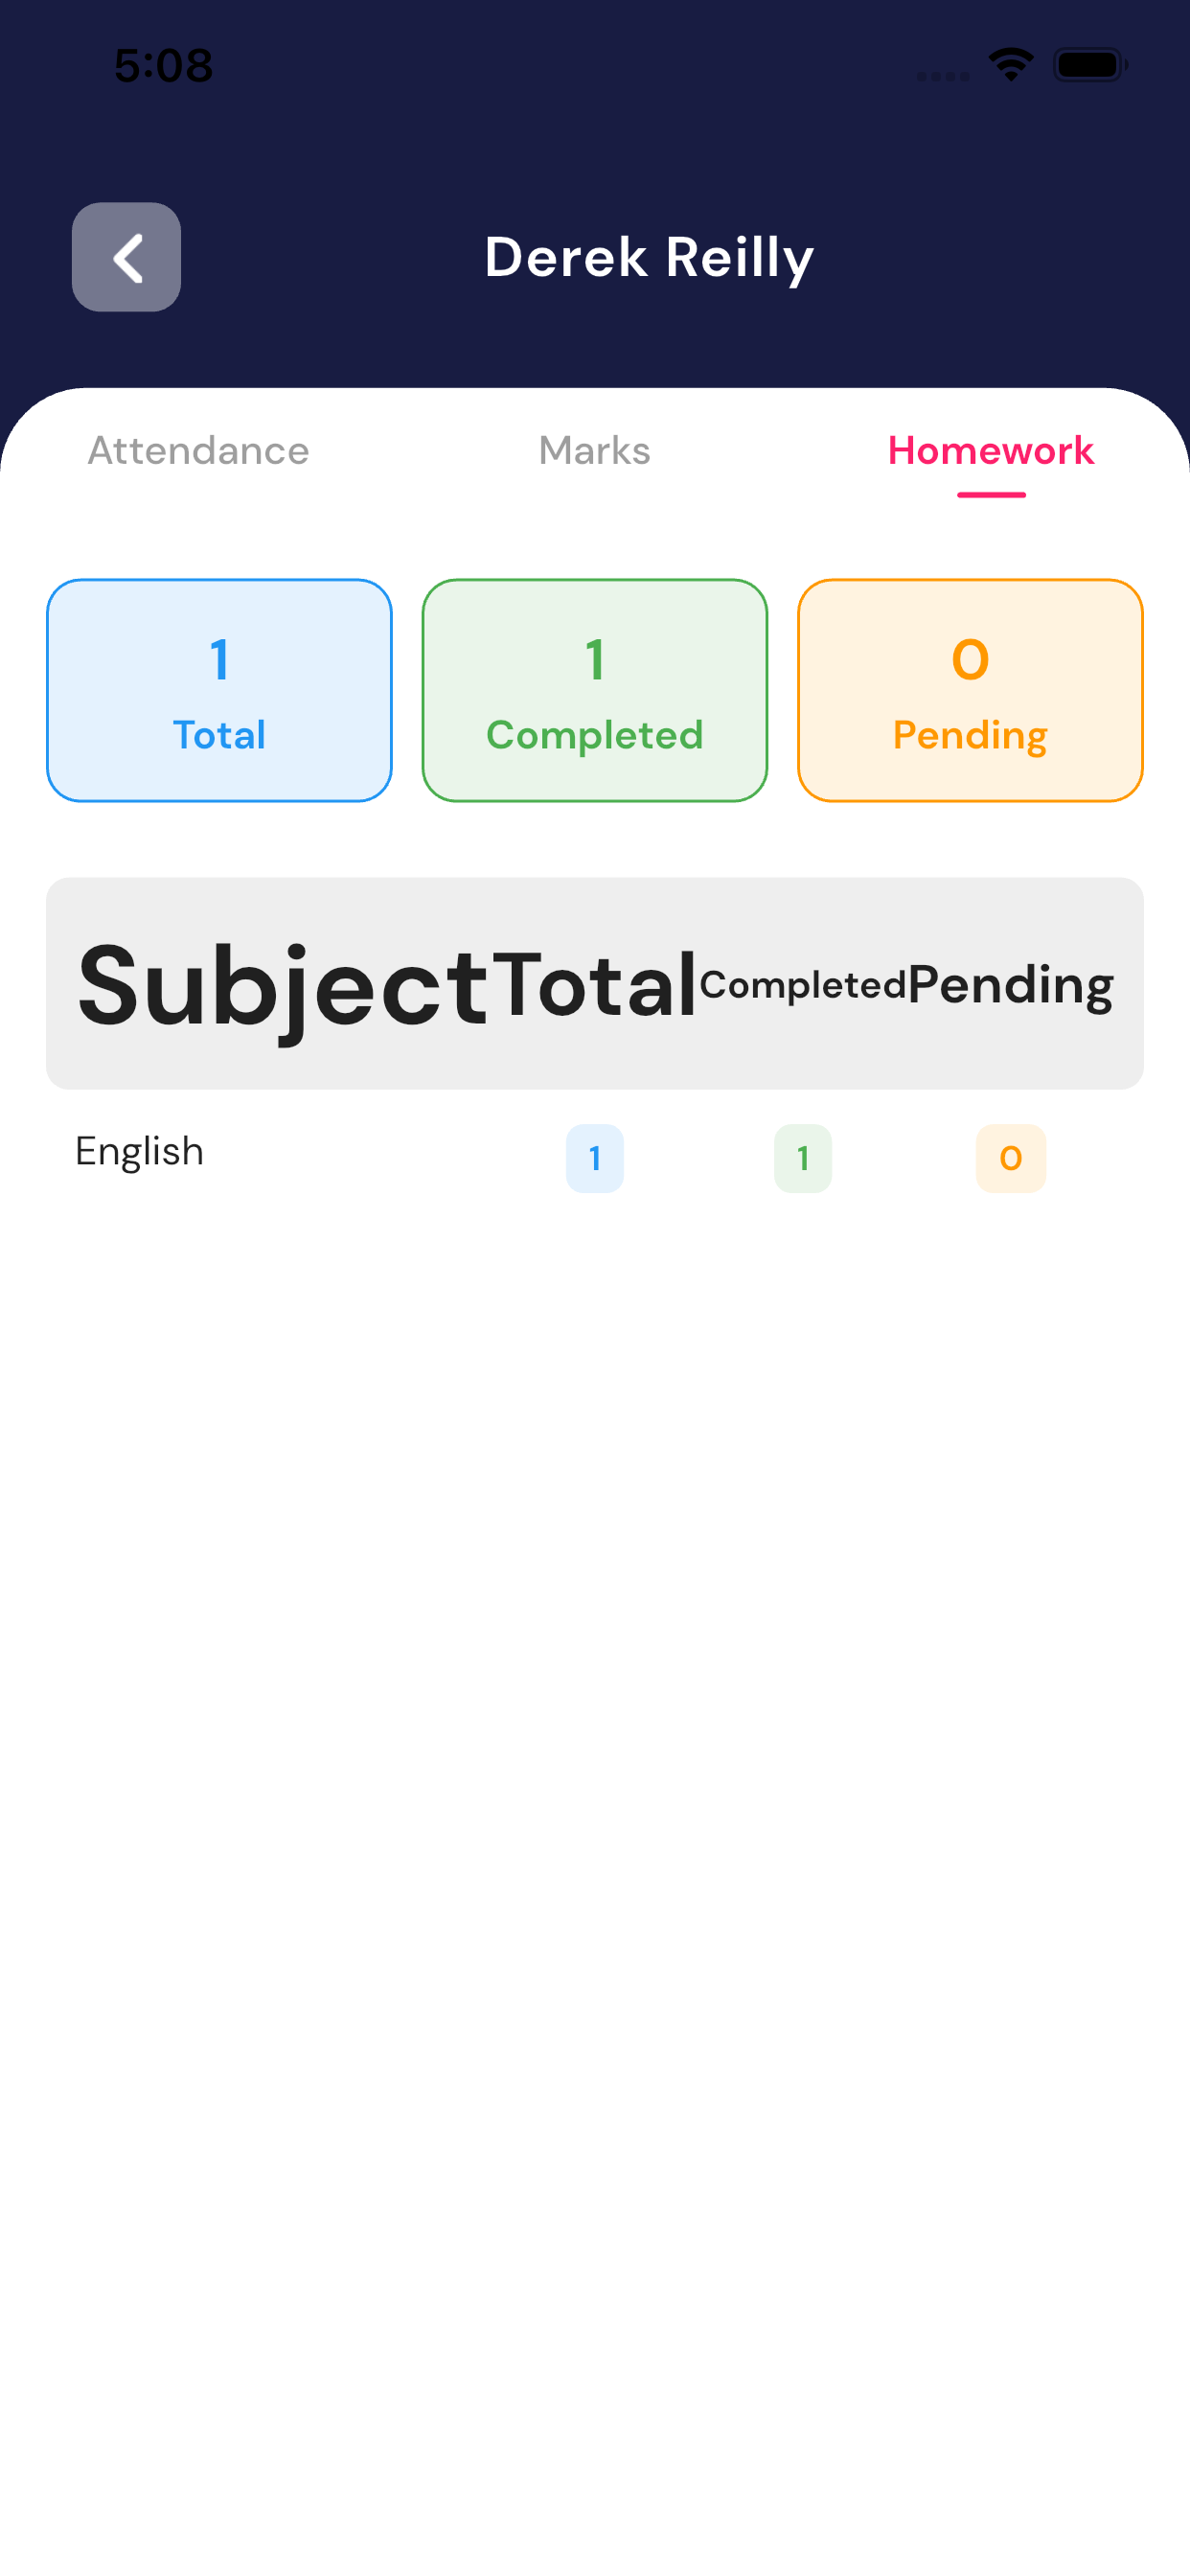
3. Homework Tab
The Homework tab shows homework details for the student:
- Total Homework given
- Completed Homework
- Pending Homework
- Subject-wise homework status
This helps the teacher understand how regular the student is with homework.
Important Points
- Teachers can only view details, no editing is allowed
- Data is automatically updated from attendance, exam, and homework modules
- All information is shownstudent-wise and subject-wise
- Graphs make performance easy to understand at a glance
Summary
The Students List module gives teachers a complete view of each student’s:
- Attendance
- Academic performance
- Homework progress
This module helps teachersmonitor students effectively, identify weak areas, and support students better.
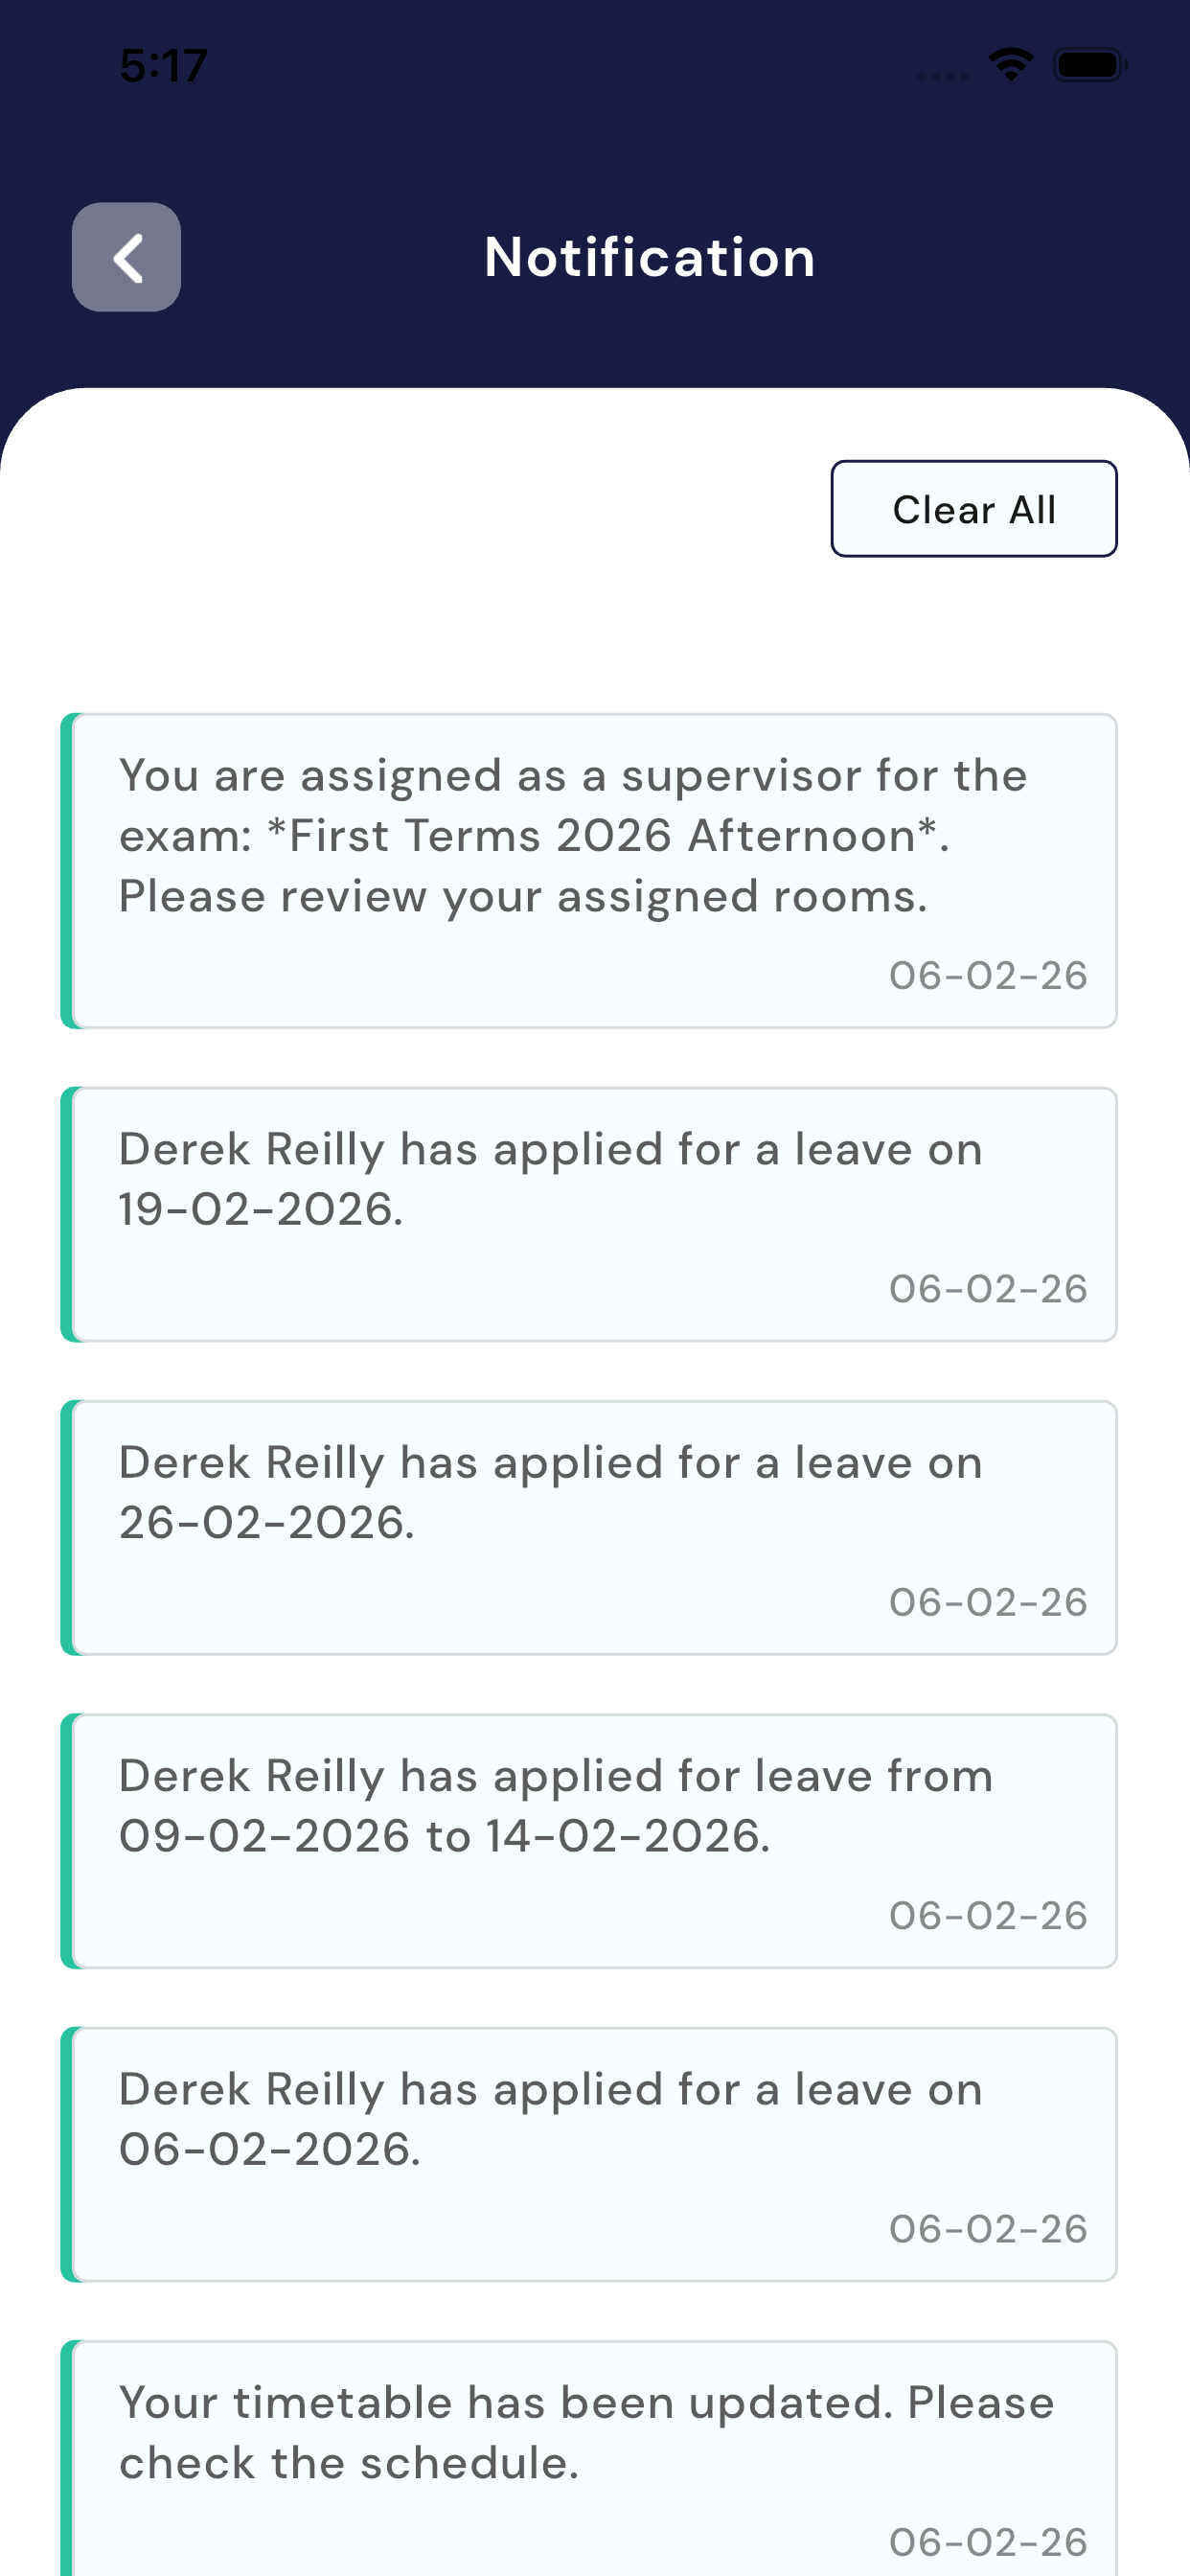
5.13 Notifications module
How to View Notifications
- Go to the Home (Dashboard) screen
- Tap on the Notification (Bell) icon at the top-right corner
- A list of all notifications history will be displayed
- Tap on any notification to read its details (if applicable)
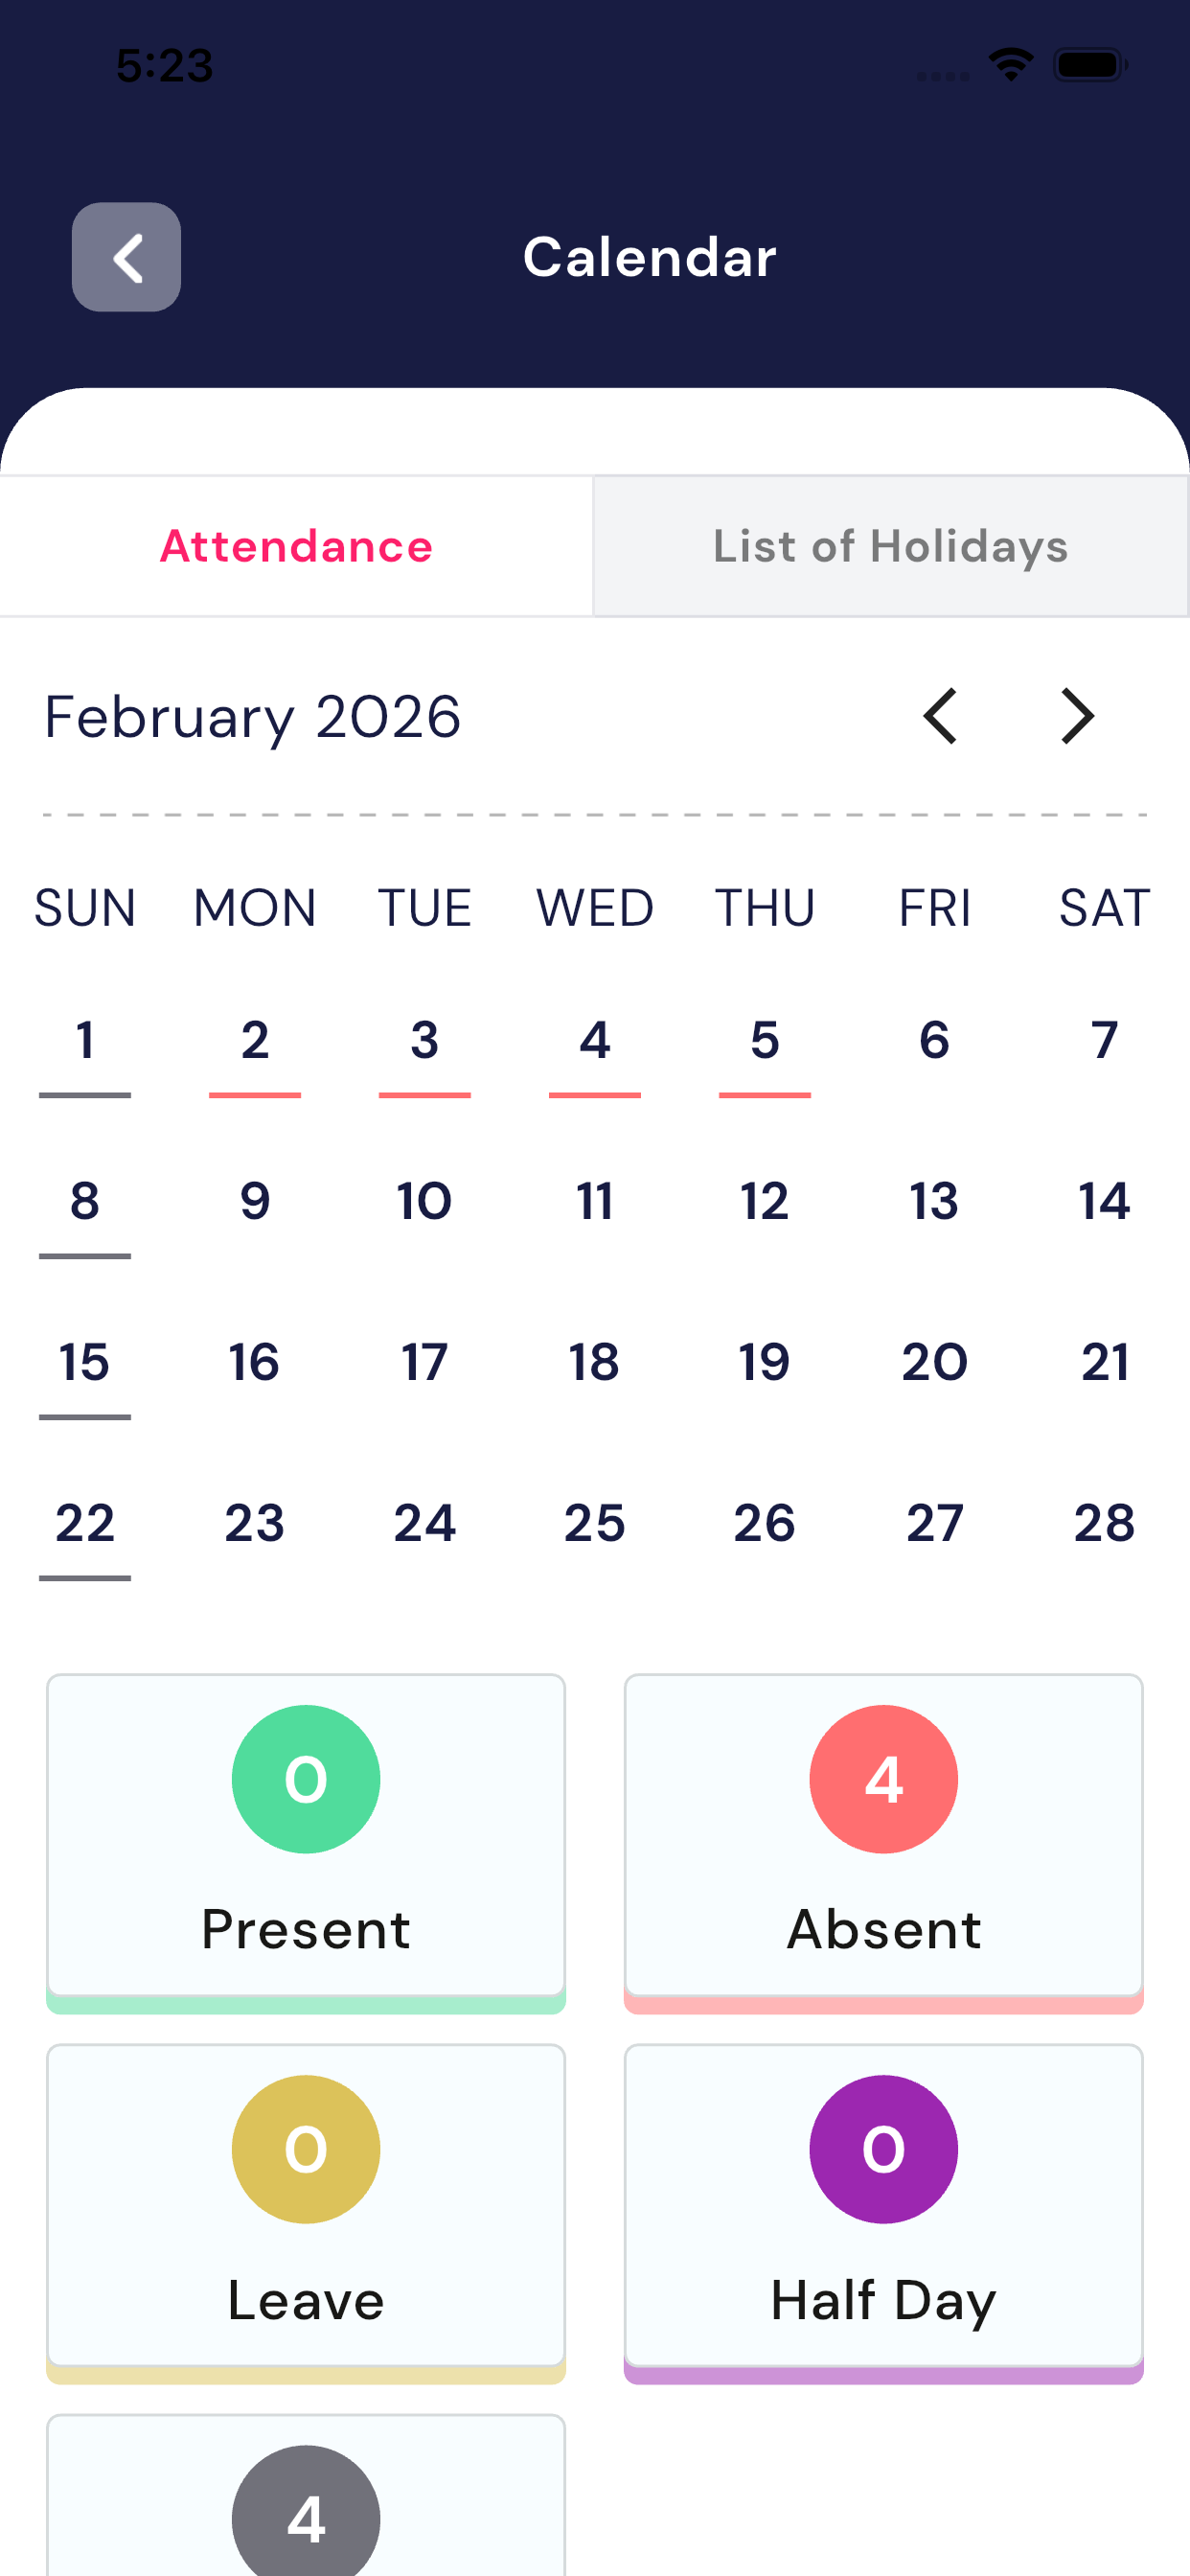
5.13 Calendar Module
The Calendar module helps the teacher view their attendance details clearly.
a) Attendance Tab
In the Attendance section, the teacher can see:
- A monthly calendar view
- Each date shows attendance status
Below the calendar, a summary is shown:
- Present – Number of days the teacher was present at school
- Absent – Number of days the teacher was absent
- Leave – Approved leave days
- Half Day – Days marked as half day
- Holiday – School holidays (non-working days)
This helps the teacher easily understand:
- How many days they taught in school
- How many days they were on leave
- How many days were holidays
- How many half days were recorded
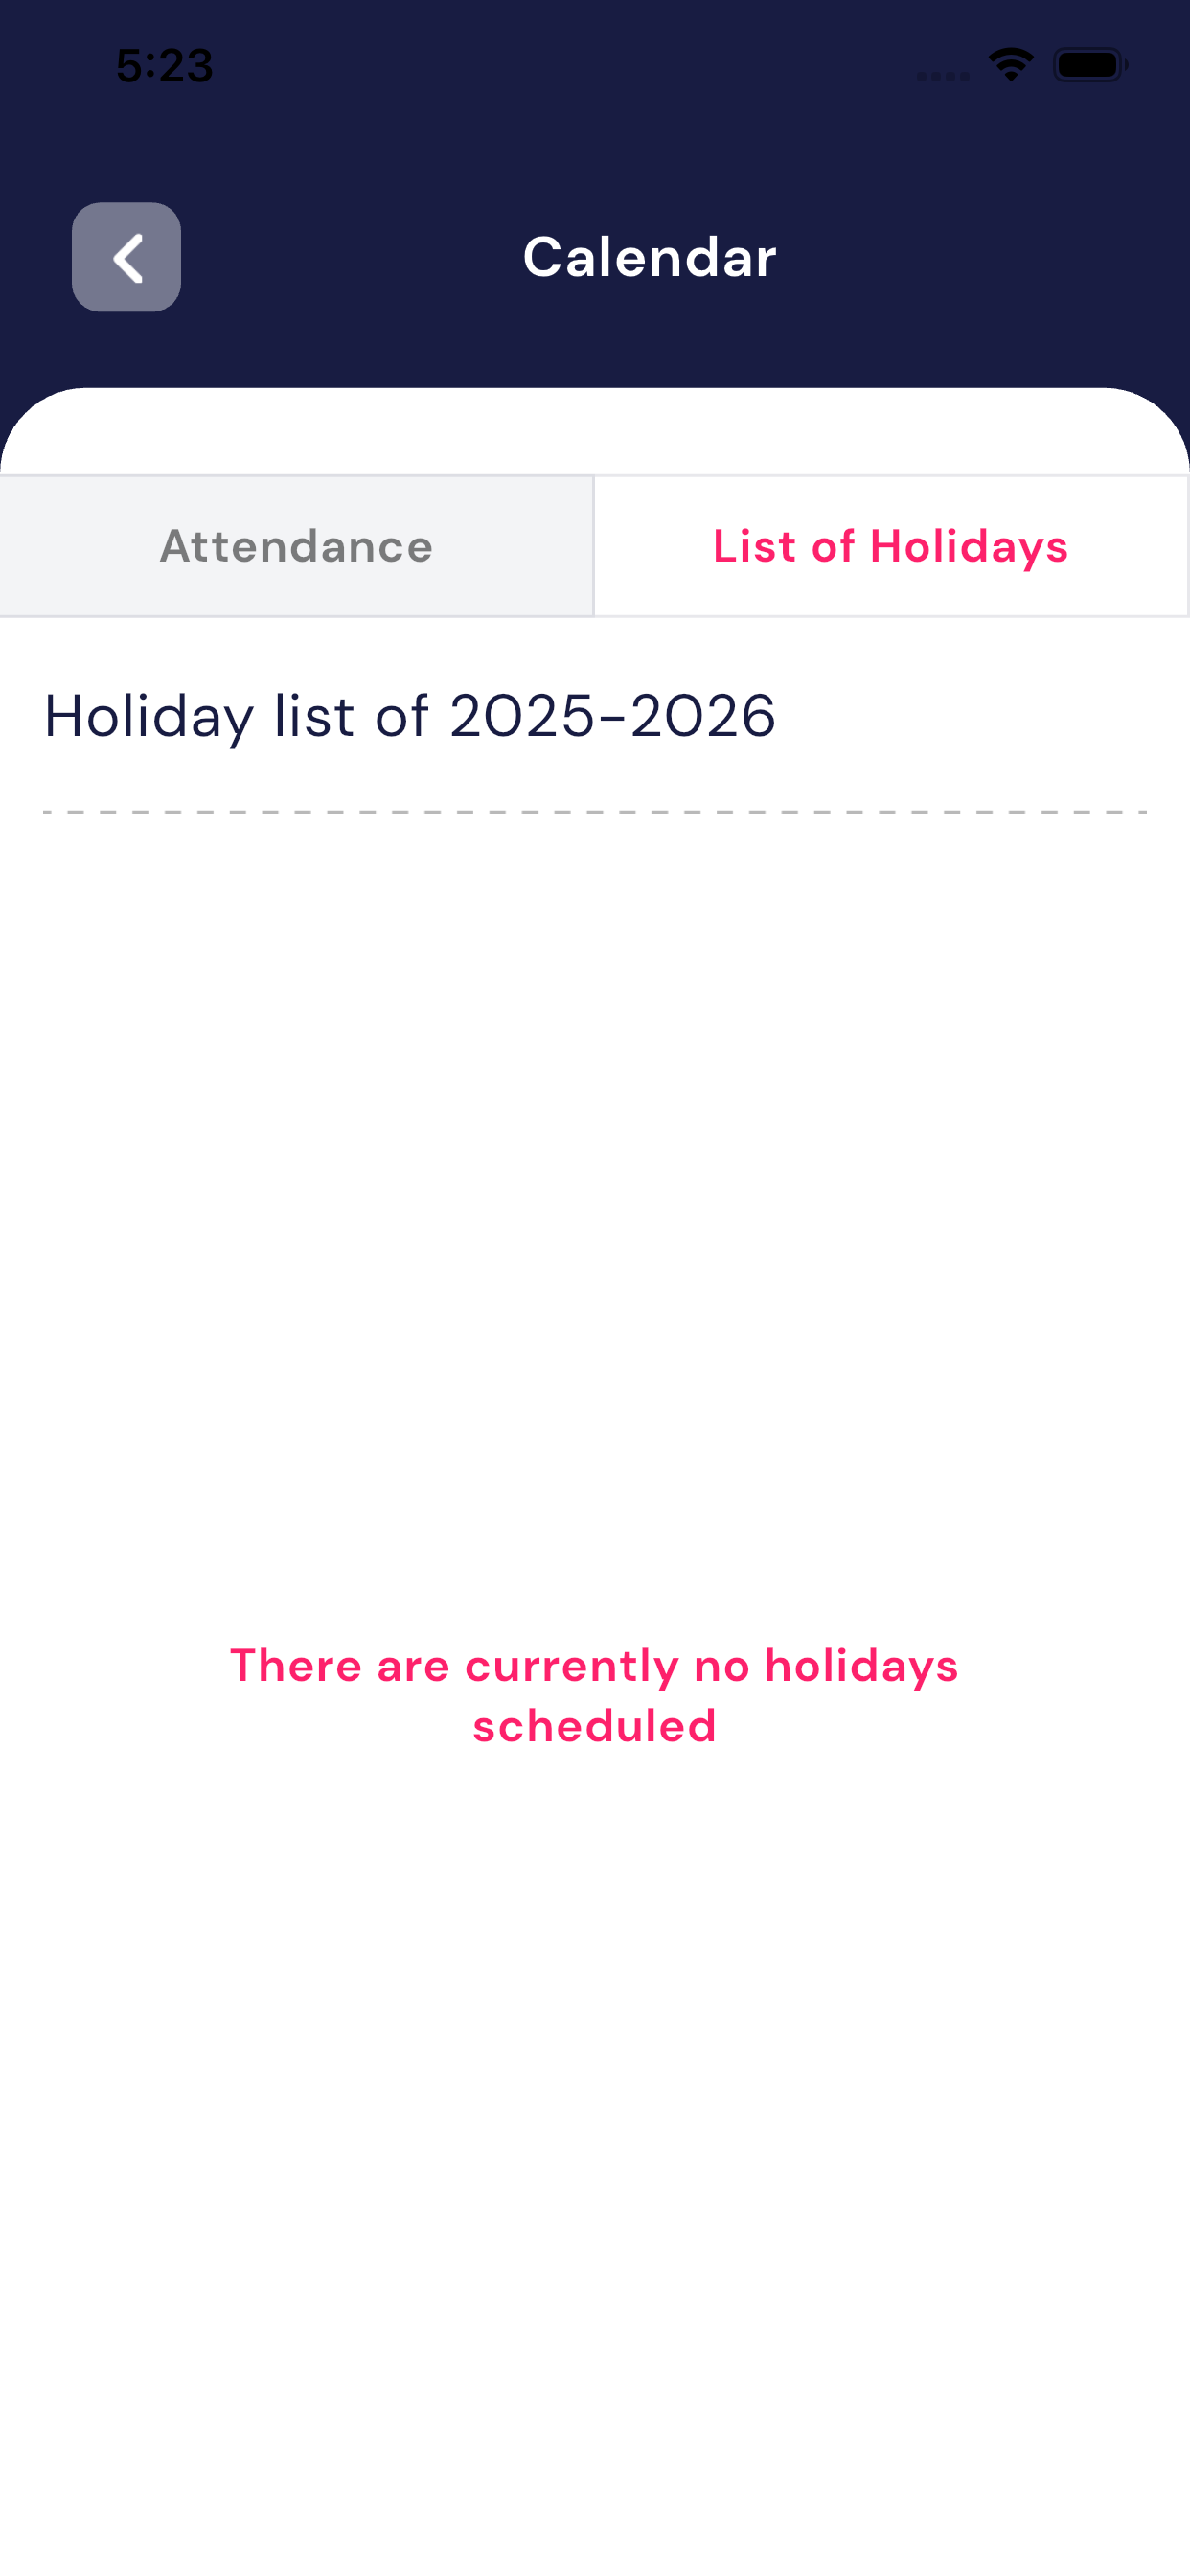
b) List of Holidays Tab
- This tab shows theschool’s default holiday list for the academic year (e.g., 2025–2026).
- All official school holidays are listed here.
- If no holidays are added yet, a message like
“There are currently no holidays scheduled”will be shown.
5. Benefits for Teachers
- Easy tracking of attendance records
- Clear visibility of holidays and leave
Leave Module
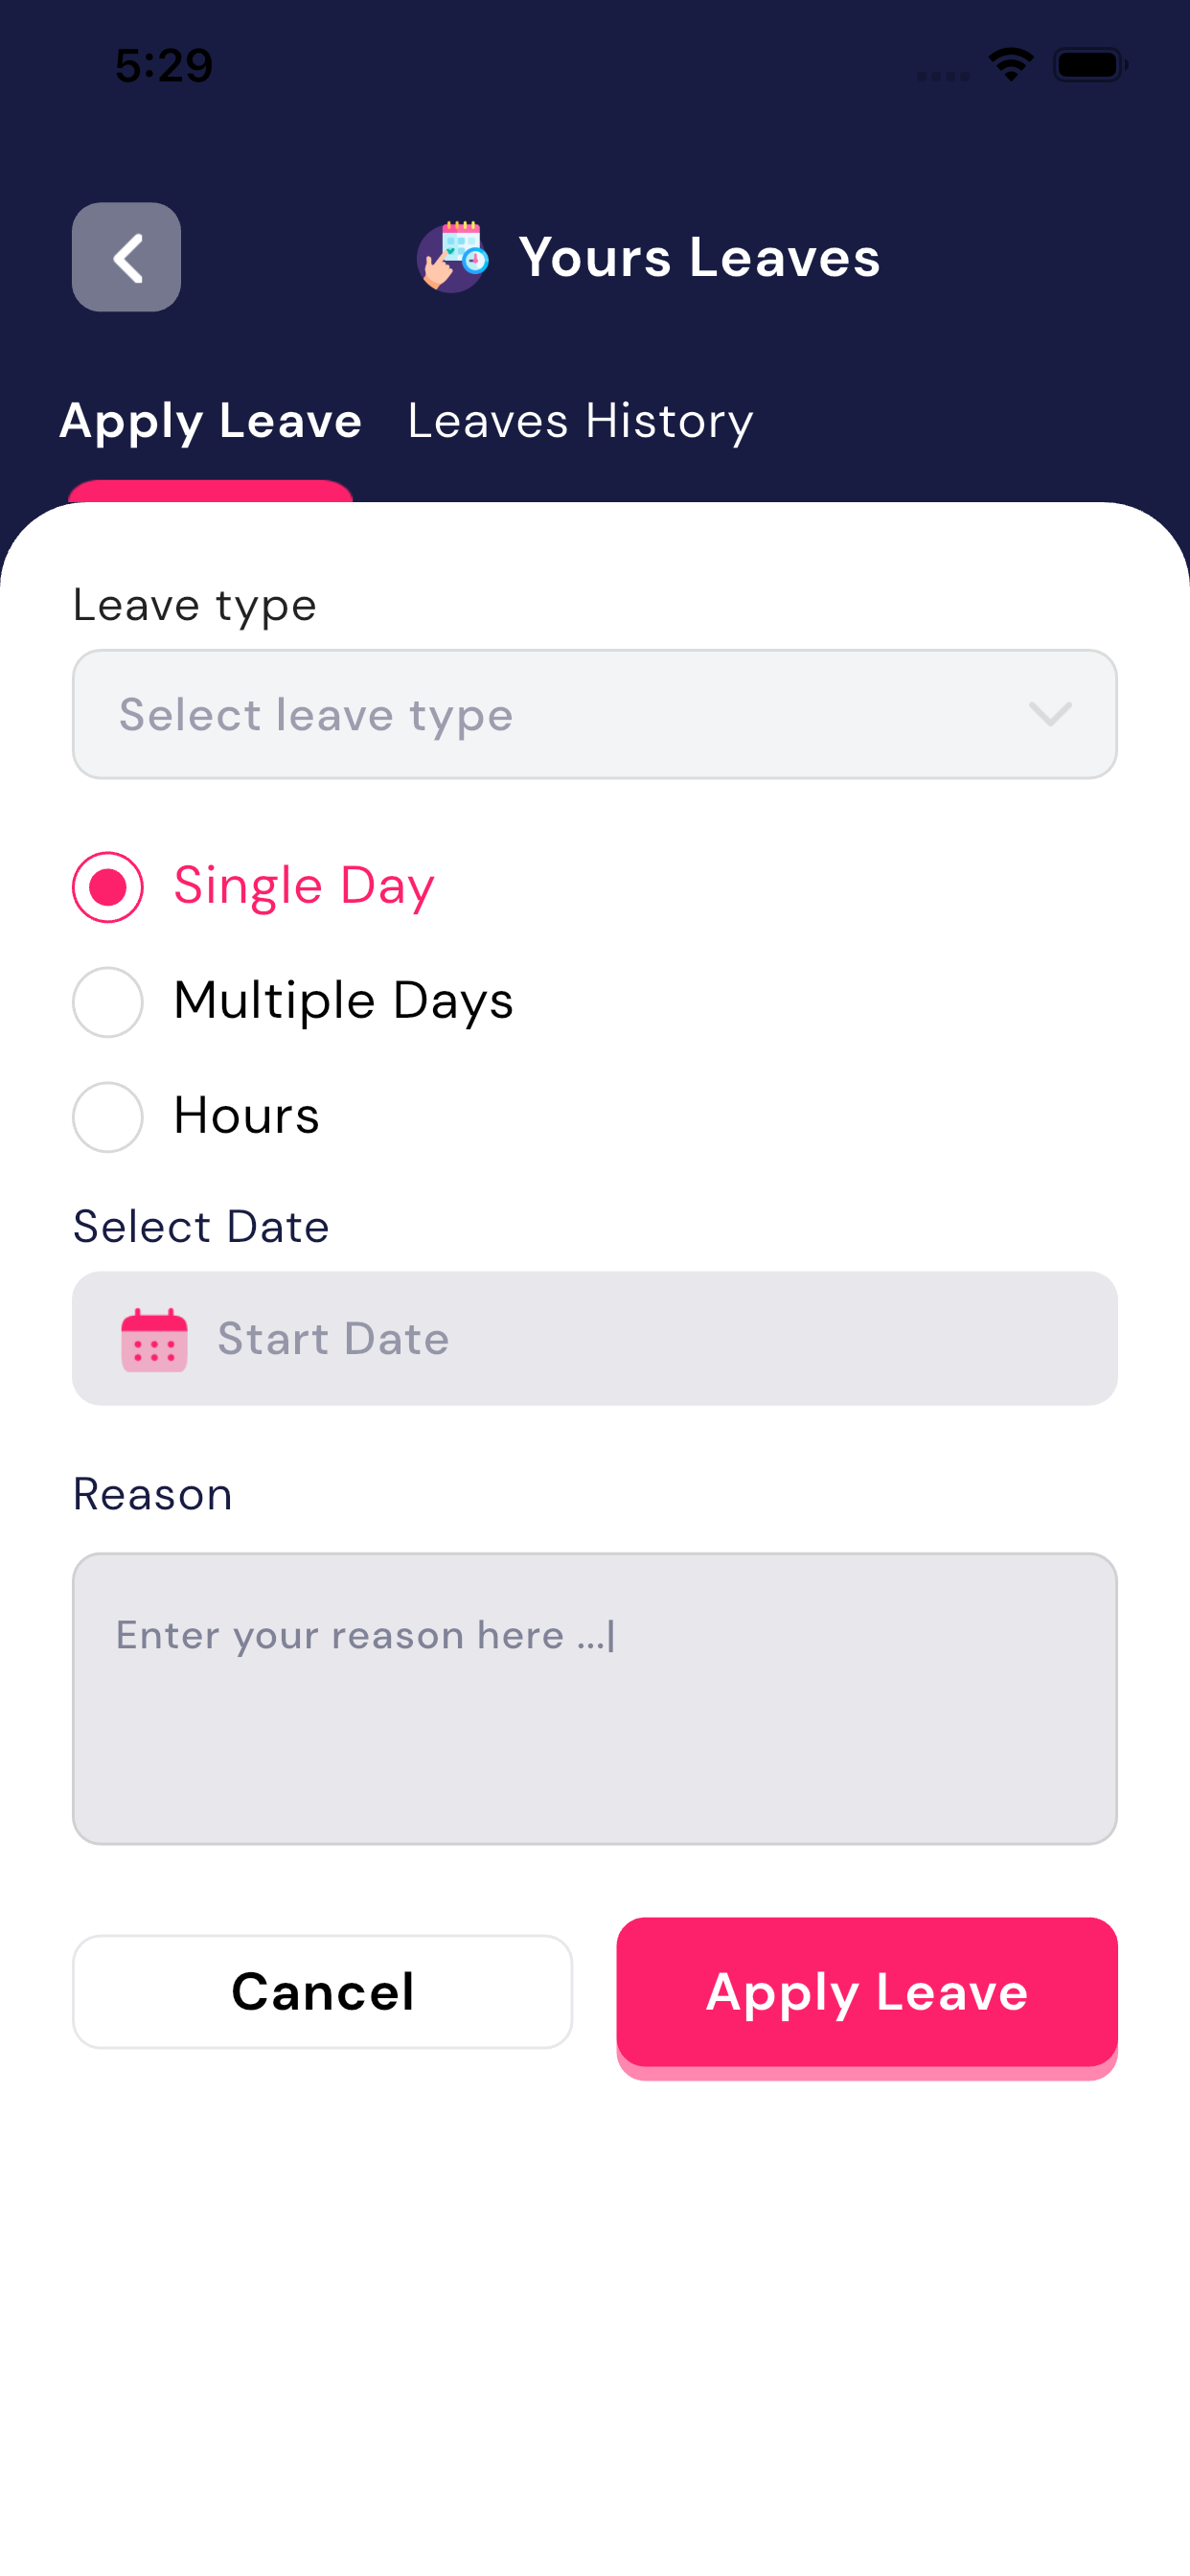
The Leave Module allows teachers to apply for leave online and track the status of their leave requests. All leave requests are sent to the school administration for approval or rejection.
1. Apply Leave
Teachers can submit a new leave request from this section.
Steps to Apply Leave:
- Select Leave Type
- Tap on Select leave type
- Choose the appropriate leave type (as defined by the school).
- Choose Leave Duration
- Single Day – For one full day leave
- Multiple Days – For more than one day
- Hours – For hourly leave
- Select Date
- Choose the Start Date (and End Date, if applicable).
- Enter Reason
- Write a clear reason for applying leave in theReason box.
- Submit Leave
- Tap on Apply Leave to submit the request.
- To discard, tap Cancel.
Once submitted, the leave request will be sent to theAdmin for approval.
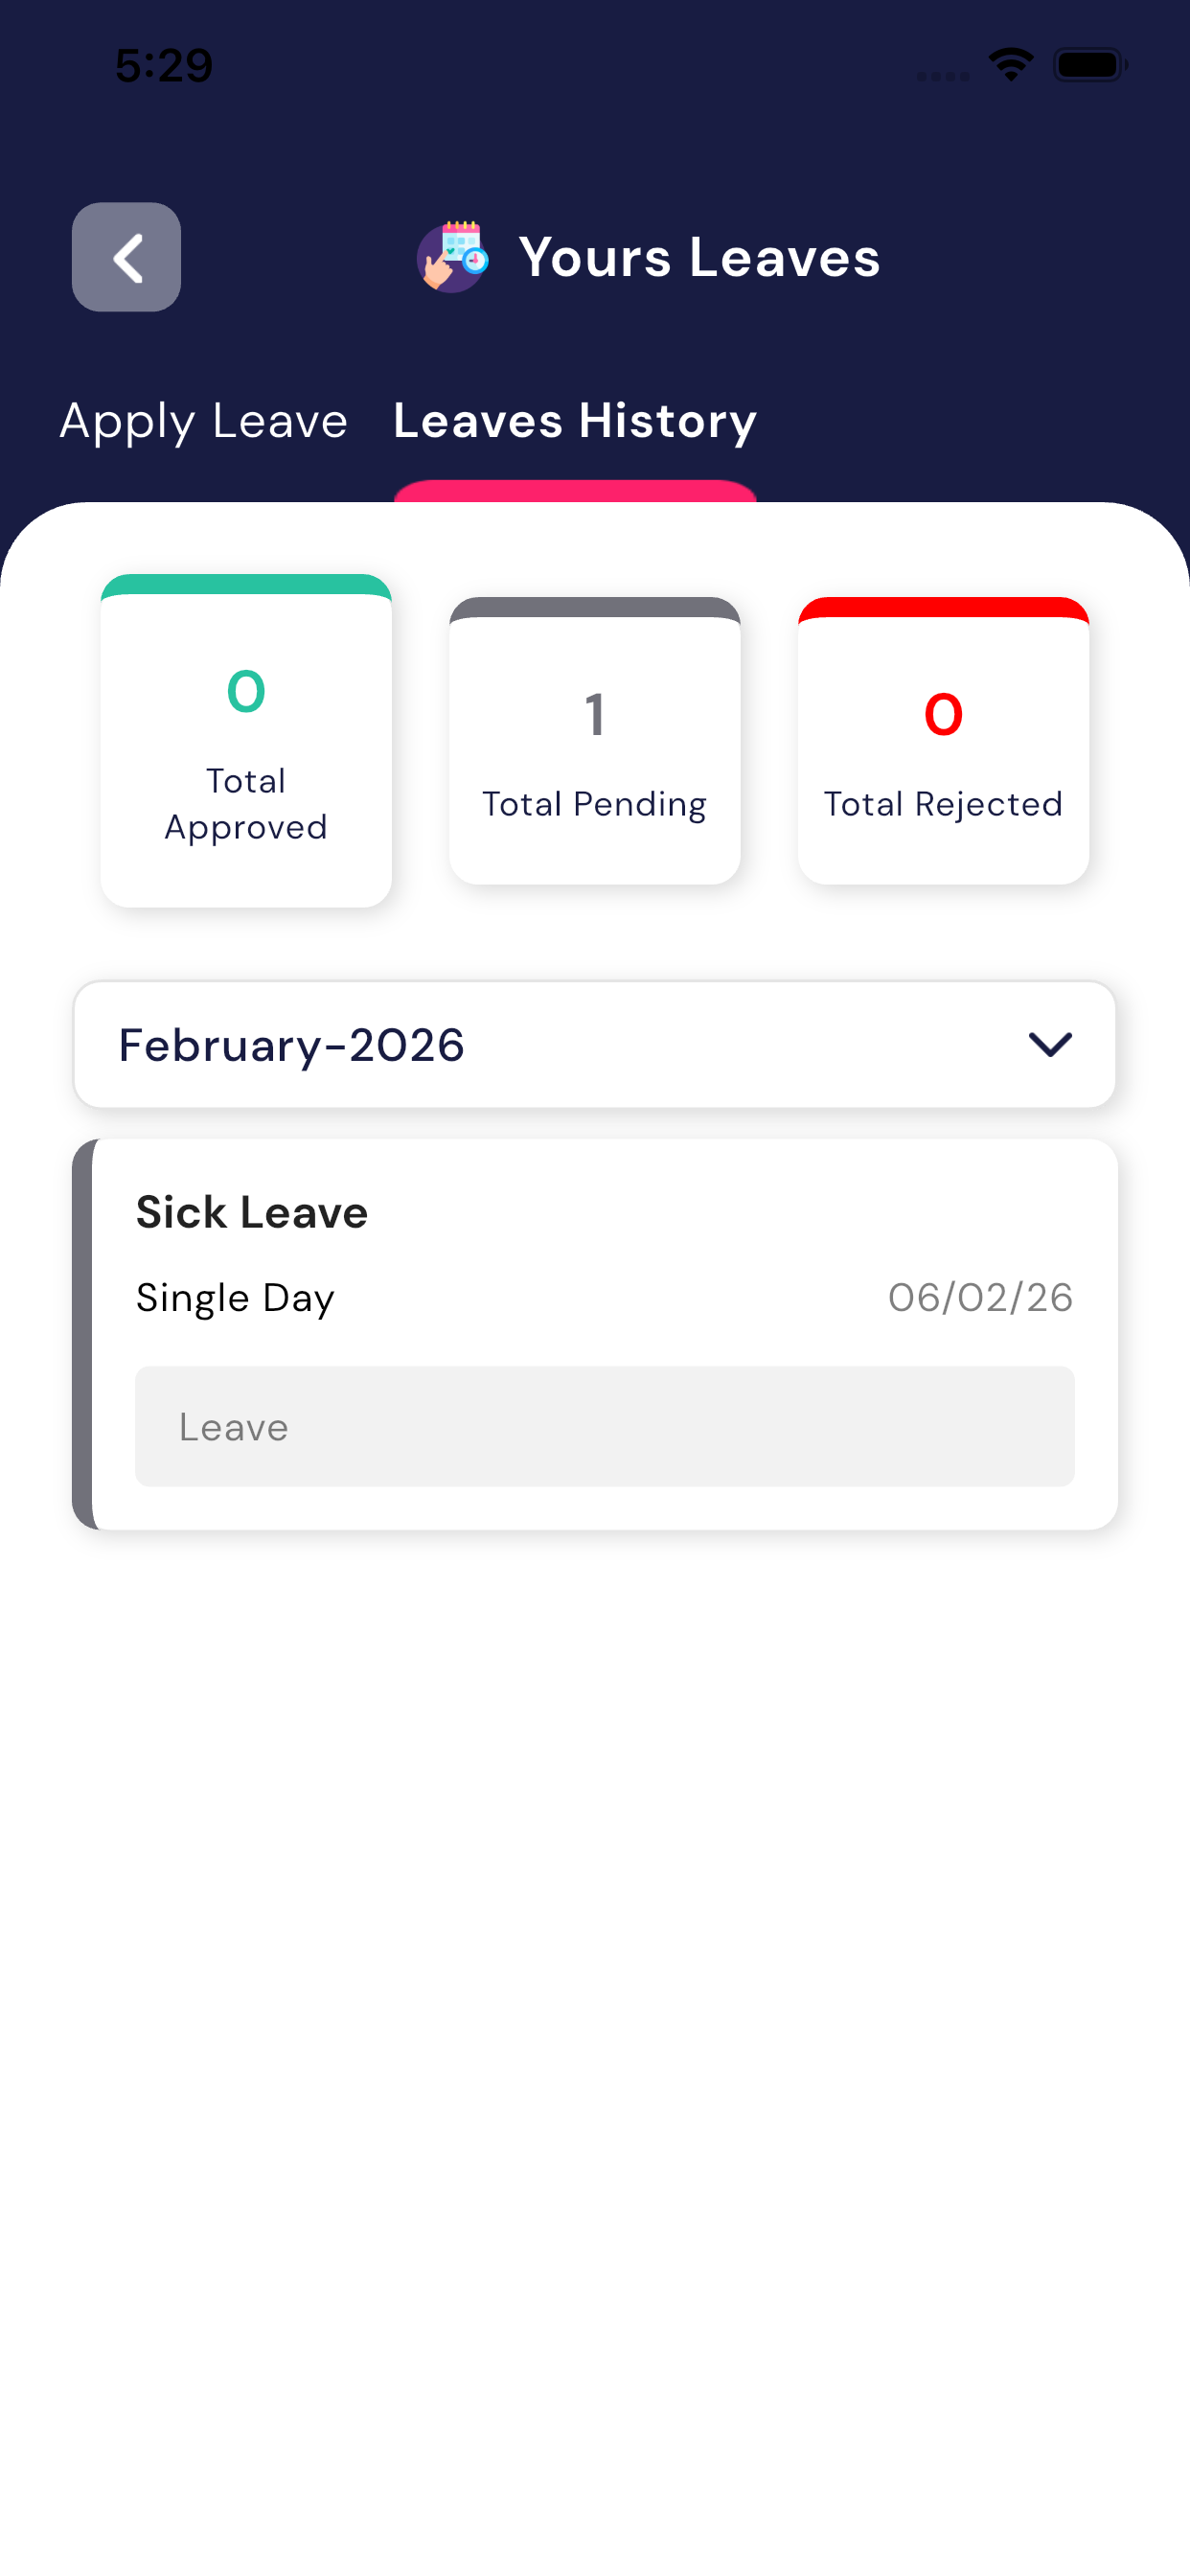
2. Leaves History
This section shows all leave-related details of the teacher.
Information Available:
- Total Approved Leaves
- Total Pending Leaves
- Total Rejected Leaves
You can:
- View leave records month-wise (e.g., February 2026)
- Check the status of each leave request
- Approved
- Pending
- Rejected
If no leave is available, the system will show:
“No available leave”
3. Leave Approval Process
- All leave requests are reviewed by theSchool Admin.
- Admin can Approve or Reject the leave.
- The updated status will be visible to the teacher inLeaves History.
4. Key Benefits for Teachers
- Easy online leave application
- Transparent approval process
- Complete leave history in one place
- No paperwork required
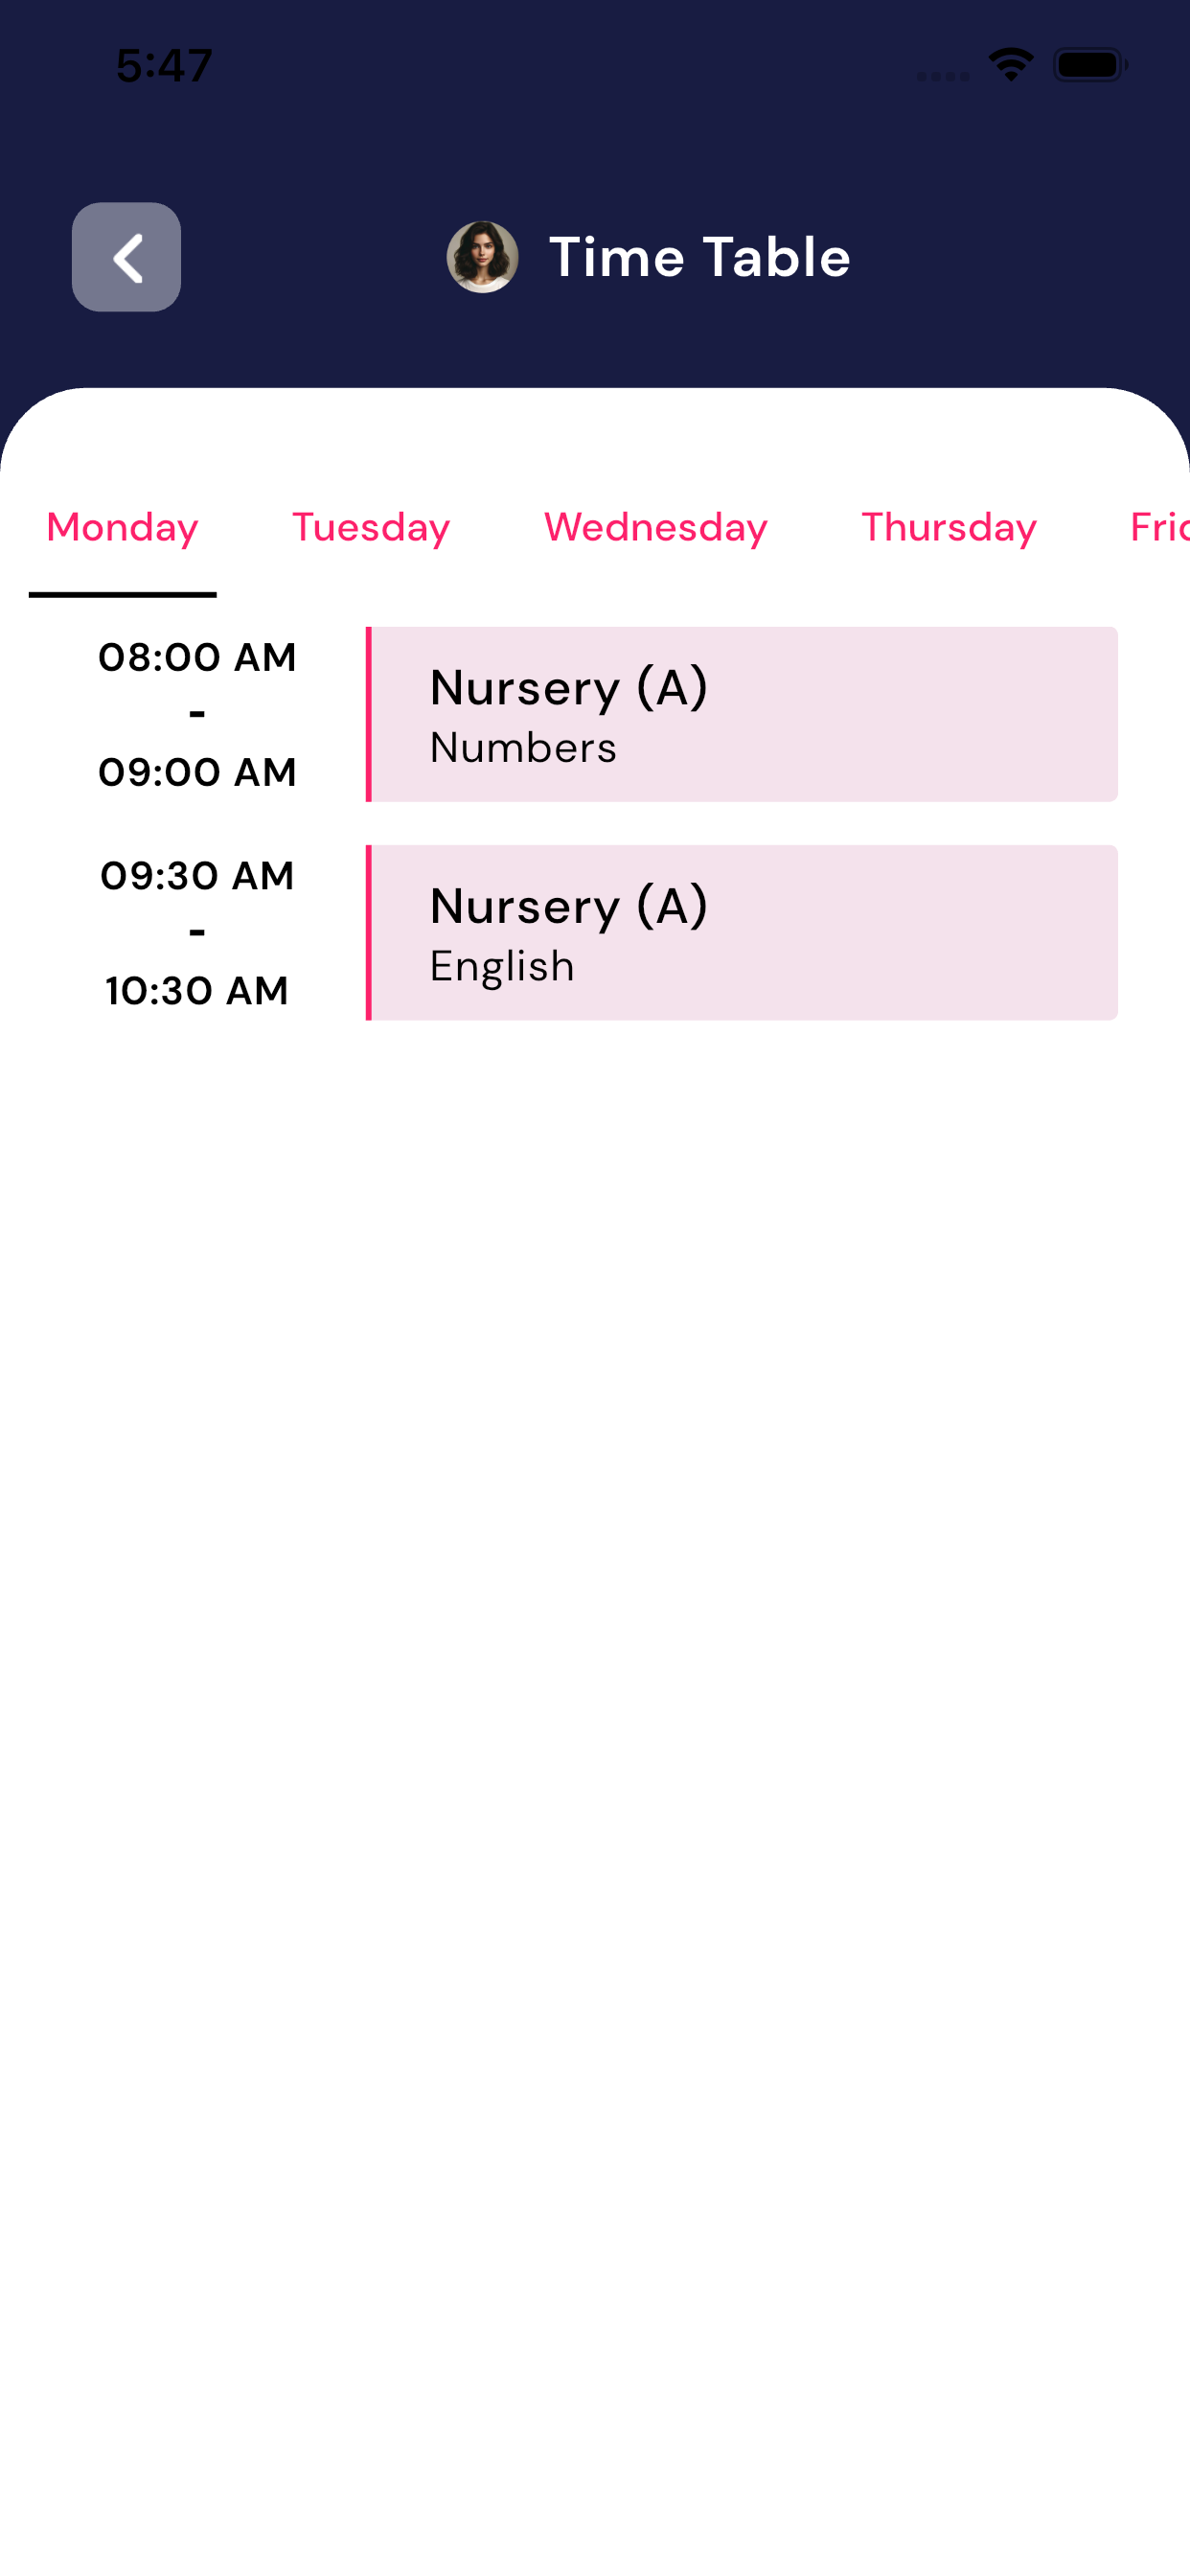
Teacher Time Table
The Teacher Time Table Module shows teachers their daily teaching schedule. It clearly displayswhich class, which subject, andat what time the teacher needs to teach.
1. Understanding the Time Table Screen
Day-wise Tabs
- At the top of the screen, days of the week are shown:
- Monday, Tuesday, Wednesday, Thursday, Friday, etc.
- Tap on any day to view your schedule for that day.
Time Slots
- Each class period is shown with:
- Start Time – End Time (Example: 08:00 AM – 09:00 AM)
- Class Name (Example: Nursery (A))
- Subject Name (Example: Numbers, English)
Example View
- 08:00 AM – 09:00 AM
Nursery (A) – Numbers
- 09:30 AM – 10:30 AM
Nursery (A) – English
This means:
- You need to teach Nursery (A)
- At the mentioned time
- For the specified subject
2. Key Features
- Day-wise teaching schedule
- Clear subject and class information
- Easy to check upcoming classes
- No manual tracking needed
3. Important Notes
- The time table is created and managed by theSchool Admin.
- Teachers can view only their assigned schedule.
- Any changes in schedule will be updated automatically.
5. Benefits for Teachers
- Know exactly where and when to teach
- Avoid confusion in class timing
- Better daily planning
- Quick access from mobile app
Payroll Module
The Payroll Module allows teachers toview their salary details,check salary payment month, anddownload their salary slip easily from the app.
1. Viewing Salary Details
On the Payroll screen, teachers can see:
- Salary Date
- The date on which the salary is credited (Example:06 February 2026).
- Total Salary Credited
- The total amount paid for that month.
- Payment Mode
- Shows how the salary was paid (Cash / Bank Transfer / Online).
- Receipt Number
- Displays the salary receipt or reference number (if available).
2. Month-wise Salary Information
- Salary entries are shown month-wise.
- Teachers can easily check:
- Which month salary was paid
- How much amount was credited for that month
3. Download Salary Slip
- A download icon is shown on the salary card.
- Tap on the download button to:
- Download your salary slip
- Save it on your mobile
- Use it for records or official purposes
4. Important Points
- Salary details are uploaded by the School Admin.
- Teachers canview and download only their own salary information.
- If salary is not shown, it means it hasnot yet been updated by the admin.
5. Benefits of Payroll Module
- Transparent salary information
- Easy access to monthly salary records
- Salary slip available anytime
- No need to ask admin for salary details
Summary
The Payroll Module helps teachers to:
- View their salary details
- Check salary month and payment mode
- Download salary slips easily
- Maintain personal salary records
